Do you have a question about the Ryobi RE180PL1 and is the answer not in the manual?
General overview of the router's features for pleasant and enjoyable use, emphasizing safety and dependability.
Stresses the importance of reading and understanding the manual, paying attention to safety rules and cautions.
Advises wearing safety goggles or glasses with side shields and a face shield to protect eyes from flying debris during operation.
Covers maintaining a clean work area, keeping bystanders away, dressing properly, and staying alert.
Details safe practices for double-insulated tools, grounding, cords, and avoiding wet conditions.
Instructions on securing workpieces, not forcing the tool, and basic care for tools and accessories.
Emphasizes qualified service personnel and proper extension cord selection and use for safety.
Covers knowing the tool, protecting lungs/hearing, cord inspection, checking parts, and avoiding cord abuse.
Warns about chemicals in dust from certain activities, advising ventilation and mask use for health protection.
Explains common symbols like Volts, Amperes, Hertz, Watt, Time, AC, Speed, and Class II Construction.
Defines DANGER, WARNING, CAUTION, and NOTE symbols to highlight potential hazards and provide vital information.
Lists key technical details: depth, collet, horsepower, input, speed, cord, weight.
Guides on removing tool and accessories, checking for damage, and contacting for assistance with missing parts.
Outlines approved uses: routing grooves, shaping edges, freehand designs, and routing edges on laminates.
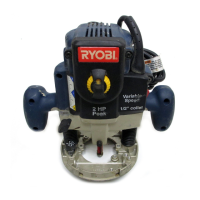
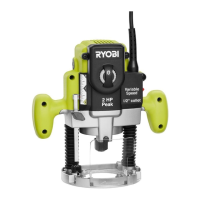
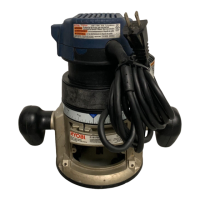
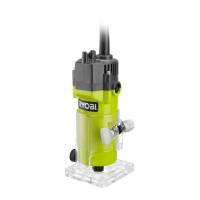
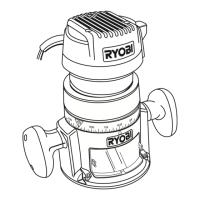
Describes the powerful motor, ON/OFF switch operation, and the protective chip shield.
Details the Accu-Stop™ depth stop and the variable speed control for precise adjustments.
Explains the spindle lock for cutter changes and the tool's ergonomic design for comfortable handling.
Covers electrical connection requirements and the safety benefits of double insulation.
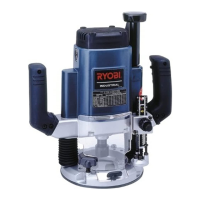
Identifies Scale, Zero Reset Indicator, Lock Knob, Stop Bar, and Accu-Stop™ for depth adjustments.
Labels the Speed Selection Sight Window and Variable Speed Control Selector.
Explains how rotating the depth stop knob changes depth by 1/64" (90°) and 1/16" (360°).
Labels Power Cord, Plunge Lock Lever, and Hex Nuts for operation and adjustments.
Identifies Collet Nut, Router Base, Subbase, Adaptor, and Wrench.
Warns against modifying the tool or using unauthorized accessories, as it can lead to injury.
Stresses unplugging the router before any adjustments or part changes to prevent accidental starting.
Guides on removing chip shield, using spindle lock, loosening collet, installing cutter, and tightening.
Explains using the 1/4" adaptor for smaller shank cutters and proper cutter insertion depth.
Warns that an improperly tightened collet can cause the cutter to detach, leading to injury.
Advises making deep cuts in multiple passes, not exceeding 1/8" per pass, considering factors like bit size and wood hardness.
Warns against using undersized shanks or cutters larger than the base opening to prevent injury or damage.
Step-by-step instructions for setting depth using plunge lock lever, hex nuts, and placing router on a flat surface.
Details setting the zero depth by adjusting hex nuts and stop bar to the depth stop.
Introduces the optional knob for precise adjustments, especially when router is table-mounted.
Provides instructions for installing the optional depth control knob, including component assembly.
Warns about potential injury if the depth control knob is not installed correctly with the compression spring.
Step-by-step guide on using the optional depth control knob to set the desired cutting depth.
Details the Accu-Stop™ system and its alignment marks for quick depth changes.
Explains how rotating the depth stop knob changes depth by 1/64" (90°) and 1/16" (360°).
Instructions on setting the depth stop to zero by aligning the highest stop with the stop bar.
Explains the variable speed control selector (A-F) for adjusting speed and torque based on material and cutter.
Provides a chart suggesting speed settings based on cutter size and material hardness.
Describes using the zero reset indicator to make quick depth changes relative to a reference point.
How to operate the ON/OFF switch and hold the router with two handles for control.
Steps for starting the router, feeding the cutter, and making initial cuts into the workpiece.
Guidance on positioning the router, feeding the cutter, and using a straight edge as a guide for grooves.
Advises making deep cuts in multiple passes to avoid damage or loss of control.
Explains using the router freehand for signs, relief sculptures, and patterns.
Tips for freehand routing including drawing patterns, initial shallow passes, and test cuts.
Instructions for routing edges, including starting the cut, feeding the cutter, and maintaining a firm grip.
Warns against using large router bits for freehand routing due to risk of loss of control and injury.
Explains how piloted cutters follow workpiece edges for rabbets and molded edges.
Details using guides with piloted bits for edge shaping, including positioning and effect on cut width.
Discusses how workpiece thickness affects pilot guidance and when an extra guide board might be needed.
Provides a recommended sequence for routing edges of a panel, starting with end grain.
Explains finding the correct feed rate for uniform chips and avoiding scorching or damage.
Advises feeding from left to right for external cuts, as cutter rotation pulls the router into the workpiece.
Guides on routing grooves, positioning the guide on the right, and the direction of travel relative to the guide.
How to plan setup and feed direction to counteract potential kickback by keeping the bit biting into new wood.
Discusses how wood hardness, moisture, cut depth, and bit diameter influence the proper feed rate.
Explains how to identify "force feeding" by sound, strain, and large chips, advising slower feed.
Describes identifying "too-slow feeding" by motor sound or bit "wiggle," leading to scraping and overheating.
Details results of feeding too fast: large chips, rough finish, motor overload, splintering.
Explains results of feeding too slowly: scraping, glazing, burning, and loss of control.
Reiterates not exceeding 1/8" depth per pass due to risk of breaking bits or rough cuts.
Advises making deeper cuts in multiple passes, lowering the bit 1/8" for each pass.
Warns against non-Ryobi parts and advises cleaning with cloths, avoiding solvents on plastic.
Notes accelerated wear with certain materials, recommending frequent cleaning.
States bearings are pre-lubricated; emphasizes keeping cutters clean and sharp.
Instructions for cleaning the collet and taper, and proper procedure for installing the collet assembly.
Details checking for wear and replacing brush assemblies, emphasizing replacement in pairs.
Guides on adjusting the plunge lock lever if it wears after extended use, involving screw removal and repositioning.
A list of practical tips for safe and effective router operation, including clamping, safety, setup, and planning.
Reminds users to clean the router, not abuse power tools, and to think safety.
Mentions an optional straight guide accessory available for purchase.
Highlights the optional depth control knob for precise adjustments, especially when table-mounted.
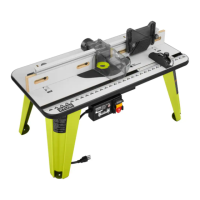
Instructions for mounting the router to a router table using specific screws and warnings about screw types.
Provides crucial warnings about using appropriate router bits, UL-listed tables, and proper guarding for safety.
Advises using appropriate gauge extension cords for the tool's current draw and keeping cords clear of the work area.
Directs users to contact Ryobi Authorized Service Centers for repair parts and service.
Instructs users to record the model and serial number for service and parts ordering purposes.
Lists the information required when ordering repair parts, including model and serial numbers.
| Power | 1800 W |
|---|---|
| Base Type | Plunge Base |
| Corded/Cordless | Corded |
| Horsepower | 2.4 hp |
| Variable Speed | Yes |
| Soft Start | Yes |
| Spindle Lock | Yes |
| Electronic Speed Control | Yes |
| Collet Size | 6mm, 8mm, 1/4" |
| Plunge Depth | 55mm |