This document is the operator's manual for the RYOBI RLM36 / RLM36B 36V Cordless Lawn Mower. It provides essential information for assembling, maintaining, and operating the machine safely and effectively.
Function Description:
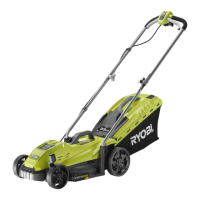
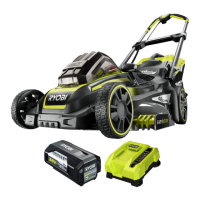
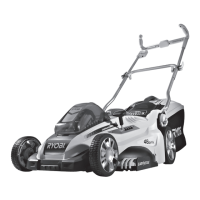
The RYOBI RLM36 / RLM36B is a 36V cordless lawn mower designed for domestic lawn mowing. Its primary function is to cut grass, with the cutting blade rotating approximately parallel to the ground. It is a pedestrian-controlled walk-behind mower, meaning it should be pushed by the operator. The mower should always have all four wheels touching the ground during operation and should not be pulled or ridden on. It is specifically intended for cutting domestic grass lawns and should not be used for any other purpose or to cut materials other than grass. The mower is equipped with a mulching plug that covers the rear discharge opening, allowing the blade to cut and recut grass for finer clippings, which are then returned to the lawn as mulch. Alternatively, it can be used with a grassbox to collect clippings.
Important Technical Specifications:
- Model: RLM36 / RLM36B
- Power Source: 36V Cordless (Battery-operated)
- Width of Cut: 400 mm
- Height of Cut: Adjustable from 20 mm to 70 mm
- No-load Speed: 3550 rpm
- Grassbox Capacity: 50 L
- Weight (RLM36): 19.27 kg (with battery), 17.9 kg (without battery)
- Battery (For RLM36 only): Lithium-ion, Model BPL3626, Rated Voltage 36V, Capacity 2.6 Ah, 20 battery cells
- Battery Charger (For RLM36 only): Model BCL3620, Input 220-240 V, 50 Hz, AC only, Output 36 V DC, 1.7 A
- Allowable Charging Temperature Range: 0-40 °C
Usage Features:
- Handle Adjustment: The mower features an upper and lower handle that can be unfolded and adjusted for operating position. Quick release fasteners and tension adjustment knobs secure the handles. For storage, the handle can be lowered by loosening the tension adjustment knobs and pushing inward on the lower handle sides.
- Grassbox Installation: The grassbox is installed by lifting the rear discharge door and seating the hooks on the grassbox frame into the slots in the handle bracket.
- Mulching Plug Installation: The mulching plug is inserted at a slight angle into the rear discharge opening after lifting the rear discharge door, then pushed securely into place.
- Blade Height Adjustment: The cutting height can be adjusted using the height adjustment lever, moving it toward the back of the mower to raise the blade height or toward the front to lower it.
- Battery Installation and Removal: The battery pack is installed by lifting the battery door, aligning the raised ribs on the pack with the grooves in the product's battery port, and ensuring the latch snaps into place. The isolator key must be inserted for the mower to start. To remove, the power lever is released, the isolator key removed, and the battery latch button pressed to release the pack.
- Starting and Stopping: To start, insert the isolator key, press and hold the start button, then pull the power lever towards the handle and release the start button. To stop, release the power lever.
- Slope Operation: The manual advises mowing across the face of slopes, never up and down, and exercising extreme caution when changing direction. It warns against mowing slopes greater than 15 degrees and near drop-offs, ditches, or embankments.
- Mowing Tips: Operators are advised to clear the lawn of objects before mowing, cut off one-third or less of the grass length for a healthy lawn, avoid cutting wet grass, and reduce walking speed for long grass. The underside of the mower deck should be cleaned after each use.
- Grassbox Emptying: To empty the grassbox, the mower must be stopped, the blade allowed to stop, and the isolator key removed. The rear door is lifted, and the grassbox is removed by its handle to empty clippings, then reinstalled.
Maintenance Features:
- General Inspection: Before each use, the entire product should be inspected for damaged, missing, or loose parts (screws, nuts, bolts, caps). All fasteners and caps should be securely tightened.
- Cleaning: The mower should be wiped clean with a dry cloth occasionally. Water should not be used for cleaning. The motor and battery compartments must be kept free from grass, leaves, or excessive grease to reduce fire risk. The underside of the mower deck should be cleaned after each use to remove clippings and debris.
- Blade Maintenance: The cutting blade should be inspected for wear or damage. Worn or damaged blades and bolts should be replaced in sets to preserve balance. When replacing the blade, the motor must be stopped, the isolator key and battery pack removed, and heavy gloves worn. An obstruction should be wedged between the blade and mower deck to prevent turning. The blade nut is loosened counterclockwise with a 15 mm wrench, and the old blade, spacer, and insulator are removed. The new blade is placed on the shaft, ensuring proper seating and orientation (curved ends pointing up). The blade insulator, spacer, and blade nut are replaced, and the nut is torqued clockwise to 62.5~71.5 kgfcm (350-400 in.-lb.).
- Wheel Replacement: For front and rear wheels, covers, opening pins, and washers are removed, the old wheel replaced with a new one, and components reassembled.
- Battery Replacement: The mower battery will eventually need replacement. To install a new battery, remove the isolator key, unlock and remove the old battery pack, then install the new one. Old batteries should be taken to a recycling center that accepts lithium-ion batteries and not disposed of in fire or regular trash.
- Lubrication: All bearings are pre-lubricated for the life of the unit under normal operating conditions, so no further bearing lubrication is required. Wheel components should not be lubricated.
- Storage: When not in use, the mower should be stored in a well-ventilated, dry, locked-up place out of reach of children, with the isolator key removed. The handle can be lowered for more compact storage.