Do you have a question about the Ryobi RT102 and is the answer not in the manual?
Option to exchange or service within 30 days for defective workmanship or materials.
Covers defects in workmanship or materials for two years, accessories for ninety days.
Procedure for returning tools to an Authorized Service Center for repair.
Excludes damage from misuse, abuse, neglect, alteration, or unauthorized repairs.
Limits implied warranties and excludes incidental damages, varies by state.
Symbol indicating not to expose to rain or use in damp locations.
Symbol prompting users to read and understand the manual to reduce injury risk.
Symbol indicating the need to wear safety goggles or glasses with side shields.
Symbol indicating precautions that involve user safety.
Symbol warning against keeping hands near the blade to prevent serious injury.
Symbol indicating to avoid contact with hot surfaces to prevent injury or damage.
Concept in safety tools eliminating need for grounding; all metal parts are insulated.
Connect to a 120V, 60Hz AC power supply; do not use DC or a substantial voltage drop.
Use correctly sized extension cords for product current draw to prevent overheating and power loss.
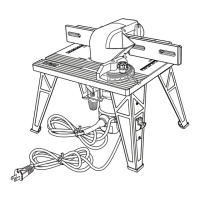
Details table dimensions, max cutter diameter, fence length, miter slot, rating, and net weight.
Understand manual and product features for safe and proper operation.
Barrier on fence assembly to protect operator from cutter contact.
Adjustable surface to support and guide work, includes vacuum attachment.
Used for mitered routing and supporting wider pieces.
Guide for odd-shaped or small workpieces when fence cannot be used; use with piloted cutters.
Toggle switch with a removable key for power control; prevents unauthorized use.
Provide stable surface around cutter, prevent objects falling through; size depends on cutter.
Dust ports accept 1-1/4 in. or 2-1/2 in. vacuum attachments.
Carefully remove product and accessories, inspect for damage, and ensure all parts are present.
List of all components included with the router table for assembly verification.
Instructions for attaching the four table legs using specific screws and washers.
Procedure for mounting the switch box to the left front leg using pan head screws.
Steps to secure the under table guard using socket head screws and flat washers.
Guide for attaching the fence assembly to the router table using carriage bolts and knobs.
Information on connecting a vacuum hose to the dust ports on the fence assembly.
Procedure for inserting and positioning the miter gauge bar into the table slot.
Steps to attach the router guard to the router using guard screws.
Instructions for mounting the router to the assembled router table using flat head screws.
Guidance on securing the router table to a workbench at hip height using bolts.
Detailed instructions for inserting and removing throat plates for proper cutter fit.
Lists table mounted dado/mortise, fence guided edging, and piloted cutter operations.
Step-by-step guide to install and remove router bits, including collet nut tightening.
Procedure for setting the cutting depth using the table's pointer and tick marks.
Steps and rules for executing a routing operation, including fence adjustment and feed direction.
Rules for using the router with the table, including power connection and switch usage.
Instructions on how to adjust and tighten the fence for workpiece support and guidance.
Advice on cleaning plastic parts with cloths, avoiding solvents, and chemical contact.
Details that bearings are pre-lubricated for the unit's life; no further lubrication is needed.
| Type | Router |
|---|---|
| Corded/Cordless | Corded |
| Voltage | 120 V |
| Horsepower | 1.5 HP |
| Collet Size | 1/4 inch |
| Speed | 25, 000 RPM |
| Power Source | Electric |