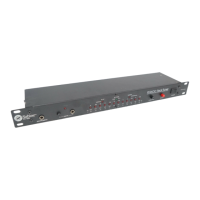
Using your RT-7100 Rack Tuner
Inputs/Outputs
The
RT-7100RT-7100
RT-7100RT-7100
RT-7100 Rack Tuner has two channels (A or B) with
inputs (labeled “INST”) for these channels on both the front
panel and back panel.
NOTENOTE
NOTENOTE
NOTE: Only one input jack (front or
back) per channel can be used at a time.
The Rack Tuner Outputs are labeled “AMP.” The
RT-7100RT-7100
RT-7100RT-7100
RT-7100
has outputs located on the back and on the front panel.
NOTENOTE
NOTENOTE
NOTE:
only one input or output jack (front or back panel) per channel
can be used at a time.
Foot Pedal
The
RT-7100RT-7100
RT-7100RT-7100
RT-7100 has ¼-inch TRS connectors for a two-switch pedal
(model # RTPED2). Use the Foot Pedal to toggle between
Chan-Chan-
Chan-Chan-
Chan-
nels A nels A
nels A nels A
nels A &
B B
B B
B and/or to
Mute Mute
Mute Mute
Mute the tuner output. Connectors are located
on both the front and back panels (use only one pedal at a time).
When a foot pedal is connected, all front panel switches still operate.
NOTE: if you use your own pedal, the switches must be momentary,
not latching.
SmartSwitch™ A/B Display
This LED array displays your input/output con-
figuration and the signal path of the
SmartSwitchSmartSwitch
SmartSwitchSmartSwitch
SmartSwitch
circuit. As you plug in your guitar(s) and amp(s)
you will immediately see the corresponding A or
B INST or AMP LED light on the Display.
When you touch the A/B switch, the signal path LEDs will clearly
show the signal routing configuration of the
SmartSwitch SmartSwitch
SmartSwitch SmartSwitch
SmartSwitch (see
diagrams on page 4). And, at the same time, the A or B input
LED will flash to indicate the active tuner channel.
Front Panel Switches
The A/B switch performs two func-
tions simultaneously.
Tuner Channel Switching:Tuner Channel Switching:
Tuner Channel Switching:Tuner Channel Switching:
Tuner Channel Switching:
Tapping the front-panel A/B
button switches the tuner to either the A or B input, and the
appropriate LED flashes on the
SmartSwitchSmartSwitch
SmartSwitchSmartSwitch
SmartSwitch display to show
you which channel is active in the tuner.
Signal Channel Routing:Signal Channel Routing:
Signal Channel Routing:Signal Channel Routing:
Signal Channel Routing:
Tap-
ping the A/B switch also routes the in-
put/output signal path to match your
rig. Use the
SmartSwitchSmartSwitch
SmartSwitchSmartSwitch
SmartSwitch A/B circuit
with any of the following configurations:
Use the front panel
Flat TuneFlat Tune
Flat TuneFlat Tune
Flat Tune
ButtonButton
ButtonButton
Button
to quickly transpose your guitar down
from standard tuning — great for
those dark-n-heavy E
b
and D tunings. The front panel
Flat TuneFlat Tune
Flat TuneFlat Tune
Flat Tune
StepsSteps
StepsSteps
Steps scale shows the number of steps or tones below stan-
dard tuning.
NN
NN
N
OTEOTE
OTEOTE
OTE: The RT-7100 display has dedicated LEDs
that show Flat Tune status. The
Flat Tune LEDFlat Tune LED
Flat Tune LEDFlat Tune LED
Flat Tune LED for the current
setting will always be lit. The “0” LED signifies standard tuning;
each position to the left of zero represents ½ tone down from
standard tuning. Press the
Flat TuneFlat Tune
Flat TuneFlat Tune
Flat Tune
ButtonButton
ButtonButton
Button once to move the
status light one LED to the left. For example, to flat tune your
guitar down two half tones, tap the
Flat TuneFlat Tune
Flat TuneFlat Tune
Flat Tune
Button Button
Button Button
Button twice. The
Flat TuneFlat Tune
Flat TuneFlat Tune
Flat Tune
ButtonButton
ButtonButton
Button will light and the
Flat TuneFlat Tune
Flat TuneFlat Tune
Flat Tune
LED LED
LED LED
LED will move two
positions to the left.
Tapping the front panel’s
Strobe But-Strobe But-
Strobe But-Strobe But-
Strobe But-
ton ton
ton ton
ton toggles the display mode between
Standard Standard
Standard Standard
Standard and
Strobe Strobe
Strobe Strobe
Strobe mode.
Standard Mode: Standard Mode:
Standard Mode: Standard Mode:
Standard Mode:
(resembles a bar graph)
Up to 8 sharp or
flat LEDs will light up to indicate the degree of sharpness or flat-
ness in cents. As the played note gets closer to the note indi-
cated by the
Note LEDNote LED
Note LEDNote LED
Note LED, the corresponding sharp or flat LEDs will
dim and turn off one by one until the green “in tune” LED lights.
Strobe ModeStrobe Mode
Strobe ModeStrobe Mode
Strobe Mode
::
::
:
LEDs strobe left to indicate flat, right to
indicate sharp. Strobe speed is a function of the distance the
played note is from being in tune. A pitch far from the closest
note (as indicated by the
Note LEDNote LED
Note LEDNote LED
Note LED) will strobe quickly. As the
played note gets closer to the note indicated by the
Note LEDNote LED
Note LEDNote LED
Note LED,
the strobe effect will slow down and eventually stop for in tune.
NOTENOTE
NOTENOTE
NOTE: As in all strobe tuners, it can be difficult to get the strobe
effect to stop completely. This is due to the extreme accuracy
of the strobe tuner and the fluctuation in string vibration fre-
quency as it varies from “first plucked” to sustained note.
Use the Front Panel
Calibrate But-Calibrate But-
Calibrate But-Calibrate But-
Calibrate But-
tonton
tonton
ton to tune your instrument to a
pitch basis other than A = 440 Hz.
NOTENOTE
NOTENOTE
NOTE: The RT-7100 display has dedicated LEDs that show
calibration status. The
Calibration LEDCalibration LED
Calibration LEDCalibration LED
Calibration LED for the current setting
will always be lit. Press the
Calibrate ButtonCalibrate Button
Calibrate ButtonCalibrate Button
Calibrate Button once to move the
status light one LED to the right (past 445 Hz, the LED will
cycle to 435 Hz). For example, if you wish to recalibrate the
tuner from standard A = 440 Hz to A = 442 Hz, tap the
CalibrateCalibrate
CalibrateCalibrate
Calibrate
ButtonButton
ButtonButton
Button twice. The
Calibrate Button Calibrate Button
Calibrate Button Calibrate Button
Calibrate Button and the
Calibration LEDCalibration LED
Calibration LEDCalibration LED
Calibration LED above
442 Hz will remain lit while the tuner is calibrated to A = 442 Hz.
The
Mute Button Mute Button
Mute Button Mute Button
Mute Button mutes both outputs
for silent tuning. The mute function can
also be operated with a foot switch.
Front Panel Microphone
The front panel of the RT-7100 is equipped with a micro-
phone for acoustic instrument tuning without a ¼-inch
cord. This microphone is disconnected whenever any of
the inputs has a connector plugged into it.
Signal fromSignal from
Signal fromSignal from
Signal from
the microphone the microphone
the microphone the microphone
the microphone
will notwill not
will notwill not
will not
pass to any of the outputs. pass to any of the outputs.
pass to any of the outputs. pass to any of the outputs.
pass to any of the outputs.
One guitar into one amp out:
Simple setup, you don’t need
the A/B Function
or
One guitar, 2 amp outputs:
Switches outputs
or
Two guitars, one amp
output: Switches inputs
or
Two separate rigs: 2
guitars into 2 amp
outs: Switches both
inputs & outputs
between channels
A or B
Quick Setup Directions
1.1.
1.1.
1. Power on the Sabine RT-7000 or RT-7100 Rack Tuner.
2.2.
2.2.
2. Plug your instrument into one of the ¼-inch input connectors.
3.3.
3.3.
3. Pluck the string you wish to tune—the nearest note will be displayed in the Note LED display and the distance to
in-tune (in relation to that note) will be shown by the number of Flat or Sharp LEDs lit.
4.4.
4.4.
4. Adjust the tuning of the string until the In-Tune LED lights.
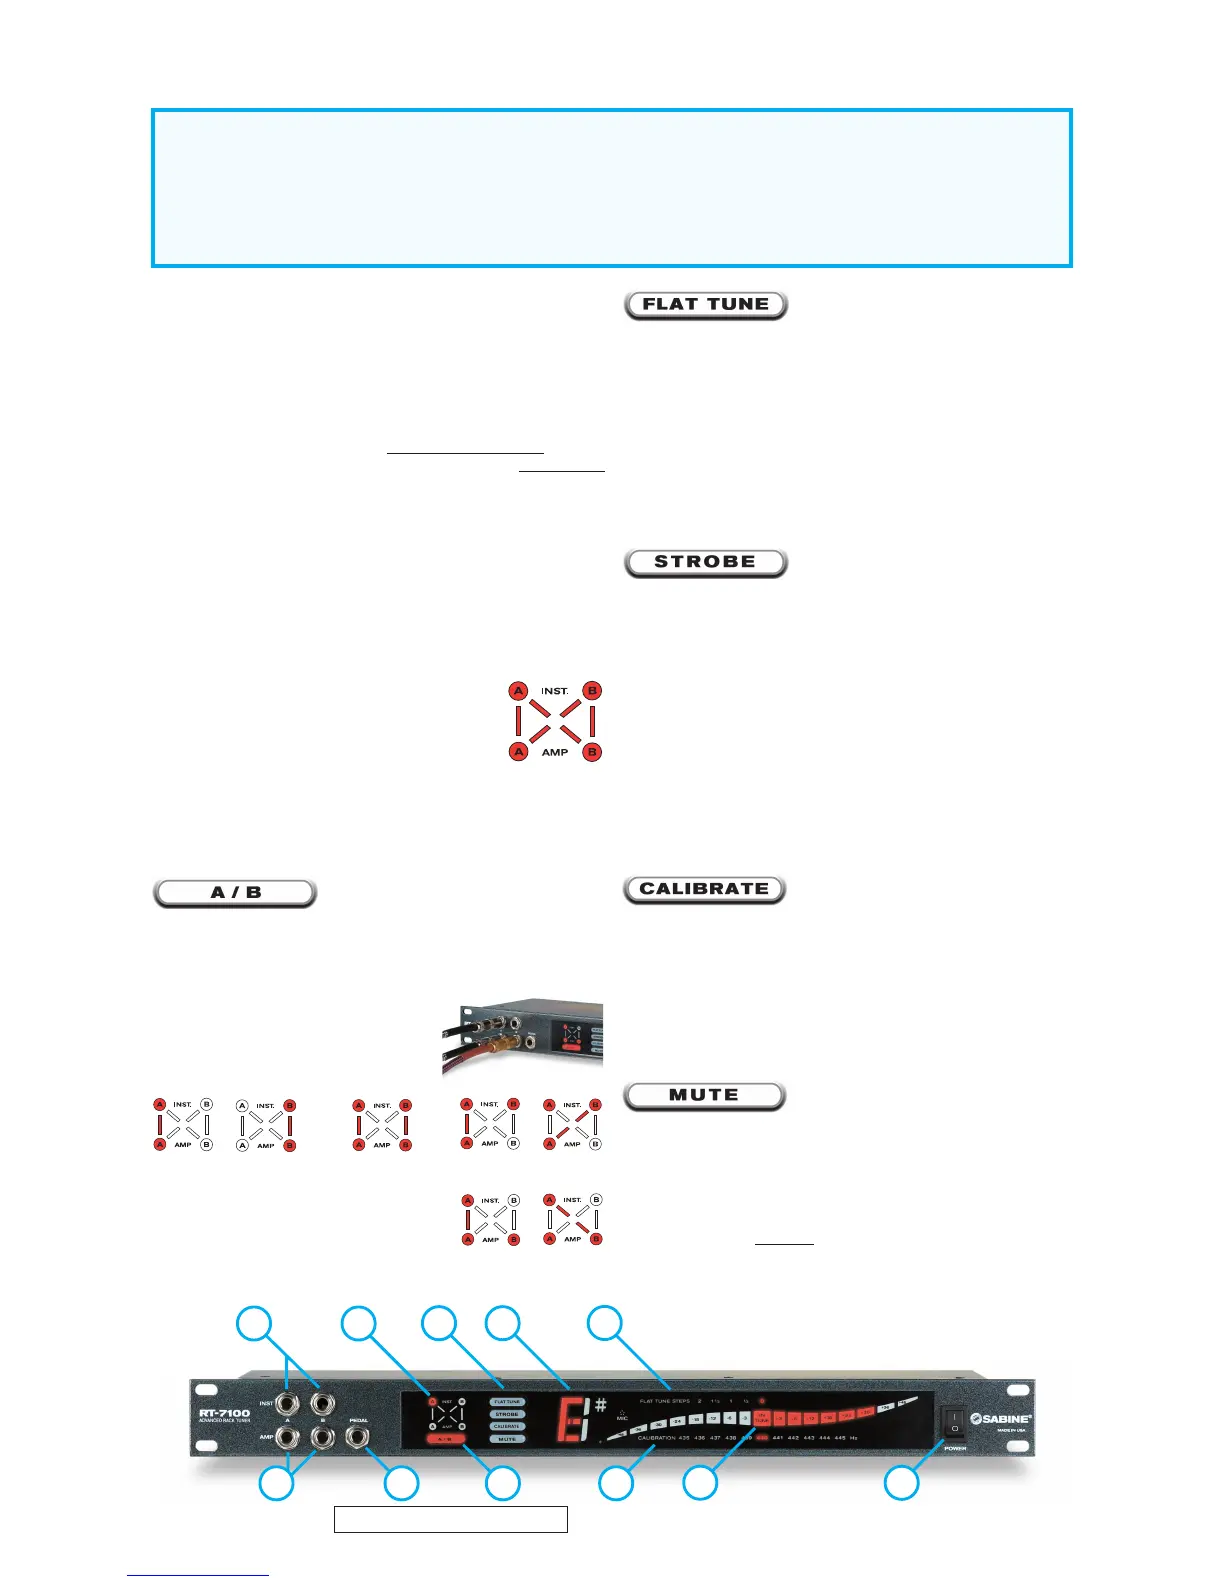
RT-7100
RT-7100 Front PanelRT-7100 Front Panel
RT-7100 Front PanelRT-7100 Front Panel
RT-7100 Front Panel
11
11
1 Instrument Inputs (See
NOTENOTE
NOTENOTE
NOTE on
last page)
22
22
2 Outputs
33
33
3 Pedal Switch
44
44
4 SmartSwitch™ A/B Display
55
55
5 A/B Display
66
66
6 Function Buttons
77
77
7 Note Display
88
88
8 Flat Tune Step LEDs
99
99
9 Calibration Scale LEDs
1010
1010
10 In Tune LED
1111
1111
11 Power Switch
77
77
7
66
66
6
88
88
8
44
44
4
11
11
1
1010
1010
10
99
99
9
33
33
3
66
66
6
22
22
2
1111
1111
11
NOTE: A/B switch does not combine signals from
inputs or outputs. Only one output is active at a time.
 Loading...