EasyManua.ls Logo

Safco E-Z Stor User Manual

Safco E-Z Stor
8 pages
To Next Page IconTo Next Page
Page #1 background imageLoading...
Page #1 background image
100922138: 1 of 8; Rev A; Rev Date 03-JUN-2016 Safco Products Company, New Hope, MN 55428
For questions or concerns, please call 1-800-664-0042
available Monday-Friday 7:30 AM to 5:00 PM (Central Time) (English-speaking operators)
Si vous avez des questions pour poser ou les préoccupations
pour exprimer, connecter au 1-800-664-0042
de 7H30 à 17H00 (Heure centrale) (Opérateurs de langue anglaise)
Si usted tiene preguntas o preocupaciones,
por favor llame 1-800-664-0042
de 7:30 AM a 5:00 PM (Hora Central) (Operadores que hablan inglés)
ASSEMBLY INSTRUCTIONS
PRODUCT WARRANTY REGISTRATION is available online at: www.safcoproducts.com
INSTRUCTIONS DE MONTAGE
INSTRUCCIONES DE ENSAMBLAJE
LA GARANTÍA DEL PRODUCTO está
disponible en la Internet: www.safcoproducts.com
LA GARANTIE DU PRODUIT est
disponible sur l’Internet : www.safcoproducts.com
E-Z Stor
®
Literature Organizer (36 Compartments)
Classeur de Documents (à 36 Cases)
Casillero para Publicaciones (36 Compartimientos)
9221
Minneapolis, MN 55428
www.safcoproducts.com
an LDI Spaces Company
Question and Answer IconNeed help?

Do you have a question about the Safco E-Z Stor and is the answer not in the manual?

Safco E-Z Stor Specifications

General IconGeneral
Product NameSafco E-Z Stor
CategoryIndoor Furnishing
MaterialSteel
ColorBlack
CapacityVaries by model
AssemblyAssembly Required
DimensionsVaries by model
Adjustable ShelvesYes
Product TypeStorage Shelf
ApplicationOffice, Garage
Wheel TypeCasters (on some models)
Weight CapacityUp to 400 lbs per shelf (depending on model)
Number of Shelves4 or 5 (depending on model)

Summary

Assembly Instructions Overview

Tools and Parts List

Required Tools

Specifies the tools needed for the assembly process, primarily a Phillips screwdriver.

Parts Identification

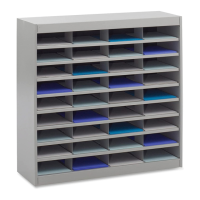
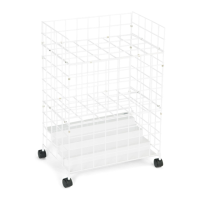
Lists and describes all components and hardware included in the package for assembly.

Assembly Step 1: Attach Side Panels

Step 1: Connect Side Panels

Attaches the main side panels (D) to the base using screws (J).

Step 2: Insert Divider F

Inserts the first divider (F) into the designated slot.

Assembly Step 3: Install Shelves

Step 3: Install Shelves E

Places shelves (E) into the unit using the shelf support tabs.

Assembly Step 4 & 5: Shelf Installation

Step 4: Insert Shelves C

Secures shelves (C) into the divider slots.

Step 5: Install All Shelves

Completes the placement of all main shelves within the unit.

Assembly Step 6 & 7: Final Divider & Securing

Step 6: Insert Dividers G

Installs the remaining dividers (G) at the top of the unit.

Step 7: Secure with Hardware I

Fastens the assembly using the hardware pack (I).

Assembly Step 8 & 9: Final Assembly

Step 8: Attach Back Panel B

Secures the back panel (B) to the inside of the unit.

Step 9: Secure Top with Screws

Fastens the top of the unit using screws (J).

Related product manuals