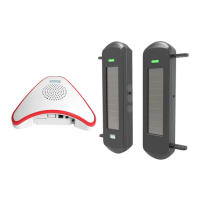
This document describes a wireless alarm system, primarily consisting of a wireless alarm receiver and solar & wireless photoelectric beam sensors. The system is designed for security and can be configured to detect intruders and alert users.
Wireless Alarm Receiver
Function Description:
The wireless alarm receiver is the central unit of the system. It receives signals from the photoelectric beam sensors and triggers an alarm when a sensor detects an intrusion. It features an indicator light, a speaker, and a backup battery compartment.
Usage Features:
- Power: The receiver is powered via a DC5V power jack.
- ON/OFF Switch/Set Button: This button serves multiple purposes:
- Turns the wireless alarm receiver on or off.
- Acts as a set button for adding or deleting sensors.
- Tone Button: Allows users to choose from 35 optional ring tones for the alarm.
- Volume Adjustment: The alarm volume can be adjusted to one of four levels by pressing and holding the "ON/OFF" button first, then pressing the "Tone" button.
- Indicator Light:
- Illuminates red when the device is powered on.
- Flashes when the device is in setting mode.
- Speaker: Emits an alarm sound for several seconds when a sensor is triggered.
- Adding Sensors: Up to 32 additional HTZSAFE sensors can be added to the receiver. To add a sensor, power on the receiver, press and hold the "ON/OFF" button for 5 seconds until the indicator light flashes, then trigger the sensor. A ring tone prompt and the indicator light stopping flashing confirm successful addition.
- Deleting Sensors: All sensors can be deleted by powering on the receiver, then pressing and holding both the "ON/OFF" button and "Tone" button for 10 seconds until a long bleep is heard.
- Changing Ring Tone: To change the ring tone for a specific sensor, power on the receiver, trigger the sensor, and then press the "Tone" button to cycle through the available tones.
- Adjusting Alarm Volume: Power on the receiver, then press and hold the "ON/OFF" button first, and then press the "Tone" button to adjust the alarm volume through its four levels.
Maintenance Features:
- Backup Battery Compartment: Houses four AA 1.5V batteries, which can power the receiver continuously for up to 100 hours in case of AC power loss. These batteries are not included in the package.
Solar & Wireless Photoelectric Beam Sensor
Function Description:
The solar & wireless photoelectric beam sensor is designed to detect intruders by creating an invisible infrared beam barrier. It consists of a transmitter and a receiver unit that communicate wirelessly with the main alarm receiver.
Usage Features:
- Power: The sensors are powered by built-in rechargeable batteries, which can be charged via sunlight or a DC5V-12V power adapter.
- ON/OFF Switch: Used to turn the solar beam sensor on or off. Pressing it three times turns on both the transmitter and receiver units.
- Infrared Beam: Emits and detects infrared beams to identify intruders. The system uses three infrared beams.
- Bubble Level: A built-in bubble level helps ensure the beams are installed horizontally for optimal performance.
- Calibration Hole: Facilitates alignment with another beam sensor, especially when beams are far apart.
- LCD Display: Provides feedback on the alignment quality between the beam sensors. A display reading of "100" or more indicates proper alignment. The LCD display will shut down after an hour.
- Solar Panel: Charges the sensor's battery even on cloudy or rainy days, ensuring continuous operation.
- Charge Jack: A red plug needs to be pulled out to connect a DC5V-12V power adapter for charging the sensor's battery if it runs low. The power adapter from the alarm receiver can be used for this purpose. After charging for 4 hours, the red plug should be reinserted.
- Screw Hole: Used for fixing the installation accessories to mount the sensor.
- Alignment Process:
- Place both beam sensors at the same height.
- Ensure both sensors are vertical using the bubble level.
- Adjust the direction of the sensors to align them with each other. The LCD display will show the alignment quality (a value of "100" or more indicates good alignment).
- Tighten the screws to secure the position and direction.
- Testing Alignment:
- Block only the top two beams: No alarm.
- Block only the bottom two beams: No alarm.
- Block all three beams: Alarm. This confirms proper functionality.
- Sensitivity Adjustment: The sensitivity of the solar beams can be set to 200ms (factory default) or 100ms. To adjust to 100ms:
- Turn on the solar beams by pressing the ON/OFF button 3 times (both transmitter and receiver).
- Press and hold the ON/OFF button for 10 seconds, release when a bleep prompt is heard, then press the ON/OFF button 6 times quickly (both transmitter and receiver).
- Ensure the solar beams are aligned.
- Press and hold the ON/OFF button for 10 seconds, release when a bleep prompt is heard (only the receiver).
- Press the ON/OFF button 4 times (only the receiver).
- A successful adjustment is indicated by 6 bleep prompts.
- To revert to factory default (200ms) sensitivity, follow the same steps but press the ON/OFF button 5 times in step 2.
Maintenance Features:
- Charging: The sensors should be charged by sunlight for a full day before initial use, or by a DC5V-12V power adapter for 4 hours.