EasyManua.ls Logo

Saga SAGA-1350I - User Manual

Default Icon
27 pages
Print Icon
To Next Page IconTo Next Page
Loading...
User Manual for:
SAGA-720I, SAGA-1350I
SAGA-720II, SAGA-1350II

Other manuals for Saga SAGA-1350I

Question and Answer IconNeed help?

Do you have a question about the Saga SAGA-1350I and is the answer not in the manual?

Summary

1. Precautions

Safety Instructions Overview

Manual Conventions

Explanation of safety categories (Danger, Warning, Caution) and symbols used in the manual.

Safety Symbol Descriptions

Description of safety symbols used in the manual (attention, prohibited, imperative actions).

General Safety Precautions

General Safety Warnings

Covers warnings about touching moving parts, disassembly, power supply, water exposure, and abnormal function.

Power and Blade Safety Precautions

Power Cord and Blade Safety

Safety advice on using undamaged power cords and handling cutter blades carefully.

Mechanism and Blade Handling Precautions

Blade Handling and Maintenance Precautions

Precautions for handling blades, mechanisms, solvents, lighting, and plotter movement.

Post-Power-On Precautions

Machine Caution Label and Stand Notes

Information on the machine's caution label and the importance of using the correct stand.

Package Contents: Whats in the Box

3. Floor Stand Installation

Floor Stand Installation: Step 1: Forming T-stands

Positioning supports perpendicularly to the bottom stand to create T-stands for assembly.

Floor Stand Installation: Step 2: Attaching Stand Beams

Placing stand beams upright on T-stands and inserting screws without full tightening.

Floor Stand Installation

Floor Stand Installation: Step 3: Mounting Roll Holder Supports

Positioning and tightening screws to attach the roll holder support to the floor stand.

Floor Stand Installation: Step 4: Installing Roll Holders

Inserting the two roll holders into the holes on the roll holder support.

Floor Stand Installation

Floor Stand Installation: Step 5: Attaching Stand to Machine

Instructions for securely attaching the floor stand to the main cutting plotter machine.

4. Blade Installation

Blade Installation and Adjustment

Detailed steps for installing, adjusting blade depth, and removing cutter blades.

Blade Handling Precautions

Cautionary advice for safe handling of sharp cutter blades and their components.

5.6. Key Functions Overview

6. SAGA Plotter 1350 I USB Setup

USB Setup: 6.1 Installing the USB Lead

Connecting the USB lead from the SAGA Plotter Cutter to the computer's USB port.

USB Setup: 6.2 Installing the USB Interface

Connecting power, turning on the plotter, and letting Windows detect and install the USB driver.

USB Setup: 6.2 Installing the USB Interface

Driver Verification and Troubleshooting

Checking driver installation in Device Manager and troubleshooting connection issues.

USB Setup: 6.3 Installing Drivers for Corel Draw;Illustrator

Specific instructions for installing drivers for Corel Draw and Illustrator software.

Driver Installation: Restart Computer and Further Details

6.3. Loading Media Instructions

6.4. Setting the Zero Point

6.5. Settings Mode

Settings Mode: Pressure and Speed Settings

Adjusting cutting pressure and speed using the operating panel menus.

Settings Mode: Scale, Baud, and Pause Settings

Configuring scale, baud rate, and ON/Offline (pause) settings for plotter operation.

6.6. Cutting Test Procedure

7. After Cutting Operations

After Cutting: 7.1. Weeding Process

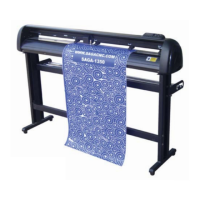
Removing unwanted media parts after the cutting job is complete.

After Cutting: 7.2. Applying Media

Applying transfer tape or flock/flex media to the cut material or textiles.

8. Drag Knives Handling

Basic Maintenance Overview

Basic Maintenance: Precaution in Cleaning

Important safety precautions to follow and avoid when cleaning the cutting plotter.

Basic Maintenance

Basic Maintenance: Recommended Cleaning Methods

Guidelines for cleaning the plotter surface, rails, platen, and stand.

Basic Maintenance: Cleaning Grid Drum and Pinch Rollers

Specific instructions for cleaning the grid drum and pinch rollers for accuracy.

Technical Specifications: Servo Cutting Plotter

Technical Specifications: Stepper Cutting Plotter

9. Software Settings for SAGA Plotter

Software Settings: 9.1 Sign Cut Settings

Specific configuration parameters for the Sign Cut software with the SAGA plotter.

Software Settings: 9.2 Flexi Starter 10.0 Settings

Software Settings: Flexi Starter 10.0 Setup Configuration

Software Settings: Flexi Starter 10.0 Cut;Plot Configuration

Setting up material, size, position, and other parameters for cutting jobs.

Printer Head Origin Settings

Printer Head Origin Settings: Software Configuration Steps

Guide to selecting specific tabs and de-selecting icons for correct software operation.

9.3 Artcut Settings

Artcut Settings: Installing the Cutting Plotter Device

Steps for installing the SAGA plotter as a selectable device within the Artcut software.

Artcut Settings: Cut;Plot Configuration

Setting up device, page size, and other parameters for cutting jobs in Artcut.

9.4 Cutting from CorelDRAW

9.5 Cutting from Illustrator

Saga SAGA-1350I Specifications

General IconGeneral
BrandSaga
ModelSAGA-1350I
CategoryPrinter
LanguageEnglish

Related product manuals