N
Nicole Golden MDSep 4, 2025
Why don't the controls work on my Sage Ice Cream Maker?
- AAlexander WeaverSep 4, 2025
The child lock may be on. Press and hold the HOLD button for 2 seconds to disengage the locking.

Why don't the controls work on my Sage Ice Cream Maker?
The child lock may be on. Press and hold the HOLD button for 2 seconds to disengage the locking.
What to do to make my ice cream even harder with my Sage Ice Cream Maker?
Remove ice cream from ice cream bowl, place in another air-tight container, and place in freezer for a further 1–2 hours or until desired hardness is achieved.
Why doesn't my Sage Smart Scoop BCI600 Ice Cream Maker remember my last setting?
The internal computer will only remember the settings once START / PAUSE has been activated.
Why is my Sage Smart Scoop BCI600 Ice Cream Maker reading the temperature in Fahrenheit?
Press the button to change temperature units.
Why is the compressor on but the ice cream not churning in my Sage Smart Scoop BCI600 Ice Cream Maker?
The PRE-COOL may be activated. To preserve the life of the compressor, there is a self-timer on the compressor. Allow up to 3 minutes for the compressor to activate.
Why is my Sage Smart Scoop BCI600 Ice Cream Maker ice cream not freezing?
If your ice cream isn't freezing, check if you've added too much alcohol or added it too soon, as this can prevent freezing. If alcohol isn't the issue, ensure your Sage Ice Cream Maker has at least 15cm of space around it for proper ventilation. Also, make sure that you pressed the START / PAUSE button.
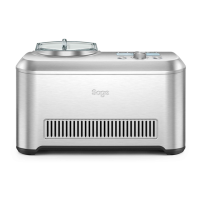
| Product Type | Ice Cream Maker |
|---|---|
| Control Type | Electronic |
| Freezing Method | Built-in Compressor |
| Pre-cool setting | Yes |
| Keep Cool function | Yes |
| Hardness settings | 3 |
| Voltage | 220-240 V |
| Frequency | 50 Hz |
| Warranty | 2 years |
| Capacity | 1.5 L |
| Material | Stainless Steel |
Churns and freezes ingredients to the selected consistency using one of four pre-set functions.
Allows manual setting of time for pre-timed recipes.
Offers four pre-set functions: sorbet, frozen yogurt, gelato, or ice cream.
Cools the machine to -10 to -30°C before churning, reducing preparation time.
Maintains dessert consistency for up to 3 hours after churning.
Locks controls to prevent accidental changes. Press and hold HOLD to activate/deactivate.
Notifies when to add extra ingredients like chocolate chips or fruit.
Allows adjustment of alert beeper volume (loud, soft, or mute).
The anodised ice cream bowl, not dishwasher safe.
The paddle for churning the ice cream mixture.
The lid for the ice cream machine.
The exterior casing of the appliance.
Button to turn the appliance on or off.
Button to start or pause the churning process.
Control for manually setting the timer.
Button to activate the pre-cooling mode.
Button to activate the keep cool function.
Dial to select dessert type and desired hardness.
Button to toggle between Celsius and Fahrenheit.
Setting for the alert beeper volume.
Handles for carrying the appliance.
The compartment where the ice cream bowl is placed.
The main display screen showing operation status and information.
Visual indicator for selecting dessert hardness.
Shows the progress of the churning process.
Indicates the Keep Cool function is active.
Flashes to signal when to add mix-ins.
Indicates the pre-cooling phase is active.
Flashes to prompt pressing Start after pre-cooling.
Indicates the dessert is ready and the blade can be removed.
The primary bowl for making ice cream.
Tool for scraping the bowl.
The mixing paddle that churns the ingredients.
Brush for cleaning the paddle.
Remove and clean all parts and accessories before initial operation.
Steps to follow for the first time use, including component placement.
Lowers machine temperature to reduce dessert preparation time.
How to clean the exterior stainless steel housing and LCD screen.
Instructions for washing the ice cream bowl with warm soapy water.
Method for washing the paddle and using the brush for cleaning.
Guidance on cleaning the lid using warm soapy water.
Recommended way to store the appliance in an upright position.