D16
- 1 -
1. Introduction
Dear customer:
Thank you for purchasing a DECT SAGEM telephone we appreciate your trust in us. This product was
manufactured with the utmost care, should you encounter difficulties during its use. We recommend
that you refer to this user guide. You can also find information on the following site:
http://www.sagem.com/faq
For your comfort and safety, we ask that you read the following paragraph carefully:
Recommendations and safety instructions
Your DECT telephone must not be installed in a humid room (wash-up room, bathroom,
laundry room, kitchen, etc.) unless it is 1.50 m away from a water point or outside. Your
telephone must be operated at temperatures ranging from 5°C and 45°C.
Only use the supplied power adapter, connect it to the base socket according to the
installation instructions provided in this booklet and the indications on the identification label
affixed to it (voltage, current, electric network frequency). As a precaution, in case of
danger, the mains adapters act as a disconnecting mechanism for the 230V power supply.
They should be placed near the device and should be easily accessible.
This telephone was designed for use on the public switched telephone network (PSTN). In
case of a problem you must first contact your reseller. Only use the supplied telephone
cord.
Telephone cord is to be connected prior to opening the door.
For your personal safety, never place your handset on the base without the batteries, or
without the battery cover, you could get an electric shock.
To avoid damaging your handset, only use certified rechargeable AAA bat teries NiMH 2.4 V
550 mAH, never use non rechargeable batteries. Insert the batteries in the handset battery
compartment respecting polarity.
At the end of their useful life, batteries must be disposed of according to the recycling
instructions
presented in this booklet.
Your DECT telephone has an inside radio range of about 50 metres and up to
300 metres in open space. The immediate presence of metal parts, (of a television for
example), of any electric appliance may result in range reduction.
In areas where storms are frequent, we recommend that you protect your telephone line
using a surge protection device.
This equipment does not function in the case of an electric network shutdown: for
emergency calls, it is recommended to use another unit during power cuts.
The CE marking certifies that the product meets the essential requirements of Directive
1999/5/CE of the European Parliament and of the Council pertaining to microwave radio
equipment and telecommunication terminal equipment, for the safety and health of users,
for electromagnetic interference. Furthermore, it efficiently uses the frequency spectrum
attributed to ground and spatial communication to prevent damaging interference.
The declaration of compliance may be looked up on the www.sagem.com site, section
"support" or can be obtained from the following address:
Sagem Communications - Customer relations department
4, rue du Petit Albi - 95800 Cergy Saint-Christophe - France
English
- 2 -
2. Before you begin
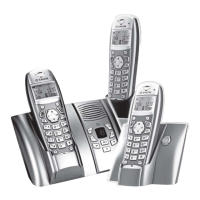
Make sure your package includes the items:
1. Base unit,
2. Handset,
3. One battery compartment cover,
4. Handset battery,
5. Telephone line cord,
6. AC power supply.
In the case of purchasing a pack duo or trio, you will find in addition for each additional handset:
1. A handset charger,
2. An additional battery flap,
3. One battery compartment cover.
2.1. Digital security system
Your cordless phone uses a security system to provide protection against false ringing,
unauthorised access and charges to your phone line.
When you place the handset in the base, the unit verifies its security code. After a power outage
or battery replacement, you should place the handset in the base for about 20 seconds to reset
the code.
2.2. Installing the phone
Power socket
telephone socket
Bloc battery
2.4V 550mAh
Battery wire
1. Remove the battery compartment door of handset.
2. Insert battery pack and connect the cord from left direction into the jack inside the handset.
3. Put the compartment door back on. «searching..» appears on the scree n.
4. Plug the power supply cord into AC outlet and the other end into the power jack on the base
bottom.
5. A welcome message in all the languages supported by the telephone is displayed on the
screen, press
*
.
6. Select the country usingor keys, press
*
.
7. A screen asks you to confirm your choice. Press
.
You will hear a confirmation tone.
8. The screen saver is displayed.
*
: depending on country
D16
- 3 -
You can change the display on the screen saver.
For this purpose, press and hold down the key
.
To return to the previous display, press and hold down the key .
Place the handset in the base station to charge for 15 hours prior to first use. if you don’t
properly charge the phone, battery performance will be compromised.
9. Plug one end of the telephone lin e cord into the modular wall phone jack and the other end
into the jack on the base.
10. After charging, press
key, you can hear dial tone.
Only use the supplied power adapter, connect it to the base socket according to the
installation instructions provided in this booklet and the indications on the identification
label affixed to it (voltage, current, electric network frequency). As a safety measure, you
can use the power adaptors to cut off the 230V current in case of danger. They must be
located near to the device, and must be easily accessible.
2.3. Handset keys
Internal call
Microphone
Earpiece
Mute the microphone /
Correction / Cancel
Talk off /
Switch handset on/off
Recall/Flash
Screen
Access to dialled number
Access to menu /
Validadate
Talk on
Activate, deactivate keypad lock
Access to phonebook
Navigation key down /
Navigation key up /
Access the caller list
Deactivate handset ringer
2.4. Base Station
Base button
Pressed briefly:
- telephone set paging.
Held down (4 seconds minimum):
- telephone set registration.
Handset location
English
- 4 -
2.5. Quick guide to handset display icons
Signal strength icon (blinking when no signal or the signal strength is weak).
Call (icon is blinking when a new call is in the caller list)..
Handset ringer muted.
Received call list (appears when a new call is in the caller list).
Memory.
Charging status icon ( :Full; + flashing (charger not connected) : Flat;
blinking during charging).
If you see the icon change into + flashing (charger not connected, that means
your battery is low and your handset keyboard is not available to use, please put the
handset in cradle of base to recharge your battery.
3. Menu structure
phonebook
new entry
list
edit entry
delete entry
delete all
direct mem.
personal set
handset name
handset tone
language
auto hang-up
clock&alarm
date / time
set format
alarm
alarm tone
advanced set
changer pin
registration
unregister
country
reset
auto prefix
recall time
dial mode
first ring
D16
- 5 -
4. Calls
4.1.
Cordless phone basics
4.1.1. Make a call
Ensure that the handset is switched on.
1. Press the Talk key
, you will hear the dialling tone and the display will show you the
phone icon
.
2. Enter the phone number. The number is dialled.
- OR -
1. Enter the phone number first and then press
key. If you make a mistake,
press
key to remove the last digit.
2. Ending a call press key or place the handset in the base station.
4.1.2. Auto talk off
Placing the handset in the case cradle while the handset is off the hook (during a call)
automatically hangs up the handset.
4.1.3. Answ ering a call
(Refer to paragraph 7.4 page 11)
1. When the phone rings, press the key to answer the call.
- OR –
1. If AUTO TALK MODE is ON, pick up the handset from the base station to answer.
2. Ending a call press
key or place the handset in the base station.
4.1.4. Handset volume
You can adjust the volume of what you hear through the handset at any time by pressing
or key. You will hear a beep with each key press. You will hear a double beep when you
reach the highest or lowest setting.
4.1.5. Caller timer
After you press Talk key on the handset, the built-in call timer shows in the display (after 10
seconds) and counts the length of time of the call on minutes and seconds.
4.1.6. Ending a call
To end a call press . The timer remains displayed on the screen for 10 seconds.
You can, however, return on the screen saver by pressing
.
4.1.7. Redialling a call
The last five numbers you have dialled can be quickly redialled.
Redialling from Standby Mode:
1. Press
key. The phone number that was last dialled appears on the display.
2. Press the
: your contact does not want their number to be displayed.
4.2.3. Accessing the caller list menu
1. Press the key to enter the Caller List menu. The display shows the recent caller phone
number (up to 12 digits).
2. Press the or key through the caller List.
4.2.4. Calling back a caller
1. Press the key to enter the caller list menu.
2. Press the or key to select a call record.
3. Press the
key to dial the number.
D16
- 7 -
4.2.5. Deletin g caller list record
1. Press the key to enter the caller list menu.
2. Press the or key to select a call record.
3. Press
key.
- Select "delete entry" to delete the current record.
- Select " delete all to delete th e entire Caller list.
4. A confirmation screen appears :
- If you do not wish to delete the current record, press
.
- To delete the current record, press
.
5. The record or the entire Caller list is deleted.
You will hear a confirmation tone.
4.2.6. Storing memory from the caller list
1. Press the key. The caller list appears on the screen. Use or to select the desired
caller number.
2. Press
key, then select "save Number". press .
3. Enter the name of the entry. Press
.
The entry is stored in the phonebook. You will hear a confirmation tone.
If the number is too long (more than 12 digits), the screen will not show the number in
full.
Press key to go to last number page for CID length.
5. Phonebook
You can store 50 phonebook entries in your phonebook.
Each phonebook entry can contain the name of your contact which can be a maximum of
12 characters long (spaces included), your contact's telephone number up to 24 digits.
5.1. Dialling a memory number
1. press key.
2. Press the or key to view the phonebook locations.
3. Press
key. The display number is dialled.
5.2. Storing a memory
1. Press , "phonebook " appears on the screen. Press .
2. "new entry" appears on the screen, press
.
3. Enter the name of the entry. Press
key to confirm the name.
4. Enter the number of your entry using the keypad keys. . Press
key.
The entry is stored in the phonebook. You will hear a confirmation tone.
English
- 8 -
5.3. Editing a memory
1. Press , "phonebook " appears on the screen. Press .
2. Using the or key, select "edit entry ". Press
.
The list of phonebook entries organised in alphabetical order appears. Select the entry you
want to edit using or .
3. You will then enter the name input screen and the cursor will be at the end of the name:
- The information is accurate. Press
key.
- To correct the name, press
key to delete characters.
Enter the new name and press
key.
4. You will then enter the number screen and the cursor will be at the end of the number:
- The information is accurate. Press
key.
- To correct the number, press
key to delete the numbers.
Enter the new number and press
key.
5. The entry is then modified and you will hear a confirmation tone.
5.4. Deleting a memory / the whole phonebook
1. Press , "phonebook " appears on the screen. Press .
2. Using the or key, select "delete entry ". Press
.
The list of phonebook entries organised in alphabetical order appears. Select the entry you
want to delete using or .
3. A confirmation screen appears.
- If you do not wish to delete the entry, press
.
- To delete the entry, press
key.
The entry is deleted from the phonebook. You will hear a confirmation tone.
Note !
If you enter the wrong digits press C key to delete the incorrect digits.
Note !
To delete the entire phonebook list, select "delete all", press .
A confirmation screen appears:
- If you do not wish to delete the entry, press
.
- To delete the entry, press
key.
the entire phonebook are deleted.
You will hear a confirmation tone.
5.5. Assign a shortcut
This menu allows you to record two quick dial numbers assigned to the keys 1 and 2 on the
keyboard.
Note !
Your voice mail number is not factory set and you can assign it to the key .
1. Press
, "phonebook " appears on the screen. Press .
2. Using the or key, select "direct mem.". Press
.
3. Using the or keys, select the key you want to assign a number (1 or 2) to and press
, "no number" is displayed on the screen. Press .
D16
- 9 -
4. "edit " appears on the screen, Press .
5. You will then enter the name input screen. Enter the name of the entry and press
to
confirm.
6. You will then enter the number screen. Enter the number of the entry. press
to confirm.
You will hear a confirmation tone.
5.5.1. Calling an abbreviated number
To call the number you have assigned to one of the shortcut keys:
1. Hold down the key on which the number was programmed (1 or 2).
2. The number is displayed on the screen and is automatically dialled.
5.6. Inserting a pause
You can insert a pause in the dialling sequence. Wait for a dial tone before you press . The
pause time is fixed to 3 seconds.
Press and hold
key during edit mode to inset the pause. The display shows an ’’P’’.
6. Using the Multi-Handset capabilities
These functions are used for handset management when two or more handsets are regis tered
on the same base.
6.1. Intercom Call/Intercom
1. Make sure your handset is on standby mode.
2. Press the
key on the handset.
- If your installation has two handsets, the second handset is directly called, and "intercom"
followed by the handset number are displayed on the screen.
- The display shows the INT icon and the number of all registered handsets
- Enter the desired handset number or press the
key if you want to call all handsets. All
registered handsets are ringing.
3. On the called handset, press the
key to answer.
6.2. Answering an internal call
1. The ring melody from an internal call is different from an external call. "intercom " and the
calling handset number appear on the screen. "
" is blinking.
2. Press the
key to answer. The " " stop blinking.
3. Ending an internal call press the
key.
6.3. Call management
6.3.1. An ext ernal and an internal call
Transfering an external call to another handset registred on same base
1. During a call, press
. The external user is put on hold.
2. Enter the internal call number. When the user answers, you can announce the call.
3. Press the
key to transfer the call.
Note!
To switch from one call to another, press and hold down the "*" key until an aural
signal is heard.
English
- 10 -
Note!
If the called handset does not answer, press to take back the call.
Making conference calls (3-way conversation)
You can connect one external call to two handsets registered at the base station. All users can
talk and listen simultaneously:
1. Press
key. The external user is put on hold.
2. the internal call number. Wait until the internal user answers.
3. Press and hold
key, until an aural signal is heard to start a three-way conference.
"conference" is displayed on the handset screen.
6.3.2. Two outside calls
Taking a second call while you are already on line
During a call, a beep is emitted by your operator to inform you that a second call is on hold. A
screen displays the number of this second caller on hold.
Press
to take back this new call.
Your first contact is put on hold and you can talk with the second caller.
Making a second call while you already on line
During a conversation, press then dial the number to be called.
The call in process is then put on hold and you can take the second call back.
Switching from one call to the other
To switch from one call to the other, press then the key .
The call in process is then put on hold and you can take the second call back.
Ending one of the two calls
To end one call and continue with the other, press then the key .
The call in process is then ended finally and you take the second call back.
To set up a 3-way conference (the 2 calls and yourself)
During a conversation, press then the key .
You can then talk with the 2 contacts at the same time.
To end the 3-way conference, press the red key
.
7. Customising the handset
7.1.
Handset naming
This function allows you to change the name of your handset.
1. Press
, select "personal set" using the or key, Press .
2. "handset name " appears on the screen. Press
.
- Use the keypad to enter the new name (up to 10 characters).
- Use
key to delete wrong input if necessary.
3. Press
key to confirm your selection. You will hear a confirmation tone
D16
- 11 -
7.2. Tone settings
7.2.1. Hand set ringer level
You can choose from four ringer volumes.
1. Press
, select "personal set" using the or key, Press .
2. Using the or key, select "handset tone" Press
.
3. "ring volume " appears on the screen. Press
.
4. Use or to select the volume level.
5. Press
key to confirm your selection.
7.2.2. Hand set ringer melody
This function allows you to assign a ring tone for incoming calls.
1. Press
, select "personal set" using the or key, Press .
2. Using the or key, select "handset tone" Press
.
3. Using the or key, select "ring tones" Press
.
4. Use or to select the ring tone.
5. Press
key to confirm your selection.
7.2.3. Key tone On/Off
This function allows you to activate or deactivate tones being heard when pressing the keypad.
1. Press
, select "personal set" using the or key. Press .
2. Using the or key, select "handset tone". Press
.
3. Using the or key, select "key beep". Press
.
4. Use or to select "ON" or "off" setting.
5. Press
key to confirm your selection.
7.3. Modifying the language
1. Press , select "personal set" using the or key, Press .
2. Using the or key, select "language". Press
.
3. Using the or key, select "key beep". Press
.
4. Use or to choose the desired language.
5. Press
key to confirm your selection. You will hear a confirmation tone.
7.4. Auto talk
(Refer to § 4.1.3 “Answering a call” page 5)
When active, the auto pick up feature enables you to automatically pick up as soon as you
remove the handset from its base.
1. Press
, select "personal set" using the or key. Press .
2. Using the or key, select "auto hang-up". Press
.
3. Use or to select "ON" or "off" setting.
4. Press
key to confirm your selection. You will hear a confirmation tone.
English
- 12 -
7.5. Key lock
You can lock the keypad to prevent inadvertent activation.
1. Press and hold
key for 1 second, when the keypad lock is switched ON, the display
will show "keys locked".
2. To recover to normal, press and hold
key 1 sec or replace handset into the base
cradle.
8. PHONE setting
8.1.
Time and date
1. Press , select "clock&alarm" using the or key, Press
.
2. Using the or key, select "date/time". Press .
The date is displayed.
- To keep the date, press
.
- To change it, enter the new date in YYYY/MM/DD format.
- To go back to change the entry, press
.
Press
.
3. The date is displayed.
- To keep the time, press
.
- To change it, enter the new time in the HH : MM format.
(If, after entering the time, the time format is 12H, use the key to set