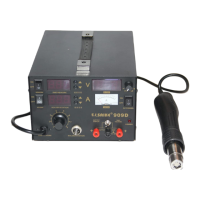
2.
Located
output
/
test
wave switch at the front's panel
on
the bottom right, then
turn the
test
side, it can be used to
test
the external test things' voltage.
(A) Replacement
of
Hot
Air
rework
heating
element
(Figure 1)
1. Ensure the Hot
Air
Rework is fully cooled down before replacing the element.
2. As figure, loosen the two screws on the handle.
3. Turns the handle component until it comes off and then remove the handle shell
cover.
4. Gently takes out the fan, loosen the three screws to remove the fixed wiring bo-
ard.
5. The wiring board in turn,
apart
from the
heater
wiring board connection cable,
pay attention to the connection location.
6. From the steel tube removed the heating
element
and cover with mica poler, ca-
reful not broken ground wire
of
the steel.
7. Wraps well with the new
heater
mica,inserted into the tube, the
a!tention
heater
to install
in
place.
8. According to the original, location
of
the connection to connect
heater
.
9. When the reverse proeess by open bo!tles and handle back.
(B) Replacement
ofthe
soldering
iron's
tip
and
soldering
iron
heating
core's
element
(Fig
~
)
1. Unscrews the nut NO.1, and then removes the steel tube NO.2, followed by rem-
oving the tip which is going to be replaced .
2. For the replacement
of
heating core's element can be performed by unscrewing
the plastic cap No.4; pulls
out
gently
the iron heating element NO.6 along with
the
circuit
board No . 7, please
carefully
and
remember
the connection
of
spring
NO
.
5.
3.
The iron core from the
circuit
board welding ,the
replacement
of
the iron heating
elements, can be install well. Note that the
order
of
the iron heater wire con nec-
tion.
VI.
Terms
ofUse
1. When turning
on
the main
unit's
power, the Hot
Air
rework's handle must be pla-
ced
properlyon
the handle's rack.
2. Please ensure the Hot
air's
outlet
is clear, must free from any blockages or obs-
truction.
3.
After
usage, the handle must be placed back on the handle's rack,
let
the unit
cooling
down(temperature
gradually
decreasing)
until it "
___
"
(Air
flow Stop).The
turn
off
the Hot Air power switch.
4.
The unit comes with three standard nozzle sizes: large, medium, small. When
using the
smaller
nozzle, the Hot
air
volume
must
be adjusted to the maximum
rate
or
set the temperature low and maintain it
in
a short time, to avoid prolong-
ed
use which could damage the Hot
air
gun.
11
 Loading...