EasyManua.ls Logo

Salamander SYNERGY 236 User Manual

Salamander SYNERGY 236
5 pages
To Next Page IconTo Next Page
Page #1 background imageLoading...
Page #1 background image
BEFORE YOU BEGIN:
t6OQBDLBMMQBSUTCFGPSFCFHJOOJOHBOESFGFSUPUIFESBXJOHCFMPX
t4IFMGQFHTBOEEPPSIJOHFTNVTUTMJEFJOUPUIFDIBOOFMTPGUIFQPTUJOUIFDPSSFDUPSEFS
5IFZDBOOPUCFSFNPWFEJOEJWJEVBMMZXJUIPVUEJTBTTFNCMJOHUIFXIPMFVOJU
SYNERGY 236
5SJQMF"TTFNCMZ
*ODMVEFT
(1) 5SJQMF6OJU
(2) 44JEF1BOFMT
(1) .FEJB%SBXFS
(2) 4%PPST
(3) "EKVTUBCMF4IFMWFT
!
Drawer Slide (2)
Adjustable
Shelf (3)
Bottom Shelf (1)
Joint Connector Bolt 300-540 (8)
Sides (2)
Rear Panel (3)
Media Drawer
Foot & Nut P-300-350 (8)
Door (2)
Aluminum Post (8)
Washer 300-470 (8)
Shelf Peg
PHK-370 Right (6)
PHK-380 Left (6)
4BMBNBOEFS%FTJHOT-UEtXXX4BMBNBOEFS%FTJHOTDPN ©2005 Salamander Designs Ltd. ® Synergy System, Patented.
Limited Warranty
For five full years Salamander Designs Ltd will repair or replace, at our option, any product defective in materials or craftsmanship. Salamander Designs Ltd. will not be responsible for any damage to or
destruction of other equipment consequential to our equipment failure. Defective product must be given Return Authorization and is to be returned to the factory prepaid, in the original carton and packing
material. Any damage incurred in a shipment not in original packaging shall be the responsibility of the owner. Warranty repairs will be returned prepaid, via UPS within the continental U.S.A. only.
Doc No. 500-785/v4.12 236 -1/5
Question and Answer IconNeed help?

Do you have a question about the Salamander SYNERGY 236 and is the answer not in the manual?

Salamander SYNERGY 236 Specifications

General IconGeneral
BrandSalamander
ModelSYNERGY 236
CategoryIndoor Furnishing
LanguageEnglish

Summary

Before You Begin

Connect Posts to Bottom Shelf

Square Post

Square the post to the bottom shelf.

Connect Post

Screw foot with washer through bottom shelf and into post.

Add Shelf Pegs & Door Hinges

Group Shelf Pegs

Identifies two varieties of shelf pegs designed to cradle shelves.

Insert Hinges & Add Shelf Pegs

Details inserting hinge plates and shelf pegs for door placement.

Assemble Drawer

Attach Drawer Slides and Brackets

Attaching drawer slides, flat nuts, and rubber tabs to the drawer components.

Assemble Drawer Box

Laying out sides, placing bottom, and inserting back panel for drawer assembly.

Drawer Adjustment and Finishing

Adding fixing hooks, attaching panels, and adjusting height with trim covers.

Attach Doors

Attach Hinges to Door Frames

Inserting and locking hinges into the corresponding holes on the doors.

Adjust Door Clearance

Setting door height above bottom shelf and securing hinges.

Attach Rubber Stops

Affixing rubber stops to the inside of the door frame.

Install Door Pull

Screwing the door pull into its designated place.

Attach Rear Panels

Insert Hardware

Combining studs with flat nuts and sliding them down posts.

Position & Secure Stud

Aligning spacer tool and positioning studs for spacing and cable passage.

Place Rear Panels

Securing each rear panel in place with thumb nuts.

Final Assembly

Placing & Adjusting Shelves

Placing shelves, angling them onto pegs, and adjusting spacing.

Fine Tuning

Using a bubble level to precisely adjust shelves and tightening pegs.

Insert Side Panels

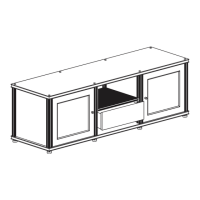
Sliding side panels down center channels of outside posts.

Secure Top

Securing the top with connector bolts to complete installation.

Related product manuals