L
C
L
C
L
C
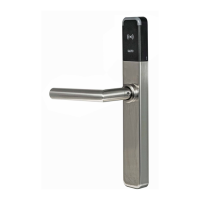
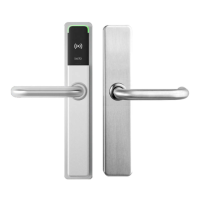
-LEVER
-MANILLA
-BEQUILLE
L
C
L
C
Vertical center
line of Backset
(Centro vertical
de la entrada)
(Centre vertical
du axe)
Vertical center
line of Door
(Centro de la
puerta)
(Centre vertical
de l´axe)
Strike Lip Position
(Posición labio del cerradero)
(Position du recouvrement gâche)
Turnpiece Hole
(inside only)
Drill depth
4-5/8"
(Vaciado
prof.117,5mm)
(Profondeur
usinage)
Boton de privacidad
(solo por el interior)
CENTERLINE LOCKCASE
CENTRO DE LA CERRADURA
CENTR DEL LA MORTISE
CENTRELINE OF STRIKE
CENTRO DEL CERRADERO
CENTRE DE LA GÂCHE
Trou pour bouton de
privacité
(seul interieur)
Inside Only.
Depth: lock center + 1/4"
Profundidad: centro cerradura + 6mm
Profondeur: centre de la serrure + 6mm
36,51-7/16" ( )50,82" ( )
411.625" ( )
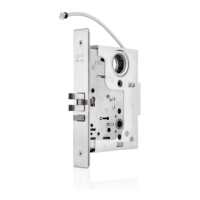
Mortise Lock:
SALTO LA1T17xx../LA1T07xx..
LOCK AND STRIKE INSTALLATION
Eng
PREPARING THE DOOR
1. Draw a horizontal line on edge of the door and on inside at the desired
height of knob above floor.
2. Draw a vertical centre line on door edge.
3. Draw a vertical line on inside at the proper backset to align the
template.
4. Position template on edge of door.
Mark ONLY top and bottom holes of mortise cavity (A) and lock front on
door edge. Remove template: Place lock face against door edge.
Trace outline of faceplate as guide for faceplate routing.
5. Mortise door for lock body and faceplate as per instructions on template
6. Position template on inside of door. Mark holes in the lateral face of the
door for turnpiece (B) and handles (C and D). Mark the corresponding
holes for the electronic escutcheon fixings (E and F). The (F) hole
doesn’t have to be through, its depth has to be ¾” longer than the
lock center.
INSTALLING THE LOCK BODY
1. Insert wires through (F) hole.
2. Insert the lock into the cavity.
3. Mark & drill faceplate holes.
Fasten with faceplate screws to hold lock in place.
INSTALLING THE STRIKE
1. Center strike to lock’s frontplate center lane. Refer to latch to determine
strike location on jamb.
2. Using strike as template, mark and chisel recess.
Drill holes for dust box. Place dust box and strike and fasten screws.
Please check that:
- Deadbolt and latch fit the cavities of the strike without touching it.
- Gap between door and jamb is 1/8”.
LUBRICATION
____________________________________________________________________________________________________
All locks come from the factory pre-lubricated with grease. We recommend, however, continued periodic lubrication of moving
parts with commercial quality grease (every 20.000 cycles or once a year), from outside the lock. This can prolong the life o
the lockset by reducing excessive wear. If the lockset is used in a harsh environment, lubrication should be applied more
frequently
.
HANDING ANSI door code Required Information
2-3/4" (70)
4-5/8" (117,5)
O
1
0
3
/
8
"
(
)
O
1
0
3
/
8
"
(
)
O
1
9
3
/
4
"
(
)
O
1
4
9
/
1
6
"
(
)
O
1
4
9
/
1
6
"
(
)
O
1
4
9
/
1
6
"
(
)
(E)
(E)
(F)
(C)
L
C
OF
BACKSET
(A)
(A)
(B)
L
C
OF
FRONTPLATE
(D)
OF
LEVER
L
C
HEIGHT ABOVE FLOOR
OF
LEVER
L
C
(D)
221373 - -ED.12/08/2013
All contents current at time of publication.
SALTO Systems S.L. reserves the right to change availability of any
item in this catalogue, its design, construction, and/or materials.
Dimension in inches (dimension in millimetres)
Template 221373
38,11-1/2" ( )
208,38-13/64" ( )
61,62-27/64" ( )
HANDING CHANGE INSTRUCTION
1. Remove special screw with allen wrench
2. Pull latch bolt out of lock
3. Rotate latch bolt 180º and reinstall into lock,
pushing the latch bolt into the lock and then releasing
4. From oposite side, insert the special screw and
tighten securely with the allen wrench.
Make sure foot is
under latch surface
Cannot put in lock with
foot above latch surface
LATCHBOLT POSITION CHANGING
LOCKING SLIDE POSITION CHANGING
1. Remove 2 screws as shown above
2. Turn lock over opposite side and reinstall screws
as shown above. To ensure locking slide does not bind,
manually push to the desired side or alternate
tightening each screw every 2-3 turns.
O
2
5
,
4
O
1
"
(
)
9,5()
3/8"
© 2013 SALTO Systems S.L.
3
/
3
2
"
o
r
T
o
r
x
1
0