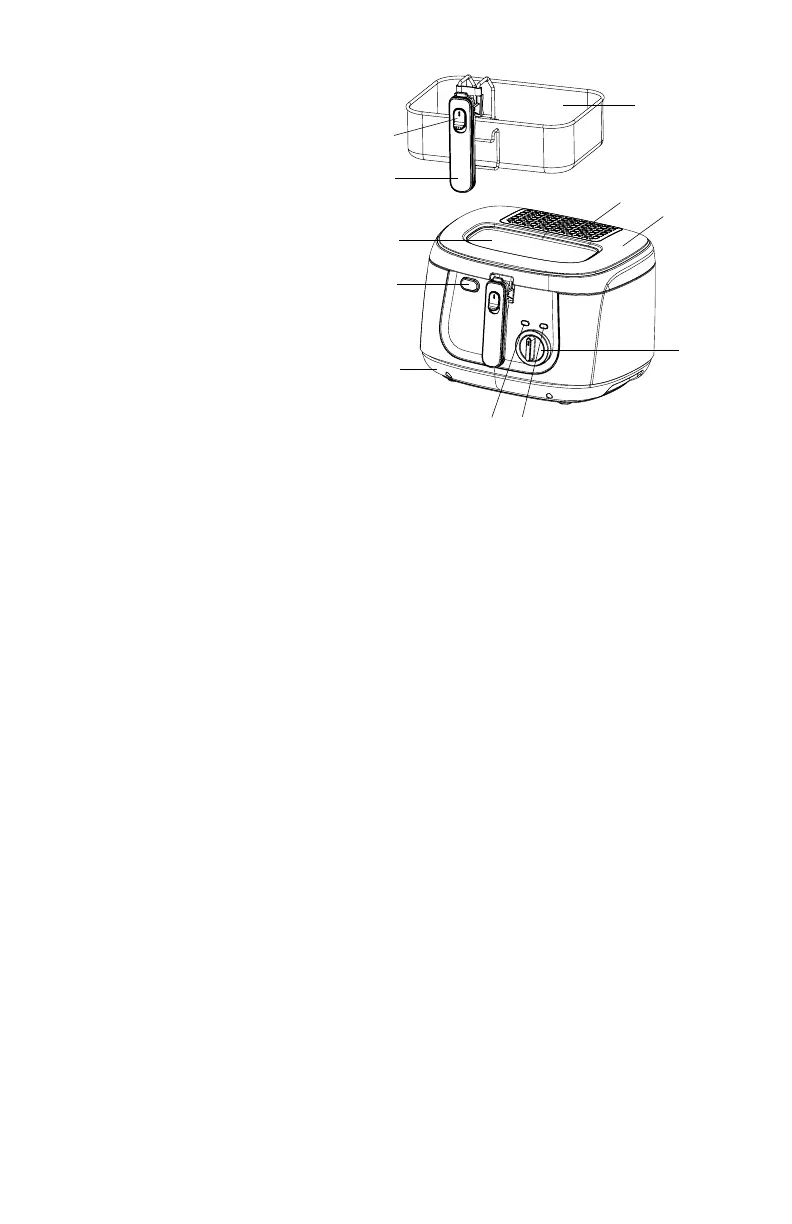
DESCRIPTION OF PARTS
1. Frying Basket
2. Frying Basket Handle
3. Frying Basket Handle
Release/Lock Button
4. Power Light (Red)
5. Ready Light (Green)
6. Temperature Control Knob
7. Cover Opening Button
8. Removable Cover
9. Frying Bowl (not shown)
10. Viewing Window
11. Filter Cover
12. Base
BEFORE FIRST USE AND ASSEMBLY
1. Open the Cover by pushing the Cover Opening Button and the Cover
will be in a vertical position. Remove the Cover by lifting upward.
2. To remove any residue that may be left over from the manufacturing
process, ll the Frying Bowl with 2 cups (500 ml) of warm soapy
water.Wash with a dishcloth or sponge. Empty, being careful that
water does not drip down the exterior wall of the Fryer.IMPORTANT:
DO NOT IMMERSE THE FRYER, CORD OR PLUG IN WATER OR
ANY OTHER LIQUID.
3. Rinse with about 2 cups (500 ml) of clear water. Empty.
4. Dry thoroughly.
5. Wipe the exterior wall with a damp cloth. Dry.
6. The Cover, Frying Basket and Handle may be immersed in hot soapy
water. Rinse and dry thoroughly.
NOTE: Do not use the Fryer until all parts are completely dry.
HOW TO USE
1. Place the Fryer on a at heatproof surface, close to a 120 volt wall
outlet.
2. Open the Cover by pressing the Cover Opening Button.
3. Remove the Frying Basket by lifting the Basket Handle to the raised
position.Lift the Basket Handle and Frying Basket out of the Fryer. If
it is a little tight, gently wiggle the handle left to right and the Basket
Handle and Frying Basket will lift out.
4. Pour between 1.9 – 2.5 quarts/liters of oil into fryer. Peanut, soya or
other high quality vegetable oil is recommended. Ensure that the
oil level is maintained between the MIN and MAX markings on
the inside of the Fryer. IMPORTANT: DO NOT USE THE FRYER
WITHOUT OIL.The Fryer will be damaged if heated dry.
4
3
2
1
4 5
8
7
6
12
10
11