EasyManua.ls Logo

Samsung S7390 - User Manual

Samsung S7390
7 pages
Print Icon
To Next Page IconTo Next Page
Loading...
SAMSUNG S7390 - Quick Start Guide
Operating Your Device
QS41 Ver25MAY2015
1) Speaker
2) Earphone jack
3) Power button / Lock Screen
4) Back button
5) Charger port
6) Home button
7) Menu button
8) Volume up / down
1
2
3
4
5
7
Customer Service (US) +1 212 785 5800
Support@mobal.com
http://support.mobal.com
www.mobal.com
8
6
Question and Answer IconNeed help?

Do you have a question about the Samsung S7390 and is the answer not in the manual?

Summary

Operating Your Device

Speaker

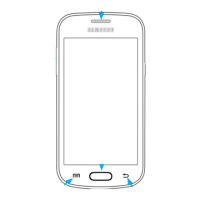
Identifies the device's speaker location.

Earphone Jack

Indicates the port for connecting headphones.

Power Button; Lock Screen

Locates the button for power and screen locking.

Back Button

Shows the location of the button to return to the previous screen.

Charger Port

Pinpoints the port for charging the device.

Home Button

Marks the button to return to the main screen.

Menu Button

Indicates the button to access device menus.

Volume Up;Down

Shows the controls for adjusting audio volume.

Setting Up Your New Smartphone

Power On and Language Selection

Instructions for turning on the phone and choosing a language.

Wi-Fi Setup

Steps to connect the device to a Wi-Fi network.

Date and Time Configuration

Guides on setting the automatic date and time or preferred time zone.

End User License Agreement

Process for reading and accepting the software license agreement.

Samsung Account Setup

Steps to sign in or create a Samsung account.

Google Account Setup

Options to create or skip setting up a Google account.

Location Services and Google Apps

Enabling location services and Google app access for relevant information.

Phone Ownership Personalization

Setting the phone's owner name to personalize apps.

Dropbox Account Options

Choices to create, sign into, or skip a Dropbox account.

Setup Completion and Hints

Finalizing setup and viewing initial operational hints.

Adding Contacts To Your Smartphone

Unlock Phone

Procedure to unlock the device by swiping the screen.

Access Contacts Application

Locating and tapping the contacts icon on the screen.

Initiate New Contact Creation

Tapping the '+' symbol to add a new contact.

Enter Contact Details

Filling in contact information and saving it to the phone or SIM.

Making a Call On Your Smartphone

Unlock and Access Phone App

Unlocking the phone and tapping the telephone icon.

Dialing a Phone Number

Inputting a number via the keypad and initiating the call.

Calling a Saved Contact

Searching for a contact by name and initiating a call.

Sending A Text On Your Smartphone

Unlock and Open Messaging

Unlocking the phone and accessing the messaging application.

Create New Message

Tapping the icon to compose a new text message.

Enter Recipient and Message

Typing the phone number or name and the message content.

Send Text Message

Completing the message and sending it.

Charging Your New Smartphone

Locate Charging Port

Identifying the charging port at the bottom edge of the phone.

Check Charging Status

Recognizing the battery icon symbol to confirm charging.

Overview

This document serves as a Quick Start Guide for the Samsung S7390 smartphone, providing essential instructions for its operation, setup, and basic functions. It is designed to help users quickly get acquainted with their new device.

Device Overview and Basic Operation

The Samsung S7390 is a smartphone designed for communication and various smart functionalities. The front of the device features a speaker (1) at the top, an earphone jack (2) for audio output, and a display screen. On the right side of the device, there is a power button / lock screen button (3) which is used to turn the phone on or off and to lock or unlock the screen. The left side of the device houses the volume up / down button (8), allowing users to adjust the audio volume. At the bottom of the screen, there are three capacitive buttons: a menu button (7) on the left, a home button (6) in the center, and a back button (4) on the right. The home button typically returns the user to the main home screen, while the back button navigates to the previous screen or action. The menu button provides access to additional options within an application. The bottom edge of the phone includes a charger port (5) for connecting the charging cable.

Setting Up Your New Smartphone

The guide outlines a step-by-step process for initial smartphone setup:

  1. Turning On the Phone: To power on the device, press and hold the power button located on the top right-hand side of the phone.
  2. Language Selection: Upon startup, the "Welcome!" screen appears, prompting the user to select a language. Users should choose their preferred language from the dropdown box (e.g., English (United States)) and then tap "Next." An accessibility option is also available for visually impaired or hard-of-hearing users.
  3. Wi-Fi Setup: The next step involves setting up a Wi-Fi connection. The phone will scan for available Wi-Fi networks. Users can select their network and enter the password if required. There is an option to "Skip" this step and set up Wi-Fi later if a connection is not immediately available.
  4. Date and Time Settings: Users can choose to use "Automatic date and time" (network-provided time) or manually set the date, time, and time zone. After making their selection, they should tap "Next."
  5. End User License Agreement (EULA): The guide instructs users to read the EULA carefully. To proceed, users must tick the box indicating they "understand and agree to the terms and conditions above." Additionally, there's an option to choose whether to send Samsung error log data by tapping "Yes" or "No thanks." Finally, tap "Next."
  6. Samsung Account: Users are prompted to sign in or create a Samsung account. This account can provide access to more content and services. However, it is not essential for the basic operation of the phone, so users can tap "Skip" if they do not wish to set one up at this stage.
  7. Google Account: The setup continues with linking a Google account. Users can tap "Get an account" to sign in or create one, or tap "Not now" if they prefer not to set up a Google account at this time. A Google account is not essential for the phone's basic operation.
  8. Location Services: Users are asked to choose whether to turn on location services. This involves ticking a box to enable Google's location service, which uses Wi-Fi and mobile network location to estimate the device's location. Users should then tap the right arrow icon to continue.
  9. Dropbox Account: The device offers integration with Dropbox. Users can sign in to an existing Dropbox account or create a new one. If they do not wish to use this service, they can tap "No thanks."
  10. Finalizing Setup: Once all the initial settings are configured, the phone will indicate that it is ready for use. Users should tap "Finish" to complete the setup.
  11. On-screen Hints: The screen may display some handy hints to help users get started with the device.

Adding Contacts to Your Smartphone

To add new contacts to the Samsung S7390:

  1. Unlock Phone: Swipe the screen to the left or right to unlock the phone.
  2. Access Contacts: Tap the contacts icon located in the bottom left of the screen.
  3. Add New Contact: Tap the "+" symbol in the top right corner of the screen to add a new contact.
  4. Enter Details: Fill in all the contact details, including the phone number. Remember to include the international dialing code (e.g., "+1" for the US) and country code before saving.
  5. Save Contact: Once all details are entered, tap "Save" in the top right corner of the screen.
  6. Save Location: Choose whether to save the contact to the phone or the SIM card, then tap "Add new account."

Making a Call On Your Smartphone

To make a phone call using the Samsung S7390:

  1. Unlock Phone: Swipe the screen to the left or right to unlock the phone.
  2. Access Phone App: Tap the telephone icon in the bottom left of the screen.
  3. Dial Number: The number pad will appear. Input the phone number you wish to dial and then tap the telephone icon to make the call.
  4. Call from Contacts (Alternative): If the contact is already saved, tap the contacts icon from the home screen. Then, type the name of the person you wish to call into the search box at the top of the screen. Tap on the name of the person from the search results.
  5. Initiate Call: Once the contact's details are displayed, tap the telephone icon to make the call.

Sending A Text On Your Smartphone

To send a text message using the Samsung S7390:

  1. Unlock Phone: Swipe the screen to the left or right to unlock the phone.
  2. Access Messaging App: Tap the messaging icon in the bottom center of the screen.
  3. New Message: Tap the new message icon in the top right-hand corner of the screen.
  4. Enter Recipient and Message: Type in the phone number or the name of the person you are sending the message to. For phone numbers, ensure to enter the full international format (e.g., +12127855000 for Mobal). Then, type your message in the message body.
  5. Send Message: When the message is complete, tap the send message icon to send it.

Charging Your New Smartphone

To charge the Samsung S7390:

  1. Locate Charger Port: The charging port is located at the bottom edge of the phone.
  2. Connect Charger: Connect the charger to a wall outlet, then connect the other end of the charger to the charging port at the bottom of your phone.
  3. Check Charging Status: To confirm the phone is charging, look for a charging symbol (typically a battery icon with a lightning bolt) in the top right-hand corner of the screen.
  4. Initial Charge: For the first charge, it is advised to charge the phone until the battery icon is completely full. This process may take several hours.

Maintenance Features

While the guide does not explicitly detail maintenance features, it implies certain aspects through its instructions:

  • Software Updates: The EULA section mentions "Software Update failure" and sending "error log data" to Samsung, suggesting that the device supports software updates to maintain functionality and security.
  • Battery Management: The charging instructions emphasize the importance of a full initial charge, which is a good practice for battery health. The presence of a battery icon indicates the ability to monitor battery levels.
  • Connectivity Management: The setup process for Wi-Fi and the mention of network-provided time highlight the device's ability to manage various network connections, which is crucial for maintaining communication and data services.
  • Contact Management: The ability to add, save, and search for contacts ensures that personal information is organized and accessible.
  • Accessibility Settings: The option to change accessibility settings during initial setup indicates that the device offers features to accommodate users with different needs, enhancing usability and maintenance of personal preferences.

This guide provides a comprehensive overview of how to get started with and effectively use the Samsung S7390 smartphone, covering essential operations from initial setup to daily communication tasks.

Samsung S7390 Specifications

General IconGeneral
StatusDiscontinued
SIMMini-SIM
OSAndroid 4.1.2 (Jelly Bean)
GPUBroadcom VideoCore IV
Internal4 GB, 512 MB RAM
Primary3.15 MP
SecondaryNo
Alert typesVibration; MP3, WAV ringtones
LoudspeakerYes
3.5mm jackYes
WLANWi-Fi 802.11 b/g/n, Wi-Fi Direct, hotspot
GPSYes, with A-GPS
RadioFM radio, RDS
USBmicroUSB 2.0
MessagingSMS(threaded view), MMS, Email, Push Email, IM
BrowserHTML
JavaYes, via Java MIDP emulator
ColorsWhite, Black
TypeTFT capacitive touchscreen
Resolution480 x 800 pixels
Card slotmicroSD
Bluetoothv4.0, A2DP
SensorsAccelerometer, proximity
BatteryLi-Ion 1500 mAh, removable

Related product manuals