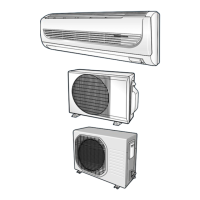
Fixing the Outdoor Unit in Position
C
OMPLETING THE
I
NSTALLATION
E-14
Checking and Testing Operations
The outdoor unit must be installed on a rigid and stable base to
avoid any increase in the noise level and vibration, particularly if the
outdoor unit is to be installed close to a neighbour.
If it is to be installed in a location exposed to strong winds or at a height,
the unit must be fixed to an appropriate support (wall or ground).
1 Position the outdoor unit so that the air flow is directed towards the
outside, as indicated by the arrows on the top of the unit.
2 Attach the outdoor unit to the appropriate support using anchor bolts.
3 If the outdoor unit is exposed to strong winds, install shield plates around
the outdoor unit, so that the fan can operate correctly.
❇ Certainly fix up its rubber leg, in order to prevent its vibration and noise.
“X” mm
Rubber leg
“Y” mm
To complete the installation, perform the following checks and tests to
ensure that the air conditioner is operating correctly.
1 Review all the following elements in the installation:
◆ Installation site strength
◆ Piping connection tightness to detect any gas leakages
◆ Connection wiring
◆ Heat-resistant insulation of the piping
◆ Drainage
◆ Earthing wire connection
◆ Correct operations (follow the steps below)
2 Press the / button.
Result
: ◆ The indicator lights on the indoor unit flash at half-second
intervals.
◆ While the indoor unit opens, the indoor unit fan runs to start.
3 Press the / button.
Result
: The outdoor unit operates in cooling or heating mode as
following the room temperature.
4 Air flow direction Press the / button and check that the
air flow blades work properly.
Model
AQ✴✴P8✴✴
AQ✴✴S8✴✴
SH✴✴✴S8
AQ✴✴SG✴✴
AQ✴✴PG✴✴
SH✴✴✴SG
SH✴✴✴PG(A)
AQ✴✴SB✴✴
AQ✴✴PB✴✴
X
457
489
506
Y
254
300
252
 Loading...