CCT19
4. Carefully cut the nylon strapping bounding the branches upright if applicable.
CAUTION:
Be extremely careful not to cut any of the exposed light set wires.
5. Now gently guide the branches downward into place.
6. Beneath the canopy of section “A”, is the on/off push button foot pedal with cord and plug. The 14’
tree is pre-attached at section B. (Fig 6a for 5’ tree, Fig 6b for 6.5‘, 7.5’ and 9‘ trees).
Remove the twist-tie binding the cord together and insert the plug into a working electrical outlet.
7. On/off push button foot pedal operation:
The on/off push button foot pedal is intended to provide basic manual on/off operation only; and
therefore cannot provide the remote control 116 function lighting capability.
10. Once section “B” is fully inserted downward into section “A”; both section “A” and section “B” will now be
lit.
11. Again, carefully cut the nylon strapping bounding the branches upright; being extremely careful not to
cut any of the exposed light set wires.
12. Now gently guide the branches of section “B” downward into place.
13. Depending on the height of the tree you have purchased, you will continue to build your tree upwards,
section by section, following the above steps until the tree is completely assembled. Each section of the
tree is labeled in alphabetical order beginning from the bottom to the top.
ASSEMBLY OF THE TREE STAND
1. Remove the tree stand from the plastic bag, loosen the eye bolt and open the tree stand to form an “X”.
2. Align the holes for the insertion of the remaining (2) eyebolts.
3. Insert each eyebolt and begin threading in a clockwise direction for a couple of rotations only; leaving
e
nough room for the tree’s pole from section “A” to be inserted into the assembled stand (Fig 2).
4. Place the tree stand in its desired location; as once the tree is fully assembled, it may be too difficult
REMOTE CONTROL OPERATION
The LED pre-lit and pre-shaped Christmas tree’s 116 lighting function capability is controlled solely by the
use of the remote control provided (Fig 7).
A CR2025 Battery is included in remote; remove the insulator sheet before operating the remote.
NOTE:
By reducing the distance from your tree; you may achieve better remote control reception.
To change a color within a selected function:
Press the button of your desired function. Continuously press it to scroll through the 14 color
choices. (Example: Press the Steady button once for Steady Warm White, press again for Steady Cool
white and so on). If you scroll pass your color choice, continue to press the button to cycle forward to
your desired choice. You cannot scroll backwards.
to move and relocate.
ASSEMBLY OF THE TREE
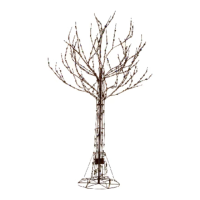
1. Locate the bottom s
ection of the tree which is identified by a label on the outer branches marked
“A” (Fig 5).
2. Remove the protective plastic cap from the end of the pole, and place that end into the tree stand. Be
sure that the pointed end of the pole extends to the bottom of the stand.
3. Now tighten the eyebolts evenly on the tree stand; being careful not to over-tighten (Fig 3).
PRE-LIT & PRE-SHAPED CHRISTMAS TREE
Thank you for your purchase of this pre-lit & pre-shaped Christmas tree.
With proper use and care, this tree will provide years of trouble-free enjoyment.
Please follow the instructions below in order to properly assemble and store your tree.
In the event that you should encounter any issues during the assembly of your tree; please refer to the
“Troubleshooting” portion of this manual or call our toll free customer service number at
1-888-831-6656, and a trained representative will assist you.
ASSEMBLY INSTRUCTIONS
(We recommend wearing proper clothing in order to prevent scratches that may occur during the
assembly process.)
Carefully unpack the contents from the tree’s carton (Fig 1).
Your tree should include the following components:
Contained in the poly-bag are LED replacement bulbs and a remote control which operates your tree’s
116 function lighting capability.
A folding metal tree stand with (3) eyebolts.
A
n on/off push button foot pedal with cord and plug (Fig 6); which is pre-attached to your tree (Fig 5).
The 5’ and 6.5’ trees will have (2) tree sections. (“A” and “B”).
The 7.5’ tree will have (3) tree sections; (“A”, “B” and “C”; as shown in Fig 5).
The 9’ tree will have (5) tree sections “A”, “B”, “C”, ”D” and “E”.
EZ-POWER™ TECHNOLOGY
NOTE: Your tree has been designed with EZ-Power™ technology; allowing for each of the tree’s
sections to light up automatically, upon a firm insertion of each lettered section (Fig 5).
8. Locate the next section of the tree which is identified by a label on the outer branches marked “B” (Fig
5).
9. Remove the protective plastic cap from the end of the pole on section “B”; insert that end onto the top
of the pole of section “A” (Fig 4).
Fig 2
Fig 3
Fig 4
Fig 1
Fig 6a
Fig 6b
A
B
C
Foot Pedal
Fig 5
13”