EasyManua.ls Logo

Santa's best LED15 - User Manual

Santa's best LED15
4 pages
Print Icon
To Next Page IconTo Next Page
Loading...
LED15
ASSEMBLY INSTRUCTIONS:
No tools required (Hammer optional).
Retain carton for storage.
1. Carefully remove all parts from the carton. Your tr
ee should
include the f
ollowing (Fig 1):
1 collapsible tree base
1 trunk with control box and plug
1 top branch tree section
1 Bag containing:
1 remote control
9 Volt battery
Replacement RGB/LED bulbs
Extra branch safety tips
4 Lawn stakes
ASSEMBLY OF TREE STAND:
1. Open the two sides of the hinged collapsible tree base and
plac
e on level ground in your desired display location (Fig 2).
Fig 2
2. Locate the 4 swing arm hooks that are clipped midway on the
tr
ee trunk (clipped for storage purposes only) (Fig. 4a).
3. Unclip the 4 swing arm hooks and lower all 4 swing arm hooks
t
o the tree's base (Fig. 4b).
4. Insert the hooks from the 4 swing arms into the ey
elets
located on the trees base (Fig. 5).
ASSEMBLY OF THE TREE:
1. Insert the trees trunk into the trees
base (F
ig 3).
Fig 3
Fig 5
Fig 4a Fig 4b
5. Lift the "top branch tree
sec
tion" and insert int
o the
t
op of the tree's trunk.
A
lign and p
osition the base of
the "t
op branch tree sec
tion"
into the "V" opening on the
t
op of the tree's trunk (Fig. 6).
6. Insert the 2 swing arm ho
oks
(lo
cated at the bott
om of the
"T
op branch tree sec
tion")
into the eyelets located on
t
op portion of tree's tr
unk
(F
ig. 7).
7. Make the only male to f
emale
c
oaxial connection needed;
the "top branch tree section"
t
o the trees trunk. (Mat
ching
lab
el #1 to label # 1) (Fig. 7a)
Fig 6
Fig 7
Please follow the instructions below in order to effectively
assemble and disassemble your outdoor tree.
In the event that you should encounter any issues during the assembly
of your tree; please refer to the Troubleshooting portion of this manual
or call our toll free customer service number at 1-888-831-6656, and a
trained representative will assist you.
Customer service hours of operation:
Monday-Friday: 8:00am – 4:30pm CST.
Holiday weekends:
Last weekend in November: 8:00am – 4:30pm CST.
First weekend in December: 8:00am – 4:30pm CST.
Visit us on the web at www.santasbest.com
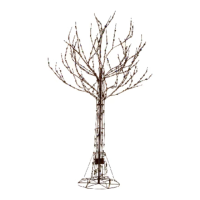
OUTDOOR BARE BRANCH TREE
SCULPTURE
Fig 7a
1
1
1
1
1
1
Fig 10
Fig 8
3. Proceed to now shape the
tree. The main branches, along
with the branch tips, are
fle
xible, and should be spr
ead
op
en to mirror that of a r
eal
bar
e branched tree (Fig 8).
1. Remove the velcro straps, binding the branches of the t
op
br
anch tree section together; being careful that the poten
tial
spr
ing release of the branches does not cause injury.
2. Begin to gently guide the hinged branches downward t
o a
desir
ed position, being careful not to cause injury fr
om the
br
anch tips.
NO
TE: The top 3 branches are not hinged; they must b
e guided
in
to a desired position.
SHAPING OF THE TREE
Fig 1
Collapsible
tree base
Replacement RGB/LED bulbs,
branch safety tips and
9 volt battery
Top branch tree section
Lawn stakes
Trunk with control box
and plug
remote control
4. To illuminate fully insert the plug into a working GFCI outlet or
an out
door rated extension cord.
5. Push or gently hammer support stakes into the ground
secur
ing the tree base. Angle each stake 45 degrees towar
d
the c
enter of the tree (Fig 9).
Fig 9
You have completed the
assembly of the tree (Fig 10).
REMOTE CONTROL OPERATION
Included is the remote control that operates the color and
function of your outdoor tree.
Before operation; a standard 9 volt battery (6F22, 6LR61 or
23F6-220) must be installed into the remote control; by simply
removing the slide plate located on the back of the remote control.
The tree's 56 lighting function capability is controlled solely by
the use of the remote control provided.
By simply depressing the color, function or ON/OFF button on
the remote control; indicator lights will keep you on track as to
the exact color and function that you are currently on.
Select your favorite color and your favorite function!
NOTE: When the tree is turned OFF by the use of the remote
control; and is then turned back ON by the use of the remote
control; the tree will resume the memory of the last color and
function that was selected on the remote control.
TIMER FEATURE
Activating the timer mode:
Simply press the "timer" button on the remote
control once (every other light on your tree sculpture
will then flash RED 3 times) your tree's 6-hour timer
has now been activated.
Deactivating the timer
mode:
Depress the "timer" button
once again (every other light
on your tree sculpture will
then flash GREEN 3 times)
your tree's timer feature has
now been deactivated.
PLEASE NOTE:
The moment that the "timer"
button is pressed (activated),
your tree sculpture will
remain ON for exactly 6
hours. The tree will then
automatically turn back ON
exactly 18 hours later.
Made in China
Printed in China
This is not a toy, for decorative use only.
Distributed by Santas Best®
Riverwoods, IL 60015 USA
www.santasbest.com
NOTE: Check the item for any loose, unlit or damaged
bulbs. Although it will still operate, the bulbs must be
replaced promptly to ensure the performance and life
expectancy of the item.
NOTE: Replacement bulbs are provided. This is a specialty
bulb. Do not replace with a standard LED or Incandescent
bulb. Should you need additional bulbs please call our
customer service department at 1-888-831-6656.
To determine which color replacement bulb is needed;
select Steady function and Christmas color on your
remote control.
1. If the tree does not illuminate press the on/off button on your
remote control. If failure to light persists the battery may need to
be replaced. Insert a standard 9 volt type battery (6F22, 6LR61 or
23F6-220); aligning the appropriate ( +/- ) markings accordingly.
NOTE: By changing the remote angle slightly, or r
educing
y
our distance from the sculpture, you may achieve bett
er
r
emote control reception.
I
f the tree fails to light due to a damaged or defectiv
e
r
emote control; a new remote control can be pro
vided
through our customer service center.
2. A delayed response, while switching between color selections
on the remote control, is in no way a malfunction of the light set,
but is a normal operating response due to the complexity of the
technology.
A
ll bulbs must independently receive their signal to alter to the
correct color selected. Some bulbs receive their signals quicker
than others, hence a delayed receiver response may occur.
Again, this is a normal response based on the technology.
3. If a branch light set is unplugged from the trunk and then
plugged in and branches don't synchronize, unplug the tree at
the GFCI outlet and plug in again and all functions/colors should
be the same on the whole tree.
TROUBLESHOOTING
11 colors Options - White, Red, Green, Blue,
Yellow, Purple, Amber, Spring (Blue, Yellow,
Purple), Patriotic (Red, Pure White, Blue), Fall
(Green, Purple, Amber), Christmas (Red, Green,
Blue, Yellow, Purple, Amber).
5 functions per color - Steady, Glisten, Firefly,
Twinkling, Flash.
+ Color Morphing (7 colors – White, Red, Green,
Blue, Yellow, Purple, Amber).
56 TOTAL LIGHT SETTINGS
1. Leave assembled if storage room permits or disassemble,
placing all components in the original carton.
2. Store in cool, dry location away from sunlight.
NOTE: Store your remote control in a SAFE & DRY loca
tion
and r
emove the battery from remote control before storage.
STORAGE INSTRUCTIONS
18”
15”
Question and Answer IconNeed help?

Do you have a question about the Santa's best LED15 and is the answer not in the manual?

Summary

Assembly Instructions

Part Inventory and Preparation

Carefully remove all parts from the carton and identify included components.

Tree Stand Assembly

Open the hinged collapsible tree base and place on level ground.

Tree Trunk and Base Connection

Insert the tree's trunk into the base and connect swing arms to eyelets.

Connecting Tree Sections

Top Branch Section Installation

Lift and insert the top branch tree section into the trunk.

Electrical Connection

Make the male to female coaxial connection for the top branch section.

Shaping and Securing the Tree

Branch Shaping

Remove velcro straps and gently guide branches to desired positions.

Ground Stakes

Install support stakes into the ground at a 45-degree angle.

Remote Control Operation

Remote Control Setup

Install a 9-volt battery into the remote control.

Function Control

Use the remote to control color, function, and on/off for tree lights.

Timer Feature

Activating Timer Mode

Press the 'timer' button; lights flash red 3 times.

Deactivating Timer Mode

Press the 'timer' button again; lights flash green 3 times.

Troubleshooting

Lighting Issues

Check bulbs, battery, and remote reception for lighting problems.

Delayed Response

Delayed color switching is normal due to technology complexity.

Synchronization Issues

Unplug and replug the tree at the GFCI outlet for synchronization.

Storage Instructions

Storage Options

Leave assembled or disassemble and place components in original carton.

Storage Location

Store in a cool, dry location away from sunlight, remove remote battery.

Overview

This document describes the Outdoor Bare Branch Tree Sculpture, an outdoor decorative tree with extensive lighting features and remote control operation.

Function Description:

The Outdoor Bare Branch Tree Sculpture is designed as an outdoor decorative item, featuring a bare branch aesthetic and a sophisticated lighting system. It offers a wide range of color and function options, controllable via a remote. The tree is intended for display in various outdoor settings, with a collapsible design for ease of assembly, disassembly, and storage. Its primary function is to provide ambient and festive lighting, with specific settings for different holidays and moods.

Important Technical Specifications:

  • Lighting Options: 56 total light settings.
    • Colors: 11 distinct color options: White, Red, Green, Blue, Yellow, Purple, Amber, Spring (Blue, Yellow, Purple), Patriotic (Red, Pure White, Blue), Fall (Green, Purple, Amber), Christmas (Red, Green, Blue, Yellow, Purple, Amber).
    • Functions per Color: 5 functions: Steady, Glisten, Firefly, Twinkling, Flash.
    • Color Morphing: An additional feature offering 7 colors (White, Red, Green, Blue, Yellow, Purple, Amber) that transition.
  • Bulb Type: Specialty RGB/LED bulbs. Standard LED or Incandescent bulbs are not compatible. Replacement bulbs are provided, and additional bulbs can be ordered from customer service.
  • Power Source: The tree requires a working GFCI outlet or an outdoor-rated extension cord for illumination.
  • Remote Control: Operates on a standard 9-volt battery (6F22, 6LR61, or 23F6-220). The remote controls all 56 lighting functions and colors.
  • Timer Feature: A 6-hour timer mode can be activated via the remote. Once activated, the tree remains ON for 6 hours and then automatically turns ON again 18 hours later.

Usage Features:

  • Assembly: No tools are required for assembly, though a hammer may be optional for lawn stakes. The tree includes a collapsible tree base, a trunk with a control box and plug, a top branch tree section, a remote control, a 9-volt battery, replacement RGB/LED bulbs, extra branch safety tips, and 4 lawn stakes.
    1. Tree Stand Assembly: The hinged collapsible tree base is opened and placed on level ground.
    2. Tree Assembly: The tree's trunk is inserted into the base. Four swing arm hooks, initially clipped midway on the trunk for storage, are unclipped and lowered to the tree's base. These hooks are then inserted into eyelets on the tree's base.
    3. Top Section Assembly: The "top branch tree section" is lifted and inserted into the top of the tree's trunk, aligning its base with the "V" opening. Two swing arm hooks from the bottom of the "top branch tree section" are inserted into eyelets on the top portion of the tree's trunk.
    4. Electrical Connection: A male-to-female coaxial connection is made between the "top branch tree section" and the tree's trunk, matching label #1 to label #1.
    5. Shaping: Velcro straps binding the branches are removed. Hinged branches are gently guided downward to a desired position, taking care not to cause injury from branch tips. The top 3 branches are not hinged and must be guided into position. Main branches and branch tips are flexible and should be spread open to mimic a real bare-branched tree.
    6. Power Connection: The plug is inserted into a working GFCI outlet or an outdoor-rated extension cord.
    7. Securing: Four lawn stakes are pushed or gently hammered into the ground at a 45-degree angle towards the center of the tree to secure the base.
  • Remote Control Operation:
    • A 9-volt battery must be installed in the remote by removing the slide plate on the back.
    • The remote's buttons (color, function, ON/OFF) control the tree's lighting. Indicator lights on the remote show the current color and function.
    • The tree retains the memory of the last selected color and function when turned OFF and ON via the remote.
    • For better reception, adjusting the remote angle or distance from the sculpture may be necessary.
  • Timer Feature:
    • Activation: Press the "timer" button once. All lights on the sculpture will flash RED 3 times to confirm activation.
    • Deactivation: Press the "timer" button once again. All lights will flash GREEN 3 times to confirm deactivation.

Maintenance Features:

  • Bulb Replacement: Replacement RGB/LED bulbs are provided. It is crucial to replace any loose, unlit, or damaged bulbs promptly to maintain performance and life expectancy. Only specialty bulbs should be used; standard LED or incandescent bulbs are not compatible.
  • Troubleshooting:
    • No Illumination: Check the ON/OFF button on the remote. If the issue persists, replace the 9-volt battery in the remote, ensuring correct polarity.
    • Delayed Response: A slight delay when switching between colors is normal due to the complexity of the technology, as bulbs independently receive signals.
    • Synchronization Issues: If branches don't synchronize after being unplugged and re-plugged, unplug the tree from the GFCI outlet and plug it back in.
    • Damaged Remote: If the remote control is damaged or defective, a new one can be obtained through customer service.
  • Storage:
    • The tree can be stored assembled if space permits, or disassembled and placed back in its original carton.
    • Store in a cool, dry location away from sunlight.
    • The remote control should be stored in a safe, dry location, and its battery should be removed before storage.
  • Customer Service: For any issues or to order additional bulbs, contact customer service at 1-888-831-6656 during operational hours (Monday-Friday: 8:00 am – 4:30 pm CST; Holiday weekends: Last weekend in November and First weekend in December: 8:00 am – 4:30 pm CST). Further information is available at www.santasbest.com.

Important Notes:

  • This product is not a toy and is intended for decorative use only.
  • Retain the carton for storage.

Santa's best LED15 Specifications

General IconGeneral
BrandSanta's best
ModelLED15
CategoryArtificial Pine Trees
LanguageEnglish

Related product manuals