This document is an instruction manual for a Sanyo Split System Heat Pump, covering models KHS0921, KHS0922, KHS1222, KHS1822, and KHS2422. It provides comprehensive guidance on the operation, maintenance, and troubleshooting of the air conditioning unit.
Function Description
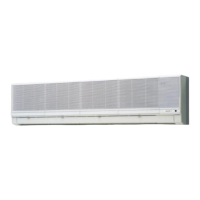
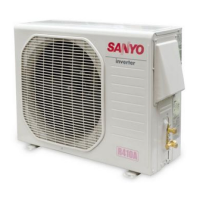
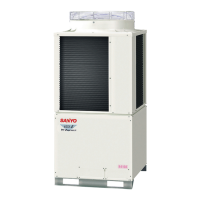
The Sanyo Split System Heat Pump is designed to provide comfortable room conditions through both cooling and heating operations. It consists of an indoor unit and an outdoor unit, connected by copper tubes through which refrigerant gas flows. The indoor unit draws air from the room, passes it through air filters to remove dust, conditions it, and then blows it back into the room. The outdoor unit houses the compressor, fan motor, heat exchanger coil, and other electrical components essential for the heat pump's operation. Moisture condensed from the room air is drained off through a dedicated hose.
The air conditioner is primarily controlled by a wireless remote control unit, which allows users to manage various settings such as power ON/OFF, operation mode selection (Cool, Heat, Fan, Auto), temperature adjustment, fan speed, timer settings, and airflow direction (air sweeping). The indoor unit also features an operation selector for basic control in case the remote is unavailable or malfunctioning.
Usage Features
Remote Control Operation:
The remote control unit is the primary interface for operating the heat pump. It displays the current time, room temperature, and set temperature. When buttons are pressed, the unit's transmitter head flashes to send signals to the air conditioner's receiver.
- ON/OFF: A dedicated button turns the air conditioner on and off.
- Mode Selection: A selector switch allows users to choose between FAN (circulation only), COOL (cooling the room), HEAT (warming the room), and AUTO (automatic mode based on thermostat and room temperature).
- Temperature Setting: "COOLER" and "WARMER" buttons adjust the set temperature in 2°F increments, typically within a range of 64°F to 84°F. These buttons can be used even with the remote's cover closed.
- Fan Speed: A selector switch allows users to choose between AUTO, HIGH, MED (Medium), and LOW fan speeds. In AUTO mode, a microcomputer automatically adjusts the fan speed based on the difference between room and set temperatures.
- Timer Setting: The remote allows setting the present time, OFF time, ON time, and daily ON/OFF operations. The "PROGRAM" button is used to select the desired timer mode, and "HH" and "MM" buttons adjust hours and minutes.
- Airflow Direction (Sweep): The "SWEEP" button activates or deactivates the automatic up and down movement of the flap in the air outlet, distributing air over a set range. For models KHS0921 and KHS0922, this feature is not available, and the flap must be manually adjusted.
- Night Setback Mode: This energy-saving feature is available in COOL mode. When activated, the air conditioner cools the room to the set temperature, then pauses. After about 30 minutes, the set temperature is automatically raised by 2°F. This process repeats, allowing for gentle cooling and energy savings without sacrificing comfort. In heating mode, the set temperature is lowered by 4°F after 30 minutes.
Operation without Remote Control:
In situations where the remote control is lost or malfunctioning, the indoor unit's operation selector can be used for basic control. Switching the selector to the ON position turns the unit on, and to the OFF position turns it off. When operating this way, the set temperature and fan speed are automatically set to the latest selections made before stopping.
Installation Location:
The manual emphasizes proper installation by a qualified technician, ensuring the electric supply voltage matches the unit's nameplate. It warns against installing the unit in areas with fumes, flammable gases, high humidity (like a greenhouse), or near excessively heat-generating objects. For the outdoor unit, avoiding locations where salty seawater or sulphurous air can cause heavy corrosion is recommended.
Electrical Requirements:
All wiring must conform to local electrical codes and be performed by a qualified electrician. Each unit requires proper grounding. It is crucial to turn on the power mains at least five hours before initial operation and keep them on unless the appliance will not be used for an extended period.
Safety Instructions:
The manual highlights several safety precautions, including:
- Never using or storing flammable vapors or liquids near the unit.
- Ensuring adequate ventilation when using gas or oil heating appliances in the same room, as the air conditioner does not intake fresh air.
- Using the operation ON/OFF button on the remote or unit, not the power mains switch, to turn the unit on and off.
- Avoiding sticking objects into the air outlet due to the high-speed fan.
- Preventing children from playing with the unit.
- Avoiding excessive cooling or heating when babies or invalids are present.
- Not setting selector switches between indicated positions to prevent malfunctions.
- If the outdoor temperature is too cool (around 59°F for cooling or around 10°F for heating), the unit may suspend operation, and an auxiliary heating appliance might be recommended in extreme cold to prevent room freezing.
Maintenance Features
Care and Cleaning:
Regular maintenance is crucial for the air conditioner's performance and longevity.
- Safety First: Always turn off the air conditioner and disconnect power before cleaning to prevent electric shock.
- Indoor Unit Casing and Grille: Clean with a vacuum cleaner brush or a clean, soft cloth. For stains, use a cloth moistened with a mild liquid detergent. Exercise caution not to force the vanes out of place. Avoid using solvents, harsh chemicals, or very hot water on plastic parts.
- Metal Edges and Fins: Be careful when cleaning these parts as they can be sharp and cause injury.
- Internal Coil and Outdoor Unit Components: These should be cleaned annually by a dealer or service center.
- Air Filter: The air filter, located behind the air intake grille, should be checked and cleaned every two weeks.
- Removal: Move the flap on the air outlet grille to its lowest position, then hold the air filter by the tab at the bottom and pull it downward.
- Cleaning: Use a vacuum cleaner to remove light dust. For sticky dust, wash the filter in lukewarm, soapy water, rinse it in clean water, and dry it.
- Replacement: Ensure the "FRONT" mark on the filter faces you when replacing it.
Troubleshooting:
The manual provides a troubleshooting guide for common issues:
- Air conditioner not running: Check for power failure, tripped leakage breaker, low line voltage, OFF operation button, or run-down remote control batteries.
- Compressor stops soon: Check for obstructions in front of the condenser coil.
- Poor cooling/heating performance: Check for dirty/clogged air filter, heat sources/many people in the room, open doors/windows, obstacles near air intake/discharge port, incorrect thermostat setting, or extremely low outdoor temperature (for heating).
Tips for Energy Saving:
- Do not block the air intake and outlet of the unit.
- Use sunshades, blinds, or curtains to prevent direct sunlight from warming the room, which increases cooling load.
- Keep the air filter clean to maintain optimal performance.
- Keep windows, doors, and other openings closed to prevent conditioned air from escaping.