Do you have a question about the Saris Cycle-On Pro and is the answer not in the manual?
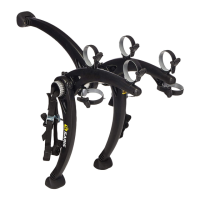
Choose mounting holes for front wheel trays, noting 20" tire limitations.
Assemble front wheel trays by inserting bolts, trays, washers, and nuts.
Insert hitch pin and lock into place, ensuring cable is not threaded through.
Attach the rack to the tilt bracket in the specified stepped order and tighten.
Operate the upright arm by pushing the button and rotating it outwards.
Open the rear wheel clamp by depressing the lever and rotating.
Place bicycle into trays, ensuring front wheel is seated and arm is secured.
User must ensure adequate clearance between load and ground (12-15" recommended).
Position rear wheel and align clamp to secure it to the tray.
Use additional straps for odd rims/high spoke counts; load 20" wheels closest.
Slide upright arm into base for storage when not in use.
Remove bicycles by reversing the loading instructions (steps 3-5).
Remove the clevis pin by pulling the cotter pin and then the clevis pin.
Rotate rack up, insert pin into lower hole, and replace cotter pin.
Details on minimum vehicle tongue weight and maximum load for different models.
Specifies weight limits for add-on kits, with a 35lb per bike maximum.
Read instructions, ensure vehicle condition, note 20" wheel limitations, avoid car washes.
User responsibility for correct attachment, use, and maintenance; liability disclaimer.
Lifetime warranty against defects in material and workmanship.
| Capacity | 2 bikes |
|---|---|
| Material | Steel |
| Type | Hitch Rack |
| Mounting | Hitch |
| Hitch Compatibility | 2-inch hitch receiver |
| Tilt Feature | Yes, allows access to rear of vehicle |
| Folding Arms | Yes, folds down when not in use |