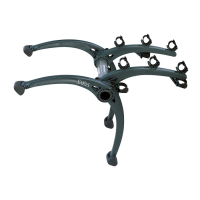
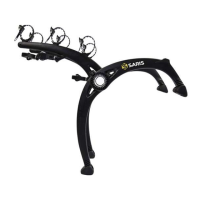
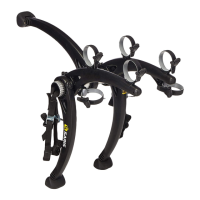
Rear Leg
Arm
Bumper
Leg
Figure 3a Figure 3b Figure 3c
Model #801
OWNER'S MANUAL
S-hook Strap
Arms with Stabilizers
and Hold-downs
Bumper Legs: Rest on Bumper
Lower Hook
Side Hook
Strap
Rear
Leg
Hold-downs
CAUTION Bones is a bumper-supported bike rack.
Be sure to check Saris Fit Guide before
installing rack on vehicle.
NOTE: Before installing carrier, clean all
surfaces of vehicle which may come in contact
with the carrier or its straps. Make sure foot pads
are free of any debris that could scratch vehicle’s
finish.
Figure 2
• To adjust rear legs, loosen knobs, remove from end of cylinder and
reposition (A).
• To adjust arms, loosen knobs, slide to center of aluminum cylinder and
rotate (B).NOTE: It is not necessary to move bumper legs, as the
bones rack is pre-assembled to fit a majority of vehicles and bicycles.
However, it offers the flexibility of a wider arm or base spread if necessary.
To do so, remove rear legs, bumper legs, and arms and reposition
symmetrically as desired. For questions, see a local Saris dealer or call
1-800-783-7257 (C).
ADJUST CARRIER TO VEHICLE:
1
As shown in figure 3c, it is important that the tip of the arms (3rd position)
are at the highest point , as shown in Figure 3c.
•Following the illustration that most resembles the rear of your
vehicle, adjust arm and rear leg to position carrier.
•Retighten knobs. Do not overtighten knobs.
NOTE: To keep legs/feet firmly against glass of square back vehicles, lean carrier
slightly farther away from vehicle.
REAR
LEG
REAR
LEG
ARMS
(A)
(A)
(B)
(C)
(C)
BUMPER LEGS
•Attach S-hook straps to top hinge line of vehicle as shown in
Fig's. 4a & 5. Always place strap between car surface and
hook. NEVER bring strap over the top of hook (Fig. 4b).
S-hook special application:
If top hinge line has a rubber seal or indicated in fit guide, use
large bend in S-hook. To do so: remove strap from buckle, thread
end of strap into either slot in the hook and pull through (Fig. 4c).
Rethread strap as shown in Fig. 4d.
NOTE: S-hook attachment must be to a supported hinge line
- NEVER hook to glass, unsupported plastic, or roof rack.
•Attach lower hook straps to bottom edge of trunk at position
C2; and side hook straps to the side at position C1 or above
bend in trunk at position C3 (Fig. 5). NOTE: For square back
vehicles such as mini-vans, make sure the side straps are in-
line with aluminum cylinder.
ATTACH STRAPS:
Figure 5
LOWER
STRAP
HOOK
SIDE STRAP HOOK
2
Figure 4a
Figure 4b
Figure 4d
Figure 4c
Figure 6
Lower strap hook special application:
ONLY IF SPECIFIED IN CURRENT FIT CHART
Some vehicles require placing the lower strap hook
completely inside the trunk. To do so, loosen lower
strap, place hook inside trunk, close trunk, pull strap
until hook braces against trunk wall, and tighten as
usual (Fig. 6).
•Tighten all straps evenly, removing any slack. When
straps are taut, shake carrier to check for any
movement. Retighten if necessary.
1
2
3
Locking Knobs