EasyManua.ls Logo

Saris CycleOps FLUID - User Manual

Saris CycleOps FLUID
7 pages
Print Icon
To Next Page IconTo Next Page
Loading...
a
b
If you do not find all of these items in the box, please
contact customer service at 800.783.7257.
Si en la caja no encuentra todos estos elementos,
póngase en contacto con el servicio de atención al
cliente llamando al 800-783-7257.
Indien u niet alle onderdelen vindt in deze verpakking,
neem dan contact op met de klantendienst op het
nummer 800-783-7257.
Se non trovate tutti questi elementi nella scatola, si
prega di contattare il servizio clienti al 800.783.7257.
Wenn Sie nicht finden, alle diese Elemente in der Box,
wenden Sie sich an den Kundendienst unter
800.783.7257.
Als u niet al deze items te vinden in de doos, neem
dan contact op met de klantenservice op
800.783.7257.
PARTS LIST | Listado de piezas | Onderdelenlijst
c
d
e
f
g
OWNER’S MANUAL FOR
THE FLUID & MAG.
RESISTANCE UNITS
UNIDAD DE RESISTENCIAS
WEERSTANDSUNITS
UNITA 'DI RESISTENZA
Widerstandseinheiten
weerstandseenheden
FLUID
1021
MAG
1020
1022
+
Question and Answer IconNeed help?

Do you have a question about the Saris CycleOps FLUID and is the answer not in the manual?

Overview

This document serves as the owner's manual for the CycleOps Fluid & Mag bicycle trainers, manufactured by Saris. It provides detailed instructions for setup, usage, and maintenance, along with important safety information and warranty details.

Function Description:

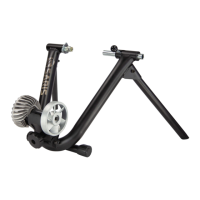
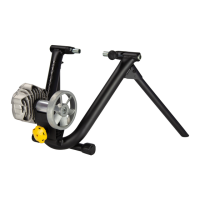
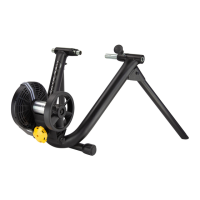
The CycleOps Fluid & Mag trainers are devices designed to convert a standard bicycle into a stationary exercise machine, allowing users to train indoors. By attaching the rear wheel of a bicycle to the trainer, users can simulate riding conditions and perform resistance-based workouts. The manual covers two primary types of resistance units: "MAG" (Magnetic) and "FLUID," each offering different resistance characteristics. The trainer's design includes a frame that supports the bicycle, a resistance unit that applies drag to the rear wheel, and a quick-release skewer system for secure attachment. The setup process involves extending the trainer legs for stability, installing the quick-release skewer, attaching the bicycle, and adjusting the resistance unit against the tire.

Important Technical Specifications:

The manual highlights two specific resistance unit models:

  • MAG: Models 1020 and 1022. These units likely utilize magnetic fields to generate resistance, offering a consistent and adjustable workout.
  • FLUID: Model 1021. This unit typically uses a fluid-filled chamber to create resistance, which often provides a more road-like feel where resistance increases with wheel speed.

The trainer frame is designed to be stable on various surfaces, with rotatable foot pads to level the unit on uneven ground. The quick-release skewer system is crucial for securely mounting the bicycle, and the manual specifies that the quick-release handle should be on the non-drive side (left side) of the bicycle, facing upward or backward. The resistance unit is attached to the trainer frame using an L-bolt and carriage bolt system, secured with a 1/2" wrench. Resistance adjustment is performed via a knob on the resistance unit, requiring an initial contact with the tire followed by an additional 2.5 complete rotations for proper engagement.

Usage Features:

The manual provides a step-by-step guide for setting up and using the trainer:

  1. Trainer Setup:
    • Extend Legs: Fully extend the trainer legs and place the unit on a flat surface. Adjust foot pads for stability on uneven ground.
    • Insert Bolt Action Tube: Insert the bolt action tube into the trainer, followed by the lollipop lever through the trainer slit and the center hole of the tube. Tighten the lollipop lever into the threads of the tube.
    • Insert L-Bolt: Insert the L-bolt into the trainer frame as shown in the illustration.
    • Insert Carriage Bolt: While holding the resistance unit in place, insert the carriage bolt into the square hole of the trainer frame, through the resistance unit, and out the other side.
    • Secure L-Bolt: Turn the resistance unit knob clockwise to engage the L-bolt with the resistance unit.
    • Secure Carriage Bolt: Place a nut onto the carriage bolt and secure it with a 1/2" wrench.
  2. Attaching Your Bike to the Trainer:
    • Tire Pressure: Ensure the bicycle tire is filled to the manufacturer's suggested pressure.
    • Skewer Replacement: Replace the bicycle's rear wheel skewer with the one provided with the trainer. Position the quick-release handle on the left (non-drive) side, facing upward or backward.
    • Position Bike: Lift the bicycle by the seat post and position the left side of the bike skewer into the left side of the trainer.
    • Secure Right Side: Pull down the quick-release handle to capture the right side of the bike skewer. The handle must be fully down in the locked position.
    • Adjust Non-Drive Side: Loosen the triangular lock ring on the non-drive side of the trainer. Thread the shaft in or out to accommodate the bike's width. Secure the lock ring and re-engage the quick-release handle.
  3. Tightening the Roller Against the Tire:
    • Initial Contact: Turn the knob on the resistance unit until it just touches the tire.
    • Final Adjustment: Turn the knob an additional 2.5 complete rotations to ensure the roller presses firmly into the tire.

Maintenance Features:

While the manual does not explicitly detail routine maintenance steps beyond proper setup, it implicitly emphasizes the importance of correct assembly and adjustment for the longevity and safe operation of the trainer. The use of the provided skewer and proper tightening of all bolts and the resistance knob are critical for preventing damage to both the trainer and the bicycle. The warranty information suggests that proper use and avoidance of misuse, abuse, neglect, accident, or unauthorized modification are essential for maintaining warranty coverage. Users are advised to contact customer service for any issues, implying that specific repair or replacement parts should be handled through official channels rather than user-performed complex maintenance.

Safety Information:

The manual includes extensive safety warnings in multiple languages, emphasizing the importance of consulting a physician before starting any exercise program. Key safety guidelines include:

  • Health Precautions: Stop exercising immediately if experiencing pain, discomfort, dizziness, or shortness of breath.
  • Proper Attire: Wear appropriate clothing and footwear.
  • Trainer Stability: Ensure the trainer is on a level, stable surface.
  • Clearance: Keep children and pets away from the trainer. Maintain a safe distance from moving parts.
  • Hand Placement: Keep hands away from the resistance unit and flywheel.
  • Bike Stability: Do not dismount the bike until both the pedals and the rear wheel are at a complete stop.
  • Resistance Adjustment: Do not attempt to adjust resistance while riding.
  • Skewer Use: Use only the provided skewer.
  • Trainer Modifications: Do not attempt to modify the trainer.

Warranty Information:

CycleOps offers a "Lifetime Manufacturer's Warranty" in North America, covering defects in material or workmanship. This warranty does not cover normal wear and tear, misuse, abuse, neglect, accident, or unauthorized modification. Incidental and consequential damages are not covered. The warranty applies only to the original owner and requires proof of purchase. For customers outside the United States, warranty service is handled through their dealer. In Europe, the warranty expires after 10 years due to legal reasons, but still covers replacement and labor costs, and does not limit statutory warranty rights. Warranty claims require proof of purchase.

Saris CycleOps FLUID Specifications

General IconGeneral
BrandSaris
ModelCycleOps FLUID
CategoryFitness Equipment
LanguageEnglish

Related product manuals