EasyManua.ls Logo

Satco Blink - User Manual

Satco Blink
2 pages
Print Icon
To Next Page IconTo Next Page
Loading...

 




 









DBUiw










Satco Products Inc.




Operation manual
13"LED Flush mount light
With Integrated Dimmable Driver










Safety recommendations
  
 


 
 
 
 


 
 
Specifcations:




Question and Answer IconNeed help?

Do you have a question about the Satco Blink and is the answer not in the manual?

Summary

Dimming Compatibility

Cleaning Instructions

Warranty Information

Safety Recommendations

Electrical Shock Hazard

Install according to codes by a qualified person. Disconnect power before servicing.

Manual Reading

Carefully read the whole operation manual before using the product.

Usage Location

Product is for interior use only, suitable for damp locations.

Water Protection

Protect the product against direct contact with water.

Assembly Integrity

Assemble with provided parts only to prevent damage or injury.

Accessory Usage

Assembly must follow using only delivered accessories.

Child Safety

The device is not a toy; keep out of reach of children.

Product Specifications

Installation Steps

Mounting Bracket Attachment

Install the mounting bracket by marking holes, drilling, and securing it to the ceiling.

Wiring Connections

Connect live, neutral, and ground wires using provided connectors and ground screw.

Lamp Unit Attachment

Attach the lamp unit by aligning arrows, pushing wires, and twisting to lock.

Overview

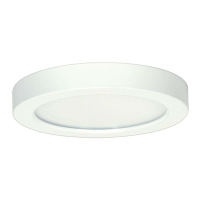
This document describes the operation and features of a 13" LED Flush mount light with an integrated dimmable driver.

The primary function of this device is to provide illumination in residential settings. It is designed for interior use and is suitable for damp locations, making it versatile for various rooms within a home. The integrated dimmable driver allows for adjustable light output, enhancing its utility by enabling users to control the ambiance of their space.

Usage Features:

The light fixture is designed for ease of installation and operation, with several features contributing to its user-friendly nature.

  • Dimming Compatibility: A key feature is its compatibility with most residential type dimmers available on the market. This allows users to adjust the brightness of the light according to their preference, creating different moods and levels of illumination. The performance of the dimming function may vary depending on the specific dimmer type and its settings. For optimal performance and to ensure compatibility, users can refer to the manufacturer's website for an updated list of compatible dimmers.

  • Installation Process: The installation process is detailed with clear, step-by-step instructions to guide users.

    1. Preparation: The first step involves twisting and unlocking the mounting bracket from the main lamp unit. This separates the two main components for easier handling during installation.
    2. Marking and Drilling: Users are instructed to use a pen to mark the desired locations for holes on the ceiling, using the edges of the mounting bracket as a guide. Subsequently, holes are drilled, and anchors are inserted to provide secure attachment points.
    3. Mounting Bracket Attachment: The mounting bracket is then attached to the ceiling using two self-tapping screws. Additionally, it is secured to the junction box using two provided screws. During this step, all three wires (positive, negative, and ground) from the ceiling are fed through the center hole of the mounting bracket.
    4. Temporary Support: A support wire is provided to temporarily hold the fixture in place while electrical connections are being made. This is a crucial safety and convenience feature, preventing the fixture from falling and freeing the installer's hands for wiring.
    5. Electrical Connections: The electrical connections involve connecting the live supply wire (typically black or the smooth, unmarked side of a two-conductor cord) to the live fixture lead using an appropriately sized twist-on connector. Similarly, the neutral supply wire (typically white or the ribbed, marked side of a two-conductor cord) is connected to the neutral fixture lead. For positive grounding in a three-wire electrical system, the fixture ground (typically copper or green plastic coated) is fastened to the fixture mounting strap with a ground screw. It is emphasized that all electrical connections must comply with local and National Electrical Code standards, as well as local building codes. If the installer is unfamiliar with these codes or proper wiring, consulting a qualified electrician is strongly recommended.
    6. Securing the Lamp Unit: Once electrical connections are complete, the lamp unit is raised into the mounting bracket, with the electrical wires pushed through the center hole into the junction box. Alignment arrows (indicated as 1-1) on both the mounting bracket and the lamp unit help ensure correct positioning.
    7. Twist & Lock Mechanism: The lamp unit is then secured to the mounting bracket using a "Twist & Lock" mechanism, aligning with the lock direction and matching alignment arrows (1-2). A critical warning is provided: if the fixture is not locked in place, it may fall and cause serious injury. This highlights the importance of correctly engaging the locking mechanism.
    8. Final Adjustment: After the lamp unit is locked in place, stickers are removed, and the lamp unit and mounting bracket are gently aligned for the best aesthetic fit.
  • Safety Recommendations: The manual includes a comprehensive list of safety recommendations to ensure safe installation and operation.

    • Electrical Shock Risk: Users are warned about the risk of electric shock and are advised that the product must be installed in accordance with applicable installation codes by a person familiar with these codes and associated hazards. Power must be disconnected at the circuit breaker or fuse before installation or servicing.
    • Read Manual: It is crucial to read the entire operation manual carefully before using the product.
    • Intended Use: The product is intended for interior use only and is suitable for damp locations, but direct contact with water should be avoided.
    • Proper Assembly: The product should only be assembled using the provided parts and housing. Improper assembly can lead to device failure, potentially damaging the product, personal property, or causing injury.
    • Accessory Use: Assembly must be performed only with the accessories delivered with the set.
    • Child Safety: The device is not a toy and should be kept out of reach of children.

Maintenance Features:

The device is designed for relatively low maintenance, with simple cleaning instructions and a robust warranty.

  • Cleaning: Cleaning the fixture is straightforward. Users are advised to clean it with a soft or damp cloth. It is crucial to ensure that the power is off before cleaning with a damp cloth to prevent electrical hazards. The use of liquids or abrasives for cleaning should be avoided, as these could damage the finish or internal components of the fixture.

  • Warranty: The product comes with a 5-year limited warranty, covering any defects in material or workmanship from the date of purchase. This demonstrates the manufacturer's confidence in the product's quality and durability. However, the warranty has specific limitations. The manufacturer (Satco) will not be responsible for faults arising from improper operation, negligent use, accidents, exposure to natural hazards, excessive use beyond specified limits, or any unauthorized alteration or repair. This emphasizes the importance of following the installation and usage guidelines provided in the manual to maintain warranty coverage.

In summary, this 13" LED Flush mount light is a versatile and user-friendly lighting solution for residential interiors, offering dimming capabilities and designed with clear installation instructions and important safety considerations. Its low maintenance requirements and a 5-year limited warranty further enhance its appeal as a reliable lighting fixture.

Satco Blink Specifications

General IconGeneral
BrandSatco
ModelBlink
CategoryLighting Equipment
TypeLED
DimmableYes
Energy Star CertifiedNo
CRI80
Voltage120V

Related product manuals