PASO 10
Fije el DORSO (J) de manera que los márgenes son
iguales a lo largo de los cuatro bordes. Empuje sobre
las esquinas opuestas de la unidad si es requerido para
hacerla “cuadrada.”
Fije el DORSO (J) a la unidad utilizando los CLAVOS (JJ).
PASO 9
Fije el EXTREMO DERECHO INFERIOR (C)
al ESTANTE (H3). Apriete dos EXCÉNTRICOS
ESCONDIDOS. Utilice un DESTORNILLADOR CON
PUNTA RECTA.
Fije el FONDO (I) al EXTREMO DERECHO INFERIOR (C)
y al PARAL (D2). Utilice cuatro TORNILLOS NEGROS DE
CABEZA PERDIDA de 48 mm (DD).
PASO 8
Fije el EXTREMO DERECHO (A2) al PANEL
SUPERIOR (F2). Apriete dos EXCÉNTRICOS
ESCONDIDOS. Utilice un DESTORNILLADOR CON
PUNTA RECTA.
Fije el ESTANTE (H3) al EXTREMO DERECHO (A2) y
al PARAL (D2). Utilice cuatro TORNILLOS NEGROS
DE CABEZA PERDIDA de 49 mm (LL).
Empuje el AGARRADOR MAGNÉTICO (V2) dentro del
agujero en el ESTANTE (H3).
PASO 7
Fije el VELO DE FONDO (L) al EXTREMO IZQUIERDO (B)
y al PARAL (D2). Utilice cuatro TORNILLOS NEGROS DE
CABEZA PERDIDA de 48 mm (DD).
PASO 6
Cuidadosamente voltee la unidad para que repose sobre
los bordes delanteros.
Fije el EXTREMO IZQUIERDO (B) y el PARAL (D2)
al PANEL SUPERIOR DE ESCRITORIO (G2). Apriete
cuatro EXCÉNTRICOS ESCONDIDOS.
PASO 5
Fije el PANEL SUPERIOR DE ESCRITORIO (G2) al
PARAL PEQUEÑO (E2) y al DORSO PEQUEÑO (K2).
Utilice dos TORNILLOS NEGROS DE CABEZA PERDIDA
de 49 mm (LL).
PASO 4
Fije el PARAL PEQUEÑO (E2) al DORSO
PEQUEÑO (K2) y al PANEL SUPERIOR (F2).
Apriete dos EXCÉNTRICOS ESCONDIDOS.
PASO 3
Fije el PARAL PEQUEÑO (E2) al DORSO PEQUEÑO (K2).
Utilice un TORNILLO NEGRO DE CABEZA REDONDA
de 49 mm (LL).
PASO 2
Fije los RIELES DE GABINETE (O y P) al EXTREMO
IZQUIERDO (B) y al PARAL (D2). Utilice cuatro TORNILLOS
DORADOS DE CABEZA PERDIDA de 8 mm (II).
NOTA: Los RIELES DE GABINETE tienen la inscripción
“CR” (derecho) y la inscripción “CL” (izquierdo) para
identifi carlos fácilmente.
PASO 1
Ensamble la unidad sobre un piso alfombrado o sobre el
cartón vacío para evitar rayar la unidad o el piso.
Empuje diez EXCÉNTRICOS ESCONDIDOS (S2)
dentro de los EXTREMOS (A2, B y C), el PARAL (D2), el
PARAL PEQUEÑO (E2) y el DORSO PEQUEÑO (K2). A
continuación, inserte un PASADOR DE EXCÉNTRICO (T2)
dentro de cada EXCÉNTRICO ESCONDIDO.
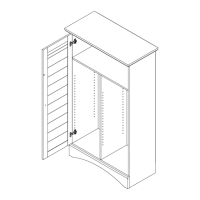
PASO 11
Fije una BISAGRA DE PIVOTE (X) a la PUERTA (N).
Utilice un TORNILLO MARRÓN DE CABEZA GRANDE
de 11 mm (HH).
Fije una PLACA DE CONTACTO (W) a la PUERTA (N).
Utilice un TORNILLO NEGRO DE CABEZA PERDIDA
de 13 mm (GG).
NOTA: La superfi cie de la PLACA DE CONTACTO con
la inscripción ”SAUDER” debe mirar hacia arriba.
Page 23
www.sauder.com/services408726