EasyManua.ls Logo

Sauder Steel River 423976 User Manual

Sauder Steel River 423976
48 pages
To Next Page IconTo Next Page
Page #1 background imageLoading...
Page #1 background image
Need help? Visit Sauder.com to view video assembly tips or chat with a live rep.
Prefer the phone? Call 1-800-445-1527.
Share your journey!
Business or pleasure.
Works both ways.
sauder.com
L-Desk
Steel River Collection | Model 423976
NOTE: THIS INSTRUCTION
BOOKLET CONTAINS IMPORTANT
SAFETY INFORMATION.
PLEASE READ AND KEEP FOR
FUTURE REFERENCE.
Enlish p 1-34
Français p 35-39
Español p 40-44
Lot #: 522270
Date Purchased: __________________
10/11/18
Be sure to ive us a rin before
makin any returns. 1-800-445-1527
Question and Answer IconNeed help?

Do you have a question about the Sauder Steel River 423976 and is the answer not in the manual?

Sauder Steel River 423976 Specifications

General IconGeneral
Product NameSauder Steel River 423976
CategoryIndoor Furnishing
MaterialEngineered Wood
TypeNot available
Number of Shelves2
StyleIndustrial
Height31.0 inches
Depth19.45 in

Summary

Part Identification

Hardware Identification

Assembly Instructions

Step 1: Assemble on floor; push hidden cams into backs, upright, end.

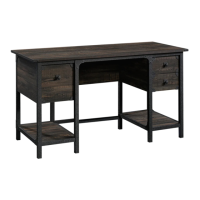
Assemble unit on carpeted floor or carton, push ten hidden cams into backs, upright, and end.

Step 2: Push small hidden cams into drawer sides and small back.

Push fourteen small hidden cams into the drawer sides and small back.

Step 3: Turn cam screws into tops, upright, end, shelf, drawer fronts.

Turn twenty-four cam screws into the left top, right top, upright, right end, shelf, and drawer fronts.

Step 4: Fasten metal brackets to end/upright with pan head screws.

Fasten four metal brackets to the right end and left upright using pan head screws.

Step 5: Fasten upright leg to upright and end leg to end.

Fasten the upright leg to the upright and the end leg to the right end.

Step 6: Fasten upright leg to upright and end leg to end (2" screws).

Fasten upright leg to upright and end leg to end using black 2" pan head screws.

Step 7: Fasten extension blocks to end/upright with flat head screws.

Fasten the extension blocks to the right end and upright using black 1" flat head screws.

Step 8: Fasten extension rails to blocks with flat head screws.

Fasten extension rails to extension blocks using black 1/2" flat head screws.

Step 9: Fasten drawer slides to extension rails with flat head screws.

Fasten drawer slides to extension rails using black 1/2" flat head screws.

Step 10: Fasten short braces to upright leg with hex head screws.

Fasten short braces to the upright leg using black 1/2" hex head screws.

Step 11: Fasten small back to upright and tighten hidden cams.

Fasten the small back to the upright and tighten two hidden cams.

Step 12: Fasten end leg to short braces/small back with hex head screws.

Fasten the right end leg to short braces and small back using hex head screws.

Step 13: Stand unit upright, fasten shelf to upright/end/back.

Stand unit upright, fasten shelf to upright, right end, and small back.

Step 14: Fasten legs to right top with pan head screws.

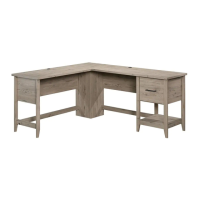
Fasten the legs to the right top using black 1-9/16" pan head screws.

Step 15: Fasten right back to right top/upright leg.

Fasten the right back to the right top and the upright leg.

Step 16: Fasten right back brace to right back/upright leg.

Fasten the right back brace to the right back and the upright leg.

Step 17: Fasten corner leg to right back/back brace.

Fasten the corner leg to the right back and the right back brace.

Step 18: Fasten lower/front braces to upright/corner leg/top.

Fasten lower and front braces to upright leg, corner leg, and right top.

Step 19: Fasten left front brace to left leg with hex head screw.

Fasten the left front brace to the left leg using a black 1/2" hex head screw.

Step 20: Fasten left leg/front brace to left top with pan head screws.

Fasten the left leg and left front brace to the left top using pan head screws.

Step 21: Fasten left back to left top/left leg.

Fasten the left back to the left top and the left leg.

Step 22: Fasten left back brace to left leg/left back.

Fasten the left back brace to the left leg and the left back.

Step 23: Fasten left back to corner leg, left back brace to corner leg.

Fasten left back to corner leg, left back brace to corner leg, and front braces.

Step 24: Fasten left lower brace to left leg/corner leg.

Fasten the left lower brace to the left leg and corner leg.

Step 25: Stand unit upright with assistance.

Get help to stand the unit upright, turn onto right back, then stand upright.

Step 26: Assemble large drawer (sides, bottom, front).

Fasten large drawer sides to back, slide in bottom, fasten front using hidden cams.

Step 27: Attach extension slides, knob, and file glides to large drawer.

Fasten extension slides to drawer sides, attach knob, and attach file glides.

Step 28: Assemble small drawer (sides, bottom, front, knob).

Fasten small drawer sides to back, slide in bottom, fasten front, and attach knob.

Step 29: Attach small drawer sides to drawer slides, apply bumper.

Fasten small drawer sides to drawer slides and apply a bumper to the drawer front.

Step 30: Insert grommets, insert large drawer, complete assembly.

Insert grommets into backs and tops, insert large drawer, complete assembly.

Safety Precautions

General Safety Warnings

Warnings about overloading, improper moving, and TV placement hazards.

Warranty Information

5-Year Limited Warranty

Details Sauder's 5-year limited warranty against defects in materials/workmanship.

Product Registration and Support

Register Your New Product Online

Instructions and website for registering product and ordering replacement parts.

Related product manuals