EasyManua.ls Logo

scandia SCWB200 - User Manual

scandia SCWB200
13 pages
Print Icon
To Next Page IconTo Next Page
Loading...
~ 1 ~
Scandia Warmbrite Range
Freestanding Wood Heaters
Model Name Model Number
Warmbrite 140 Series 2 SCWB1402
Warmbrite 200 Series 2 SCWB200
Warmbrite 200 Stacker Series 2 SCWB200ST
Warmbrite 300 Series 2 SCWB300
Introduction
Congratulations on purchasing a genuine Scandia Wood heater. When cared for properly,
these high quality, finely crafted wood heaters will offer many years of reliable performance.
This instruction manual has been developed to ensure optimum performance from your
Scandia wood heater. It's very important that you thoroughly read and understand all
instructions before using your new wood heater.
Check Local Council Requirements Eg. permits
When installing, operating and maintaining your wood heater, follow the guidelines
presented in these instructions, and make them available to anyone using or servicing the
wood heater. Your city, town, state or territory may require a building permit to install a
solid fuel burning appliance.
Always consult your local building inspector or local council to determine what regulations
apply in your area.
Your wood heater must be installed by a qualified person whose work
conforms with local council regulations, Australian standards & manufacturers
recommendations. Failure to do so will void your warranty and could possibly
void any home insurance.
Question and Answer IconNeed help?

Do you have a question about the scandia SCWB200 and is the answer not in the manual?

Summary

Check Local Council Requirements

Before Installing Your Wood Heater

Clearances to Combustibles

Respect required installation distances and local regulations for safety.

Installation

Warmbrite Clearances to Combustibles

Specifies minimum distances from the heater to walls and other surfaces.

Connecting into Standard Flue Kits

Firebox Assembly

Operating Your Wood Heater

Air Controls

Explains primary and secondary air supply for combustion and efficiency.

Wood Heater Maintenance

Regular Checks

Recommends monthly flue checks and twice-yearly overall inspections.

Troubleshooting

Fire Not Burning

Common causes for a fire not burning, like air supply or fuel issues.

Smoke in Room

Diagnosing and resolving smoke emission issues, checking room air tightness and flue.

Chimney Fire

Describes causes, detection, and actions to take during a chimney fire.

Overview

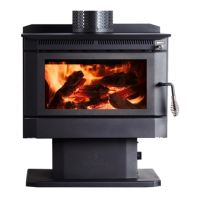
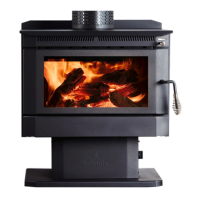
This document describes the Scandia Warmbrite Range of Freestanding Wood Heaters, providing comprehensive instructions for their installation, operation, and maintenance. These high-quality, finely crafted wood heaters are designed to offer many years of reliable performance when properly cared for.

Function Description

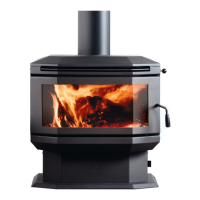
The Scandia Warmbrite Range consists of freestanding wood heaters designed to provide warmth and ambiance to a living space by burning dry hardwood fuel. The heaters are engineered for efficient combustion, with models like the SCWB200, SCWB200ST, and SCWB300 incorporating secondary air intake for improved efficiency and reduced emissions. The primary function is to generate heat, which is then radiated into the room. The flue system is crucial for safely expelling combustion gases and maintaining a proper draught for efficient burning.

Usage Features

The wood heaters are designed for ease of use, though proper operation requires adherence to specific guidelines to ensure safety and optimal performance.

  • Fuel Type: The heaters are designed to burn only dry hardwood. Burning other materials such as soft wood, paper or cardboard (except for small amounts to light the stove), treated or painted wood, synthetic fuel, household rubbish, liquid fuels, or plastics is strictly prohibited as it can damage the heater, create a fire hazard, or release toxic fumes. Fuel should have a moisture content of no more than 20% and be stored in a dry place, ideally dried for at least one year.
  • First Operation: Initial use involves lighting small fires that progressively get larger. It is recommended to light approximately five small fires, allowing the heater to fully cool between each, before putting the wood heater into full service. This process helps cure the wood heater paint, which may initially produce some smell and a small amount of smoke. Adequate ventilation (e.g., opening a window or door) is advised during this curing phase.
  • Air Controls: The heaters feature a primary air slide, typically located on the right side of the front above the door. This primary air is essential for initial fuel burning and keeping the stove glass clean. Models like the SCWB200, SCWB200ST, and SCWB300 also draw secondary air into the top rear of the firebox, which is not adjustable. Secondary air aids in secondary combustion, enhancing efficiency and reducing emissions.
    • Adjusting Airflow: The air slide control should be fully opened when lighting a fire. Once the fire is established, the air slide can be adjusted to control the burn rate. Reducing air intake will slow the burn, which might cause temporary blackening of the stove glass; this should burn off once the heater is burning brightly again. Optimal settings depend on draught and local conditions, which users will learn through experience.
  • Refueling: Before refueling, the air supply should be turned to high for a few moments to ensure a good fire, prevent harmful gas build-up, and allow new fuel to ignite quickly. The door should be opened slowly to prevent smoke from being drawn into the room and to check for falling logs or coal. Fuel should be added slowly, using tongs, a small shovel, and protective gloves. Overfilling the heater is discouraged; smaller, more frequent loads are better. Wood should be loaded front-to-back to aid airflow and reduce the risk of logs falling forward. The door should be closed gently after refueling.
  • Overnight Burning: The wood heaters are designed to support overnight burning. For best results, a good fuel bed should be established and allowed to burn for about 30 minutes before fully closing the air slide control. Upon returning to the heater, fully open the air slide control until a good, hot, red fire bed is achieved before adding more fuel. The glass may blacken during overnight burning but should clear once a hot fire is re-established. The Warmbrite 140 model may have limitations for overnight burning due to its firebox size.

Maintenance Features

Regular maintenance is crucial for the safe and efficient operation of your Scandia wood heater.

  • Regular Checks: The flue system should be checked at least once per month initially to establish a pattern of soot and creosote build-up, then an appropriate inspection interval can be determined. Other checks should be performed at least twice per year. Any damage or issues should be repaired immediately, and a damaged wood heater or flue should never be used.
  • Flue System Inspection:
    • Check for soot or creosote build-up and signs of damage to joints.
    • To inspect the flue outlet, remove the top baffle by lifting and pulling it out. Use a flashlight to check the outlet. Clean and repair as needed, always replacing the baffle before relighting.
  • Glass Care:
    • Check the glass for cracks or chips and ensure the sealing rope is in good condition, replacing it if necessary.
    • Blackening of the glass can occur with low air settings or damp wood. This usually burns off with a good hot fire.
    • To clean the glass, use a soft cloth and non-abrasive glass cleaner only when the wood heater is cold.
    • Ensure fuel does not protrude through the door opening when loading to prevent glass breakage.
    • If the glass cracks while the heater is lit, let the fire die out, allow the heater to cool completely, and replace the glass with a specified replacement part before re-using.
  • Sealing Checks:
    • In a dark room, use a strong flashlight to check for leaks or cracks at the edges and corners of the wood heater. Repair any leaks or cracks with fire cement or replace damaged parts with genuine spare parts.
    • Check the door seal by placing a strip of paper into the door and closing it. If the paper pulls out too easily at several points, the rope and seal may need replacement, secured with a suitable high-temperature sealant.
  • Door Adjustments:
    • Horizontal Adjustment: If the door appears angled, lift it off its hinge, slightly loosen hinge bolts, and tap the hinge in or out as needed. Re-tighten bolts, replace the door, and check alignment, repeating if further adjustment is required.
    • Closing Tension Adjustment: As door seals age, they may compress, allowing air to be drawn in. To adjust tension, remove the grub screw from the door handle shaft, allowing the handle to rotate 360°. Rotate the handle one full turn anti-clockwise and close the door. Repeat until the door offers slight resistance to closing. Replace the grub screw. Over-tightening can distort the door or break the glass.
    • Glass Frame Adjustment: If the glass moves within the door frame, the glass frame needs tightening. Gently pull back the corners of the door seal to expose screw heads. Lightly tighten all four corners until the glass no longer moves. Over-tightening can place excessive pressure on the glass and break it.
  • Ash Removal: Ash should only be removed when the stove is completely cold. Use a steel bucket and a small shovel. Cover the bucket to prevent ash from blowing about the house.
  • Replacing Parts: Always use genuine replacement parts, and only perform replacements when the wood heater is cold. Parts can be ordered from the manufacturer's website.
  • Surface Finish: Clean the wood heater surface with a damp cloth only. Avoid abrasive cloths or cleaning products that may scratch or stain. Painted wood heaters can be re-painted with good quality, high-temperature wood heater paint. Ensure adequate ventilation during re-painting and allow the paint to fully dry before lighting the stove. Provide extra ventilation for the first few fires as the paint cures.
  • Chimney Fire Prevention: Chimney fires are caused by soot and creosote build-up. Regular flue checks and cleaning are essential. Operating the wood heater properly, maintaining good, hot fires, and opening air controls to burn on full for a short while during each firing can help prevent build-up. In the event of a chimney fire, close air controls, evacuate the building, and call the fire department. Do not relight the stove until the stove and flue have been checked and repaired.

scandia SCWB200 Specifications

General IconGeneral
Wattage2000 W
Power2000W
Voltage220-240V
Frequency50Hz
Safety FeaturesOverheat protection

Related product manuals