Do you have a question about the Scheppach EB1700 and is the answer not in the manual?
Details on human behavior, clothing, and potential hazards like recoil, burns, and contact.
Instructions for assembling the machine, including attaching the earth auger.
Steps for filling the fuel tank with the correct mixture, including safety precautions and ratio.
Procedures for starting the engine using the starter cord, choke, and adjusting the idle setting.
Instructions for cleaning the equipment with a moist cloth and soft soap, avoiding solvents.
Routine maintenance tasks including air filter cleaning and spark plug checks.
Steps for safely transporting the machine, including cooling down and securing it.
Procedure for preparing the auger for storage longer than 30 days to prevent fuel system issues.
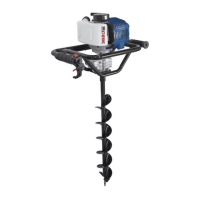
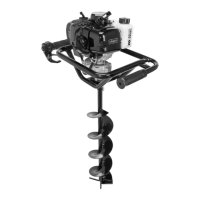
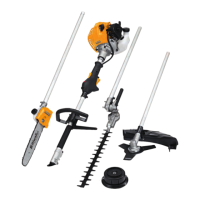
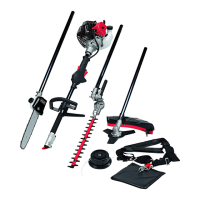
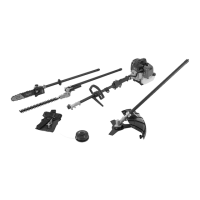
This document describes the Scheppach EB1700 Earth Auger, a petrol-powered tool designed for excavating planting holes, pergolas, and fences in light soil. It is intended for operation by one person and is suitable for use in ground that is not excessively stony, hard, or root-filled.
The EB1700 Earth Auger is a two-stroke motor-driven device that utilizes a drill to create holes in the ground. The motor powers a transmission which, in turn, rotates the drive shaft and attached drill. The device is started by pulling a starter cord and controlled via a gas regulating lever and a stop switch. A choke lever is used for cold starts, enriching the air-petrol mixture. An idle setting screw allows adjustment of the idling mixture. The fuel pump primes the system, ensuring fuel delivery to the carburettor.
The earth auger is designed for ease of use and safety. Before operation, the auger (drill) must be securely attached to the drive shaft using a driving pin and split pin. The fuel tank is filled with a 1:40 mixture of two-stroke oil and 90 octane petrol. It is crucial to pre-mix the fuel and oil in a separate container before filling the tank to ensure proper lubrication and prevent engine damage.
Starting the motor:
Operation: The auger only begins to rotate when the throttle lever (13) is used. The power can be adjusted according to ground conditions. For ideal ground conditions, the throttle control lever can be locked in the centre position using the adjusting screw for easier work. It is essential to hold the auger with both hands, maintain a safe standing position, and avoid leaning too far forward. The auger should be kept vertical during drilling and not twisted. Drilling should be done in several sections to allow for soil removal.
Stopping the engine: The engine is stopped by pressing the stop switch (11) to the "Stop" position. For restarting, the stop switch must first be returned to the "Start" position.
Safety Precautions: Users must read and understand the complete user guide and all warnings. Always wear safety glasses, hearing protection, a safety helmet, security and anti-vibration gloves, and non-skid safety shoes with cut protection. The device should not be operated in unventilated areas due to poisonous exhaust gases. Open flames are prohibited near the workplace. Bystanders must be kept away, and a safe distance maintained due to the risk of ejected debris. The exhaust and casing can become hot, posing a burn risk. Fuel is flammable and explosive, requiring careful handling and refuelling only when the motor is cool and switched off, in a well-ventilated area, and away from open flames. Recoil can occur on stony or hard ground with roots, so a firm grip on the handles is crucial. Prolonged use can cause poor circulation in hands and fingers, so regular breaks and appropriate gloves are recommended.
Regular maintenance is crucial for the longevity and safe operation of the EB1700. All maintenance work requires the spark plug cap to be removed.
Daily before beginning work:
After 20 operating hours:
After 100 operating hours:
After 300 operating hours:
Cleaning: The device should be cleaned after each use with a moist cloth and soft soap. Cleaning agents or solvents should not be used as they can damage plastic parts. Water must not seep into the device.
Air Filter Maintenance (fig. 4-5): Regular cleaning of the air filter prevents carburettor malfunctions.
Spark Plug Maintenance (fig. 6-7):
Fuel Filter Replacement (fig. 8): The felt filter (J) of the fuel filter can become clogged. It is recommended to replace it every three months to ensure unimpeded fuel flow to the carburettor. To remove, pull it out through the tank filler neck using a bent wire hook.
Storage/Transport: Before transporting or storing indoors, the motor must be allowed to cool down to prevent burn and fire hazards. The motor must be turned off even for short distances during work. The auger should be carried by the handle, avoiding contact with the hot casing. When transporting in a vehicle, it must be stored safely. For storage longer than 30 days, the fuel tank (2) must be emptied, and the engine run until it stops to clear fuel from the carburettor. A teaspoon of clean 2-cycle oil should be poured into the combustion chamber, and the starter rope pulled several times to coat internal components before replacing the spark plug. Store the auger in a dry location, away from ignition sources.
| Brand | Scheppach |
|---|---|
| Model | EB1700 |
| Category | Lawn and Garden Equipment |
| Language | English |