This document describes the Scheppach MTP370 Petrol Power Cultivator.
Function Description
The MTP370 Petrol Power Cultivator is designed for digging over beds and fields, preparing seedbeds for planting, and removing unwanted vegetation. It operates using a 4-stroke engine and features a recoil starter for ignition.
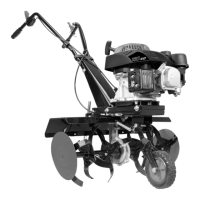
The device's operation is controlled by an accelerator lever (16), which regulates engine speed. Moving the lever in the indicated directions makes the engine run faster or slower. For normal tilling, the accelerator should be set to full throttle (position "A") for best results. For cultivating, a slower walking speed (position "C") is recommended.
The depth stop (10) regulates the tilling depth. Lowering the depth regulator rod slows the tiller and makes it till deeper, while raising it allows for faster movement and shallower tilling. This feature assists the operator in controlling the direction and speed of the tiller.
The wheel (17) features a spring-locked bracket that allows for different height and distance adjustments from the tines. For tilling, the wheel should be raised to its upper groove. When transporting the tiller, the wheel is set down, and the machine is tilted backward so the tines clear the ground, allowing it to be pushed or pulled to the next location.
The clutch handle (3) engages and disengages the rotation of the blades. It has a lock (5) to secure the accelerator trigger. Releasing the clutch handle stops the blades.
Important Technical Specifications
- Engine: 4-stroke engine, 144 cm³
- Engine Rating: 2.5 kW / 3.5 hp
- Engine Working Speed: 3600 rpm
- Working Width: 450 mm
- Hoe Blade Diameter Ø: 290 mm
- Starting System: Recoil starter
- Fuel: Unleaded petrol (min. 90 octane, max. 5% bio-ethanol)
- Engine Oil: 0.4 l (10W-30 / 10W-40 / SAE 30)
- Tank Capacity: 0.8 l
- Weight: 34.0 kg
- Spark Plug: LG F6RTC
- Depth: 130 mm
- Measured Acoustic Power Level LpA: 71.23 dB (K uncertainty: 2 dB)
- Measured Acoustic Power Level LwA: 91.23 dB (K uncertainty: 2 dB)
- Guaranteed Acoustic Power Level LwA: 93 dB
- Vibration Value ahw: (left) 11.08 m/s² / (right) 15.72 m/s² (K uncertainty: 1.5 m/s²)
Usage Features
Starting the Motor:
- Pivot the wheel (17) upwards until the locking engages in the intended recess (13).
- Set the accelerator (16) to the "A" (Full throttle) position.
- Start the motor using the recoil starter (1) by pulling gently until resistance is felt, then pulling hard all the way. Repeat until the motor starts.
- To operate the blades, withdraw the accelerator trigger lock (5) and pull the clutch handle (3). Keep the clutch handle (3) pushed downwards. Release it to stop the blades.
Tilling:
The optimal tilling depth is between 100 mm and 150 mm. For very dry soil, watering a few days before tilling is recommended. For very wet soil, waiting one or two days after heavy rain allows the soil to dry sufficiently. If the machine jumps or bucks, allow it to move forward at a slightly faster rate. If the tiller stops and digs in one spot, rock the handles from side to side until it moves forward again. Remove any excavated stones.
Cultivating:
This involves loosening or digging around growing plants to disrupt weeds and aerate the soil. The optimal depth for cultivating is less than 50 mm.
Maintenance Features
Cleaning the Tine Area:
Clean the underside of the tine shield after each use. Dirt is easier to wash off if rinsed immediately with water before it dries.
- Turn off the engine and allow it to cool.
- Set the device to position "C" and securely disconnect the spark plug wire from the spark plug.
- Remove any vegetation, string, wire, and other materials that may have accumulated on the axle between the tines and the transmission housing seal.
- Caution: Never use a pressure washer to clean the tiller, as water can penetrate tight areas and damage internal components.
Checking the Clutch:
The clutch wears out over time, which can increase the lever's opening and make operation difficult, requiring cable adjustment.
- Return the clutch lever to its original position.
- Adjust the adjustment device and lock nut accordingly.
- After each use, wipe the tiller dry and apply a thin layer of grease or silicone to prevent rust and water damage.
- Reconnect the spark plug wire.
Maintaining the Spark Plug (17):
Inspect the spark plug every 50 operating hours. Check the color of deposits on the spark plug tip (should be light brown). Remove deposits with a stiff brush. Check and adjust the gap between the electrodes (0.7-0.8 mm) if necessary.
Replacing Engine Oil (10):
Change the engine oil after the first 20 operating hours, then every 100 operating hours.
- Place the machine on a flat, stable surface and run the engine for a few minutes.
- Turn off the engine and remove the oil fill plug (15).
- Place a receptacle under the engine to collect spent oil.
- Unscrew the oil drain plug (14) and allow the oil to drain completely.
- Check the condition of the drain plug, its seal, the fill plug, and its O-ring; replace any defective parts.
- Screw the drain plug (14) back on.
- Fill the tank with fresh oil until the maximum level is reached.
Air Filter (22) (18):
Check and clean the air filter every 50 operating hours or every 3 months. Use an environmentally-friendly, water-based degreasing product for cleaning. Allow the air filter to dry completely before reassembling and replacing its cover.
- Caution: Never run the motor without its air filter.
Storage:
If the tiller will not be used for more than 30 days:
- Completely drain the fuel tank.
- Start the engine and let it run until it stops to ensure no fuel remains in the carburetor.
- Drain the engine oil while the engine is still warm. Refill with fresh oil of the recommended grade.
- Allow the engine to cool. Remove the spark plug and pour 30 ml of high-quality motor oil into the cylinder. Slowly pull the starter rope to distribute the oil. Replace the spark plug.
- Caution: Remove the spark plug and drain all oil from the cylinder before restarting after storage.
- Clean the exterior of the tiller with a clean cloth and remove dirt from the ventilation slots.
- Caution: Do not use harsh or mineral oil-based cleaning agents on plastic parts.
- Inspect for loose or damaged parts. Repair or replace damaged parts and tighten loose screws and nuts.
- Disassemble the tines. Clean and apply rust-preventing oil to the tines and tine shafts. Reassemble the tines onto the shafts.
- Lightly grease the wheel axles, accelerator cables, and all visible moving parts. Do not remove the engine cover.
- Store the tiller upright in a clean, dry, well-ventilated building.
- Caution: Do not store the tiller with fuel in a non-ventilated area where fuel fumes could contact ignition sources. Use only approved fuel containers.