Do you have a question about the schildknecht DATAEAGLE X-TREME 3 Series and is the answer not in the manual?
Legal notices regarding publication rights and modification permissions.
Limitations of liability for damages.
Explanation of symbols used throughout the manual.
Lists trademarks and registered product names.
Information source for conformity and EC directives.
Defines the authorized applications for the DATAEAGLE system.
Provides a general overview of safety precautions.
Critical safety guidelines to follow during device installation.
Essential safety measures for operating the system.
Specifies the required qualifications for personnel performing tasks.
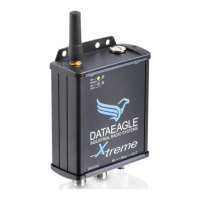
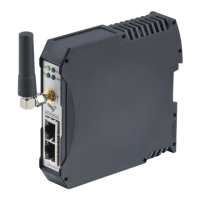
Overview of the wireless Profibus system components and architecture.
Technical specifications and types of radio modules available.
Explains the function and meaning of the device's status LEDs.
Describes the USB interface for configuration and its location.
Details pin assignments for power supply and PROFIBUS connections.
Provides a high-level sequence of steps for installing new devices.
Step-by-step guide for physically mounting the radio module.
Instructions for connecting the antenna cable to the radio module.
Procedure for connecting the PROFIBUS communication cable.
Steps for providing power to the radio module.
Initial setup requirements before extending or exchanging modules.
Lists necessary software and hardware for the PC.
Instruction to create a dedicated folder for downloaded data.
Steps to set Internet Explorer as the default browser.
Essential steps to install drivers for PC-module communication.
Guide for installing the primary configuration software.
Outlines the two primary ways to expand the radio system.
Procedure for connecting an additional Profibus slave.
Steps to integrate a new radio slave into the system.
How to launch the Dataeagle configuration application.
Step-by-step guide to set up the radio master device.
How to view the addresses of connected radio modules.
Procedure for adding new slave addresses in the master.
Viewing the configured radio channel or Bluetooth MAC address.
Step-by-step guide to set up a radio slave device.
How to input the correct addresses for the radio slave.
Entering the channel or MAC address for the slave.
General process for replacing existing modules.
Steps to safely disconnect and remove the old module.
Reference to installation steps for the replacement module.
Launching the tool for module exchange configuration.
General procedure based on radio module type and role.
Detailed walkthrough for replacing a radio slave.
Method to find the address of the replaced radio slave.
Viewing the configured radio channel or Bluetooth MAC address.
Detailed walkthrough for replacing a radio master.
How to input the correct addresses for the new radio master.
Entering the channel or MAC address for the master.
Specific procedure for exchanging masters of the 33XX series.
Setup steps for the 33XX series radio master.
Inputting addresses for the 33XX series radio master.
Process for adding partner addresses for 33XX masters.
Configuring the radio channel for 33XX masters.
Specific procedure for exchanging masters of the 37XX series.
Setup steps for the 37XX series radio master.
Process for adding partner addresses for 37XX masters.
Viewing the Bluetooth MAC address for 37XX masters.
Setting up multiple radio slaves for 37XX masters.
How addresses are automatically detected based on firmware.
Steps to take before removing an old radio master.
How addresses are assigned or detected for new masters.
Verifying firmware versions to determine address assignment needs.
Assigning addresses when adding new slaves to the system.
Assigning addresses when the radio master is replaced.
The procedure to manually assign Profibus slave addresses.
Explains how filter time helps suppress radio interferences.
Step-by-step guide for adjusting the filter time parameter.
Specifies the minimum and maximum values for filter time settings.
Recommended filter time settings for different scenarios.
The factory default setting for the filter time.
Recommended settings for normal system operation.
Recommended settings during the initial setup phase.
Specific recommendations for applications using Profisafe.
Introduction to the diagnostic slave and its capabilities.
Describes the principle of how the diagnostic slave functions.
Steps to integrate the diagnostic slave into a Profibus network.
Specific instructions for integrating the GSD file in Siemens Step 7.
Locating the DE3002 diagnostic slave within the hardware catalog.
Setting the DP parameters for the diagnostic slave.
Procedure for adding the diagnostic slave with its Profibus address.
Using PLC functions (SFC14/SFC15) for data exchange.
Details the structure of data transmitted to and from the diagnostic slave.
Information on general diagnostic data parameters.
Displays the Profibus addresses of connected slaves.
Shows the connection status for each DP slave.
Measures the data exchange time for each slave.
Counts transmission retries due to timeouts.
Tracks restarts caused by initialization errors.
Monitors restarts originating from the DP side.
Indicates the average data transmission rate.
Allows remote management of radio slave devices.
Shows transmission retry counts for the radio link.
Displays the longest detected timeout for slaves.
Command to reset all diagnostic counters.
Demonstrates practical applications for the diagnostic slave.
Using data to analyze connection performance and issues.
Improving performance by adjusting filter time and monitoring errors.
Identifying and resolving issues during system setup.
Measures to enhance electromagnetic compatibility for reliable operation.
Overview of EMC safety importance in industrial applications.
Fundamental principles for achieving good EMC performance.
Proper use of shielded cables and connectors for EMC.
Guidelines for routing power and bus cables to minimize interference.
How to properly terminate unused cable leads for EMC.
Importance of metallic or metallised plug housings.
Using mounting plates as a grounding surface for interference suppression.
Designing short and effective connections to EMC earth.
Enclosing potential HF interference sources in metallic housings.
Star-shaped routing of protective earth conductors to avoid interference loops.
Ensuring separation of neutral and earth conductors and checking for currents.
Special installation method for highly disturbed environments where PE grounding is avoided.
Best practices for positioning antennas for optimal performance.
Recommends consistent orientation for all antennas.
Maintaining distance from obstructions and ensuring free radiation.
Importance of installing antennas in a clear line of sight.
Recommends installing antennas externally to control cabinets.
Guidance for resolving common issues with the system.
Verifying channel and address settings for all modems.
Steps to test and set the optimal communication distance.
Verifying correct antenna installation and cable integrity.
Methods to check for and resolve transmission interferences.
Basic electrical and physical characteristics of the devices.
Details on frequency, power, and range.
Information on Profibus DP speed and connection types.
| Brand | schildknecht |
|---|---|
| Model | DATAEAGLE X-TREME 3 Series |
| Category | Microphone system |
| Language | English |