Table Gauge
Assembly
MAKING A LASTING MARK FOR 125 YEARS
(800) 323-1332 (847) 647-7117
www.gtschmidt.com
EASY FOUR-STEP OPERATION
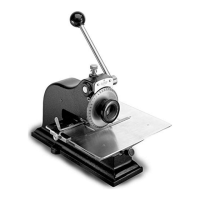
M O DEL 4 N AME P L A TE D E T A IL PRE S S
Center the Nameplate on the table. Press the
clamp handle down to slide the nameplate into a new
position. Release the clamp handle to lock it in place.
The clamp is fastened to a sliding rectangle (table
gauge assembly), which is tightened by means of a
small thumb screw. The entire table can be indexed by
pressing the space button at the front of the unit.
CAUTION: When indexing the table, be sure to grasp
the table lightly with your left hand; the table operates
like a typewriter carriage and damage will result if it is
allowed to slam against the limit screw.
Spin the character dial to select the desired number
or letter.
Set marking depth by turning the depth adjustment
screw. First, set depth until dial contacts the name-
plate. Then remove the place and make another 1-1/2
counter clockwise turn to indent the plate. Turning the
screw clockwise makes the impression shallower.
Move operating handle forward rmly to make
impressions. If the mark is not deep enough, adjust
the depth setting. The handle will return to its original
position, which automatically indexes the table one
notch to the left, placing the nameplate in position for
the next character. Move the handle forward to
backward halfway to leave a blank space or a space
between words.
CAUTION: Forcing the operating handle down or back
will cause damage to the machine.
1.
2.
3.
4.
Operating Flexibility. Y
our SCHMIDT Nameplate detail press can be
operated efficiently by pulling the operating handle down from a
sitting position or by pushing the operating handle down from a
standing position. Just remember to bring the operating handle to
the neutral position - and not beyond.
To set the plate for stamping a new line of another panel, simply move
the table gauge forward or back to center the locating pointer. For
added exibility, the table gauge can be placed on the right edge of
the table. The clamp is then in front of the dial and plates are gripped
at the bottom, allowing the machine to stamp at the extreme top edge.
With the gauge in this position, the throat capacity is also increased to
4.5 inches.
CHANGING THE MARKING DIAL:
1. Remove screw in the center of the dial and take o dial, knob and
pointer. Place new dial and pointer in position and tighten into place
with retaining screw.
2. Slide table to extreme right and remove table limit screw. Return
table to left to expose spacing mechanism. Remove escapement wheel
and replace with one that matches correct dial size. Replace the limit
screw.
3. Return table to marking position.
EXTRA DIALS: All dial assemblies are interchangeable and include
Dial, Knob, Pointer and Escapement Wheel. Sizes available include
3/32”, 1/8”, 3/16” and 1/4”
Clamp
Handle
Character Dial
Operating Handle
Depth
Adjustment
Screw
Space Button
Escapement
Wheel
Assembly
Ram (with Ball
Spring)