Do you have a question about the Scotty Downrigger and is the answer not in the manual?
Details key features of the Scotty downrigger, including auto brake, clutch brake, warranty, and design aspects.
Specific mounting instructions for models 1050 and 1060 using the slide-in bracket.
Specific mounting instructions for models 1080, 1085, and 1090 with the tilt-up bracket.
Step-by-step guide for adjusting the downrigger's brake tension for proper function.
Detailed instructions for replacing the downrigger wire, including proper spooling.
Mount designed for boats with narrow or uneven gunnels.
A portable mounting option for aluminum boats.
Durable mount for narrow/uneven gunnels with quick fastening.
Provides 360-degree rotation with 16 locking positions.
Mount designed for round or oval rails, easily removable.
Fits flush mount rod holders, eliminating drilling.
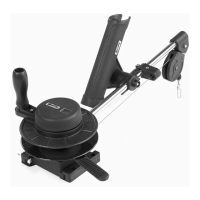
This document is a manual for a Scotty Downrigger, a device designed for a specific style of fishing known as trolling. The manual provides comprehensive instructions on the downrigger's installation, use, safety precautions, and maintenance, aiming to enhance the user's fishing experience and ensure the longevity of the device.
A downrigger is a specialized piece of fishing equipment used to precisely control the depth of a fishing lure or bait while trolling. Unlike conventional trolling methods that rely on heavy tackle to achieve depth, a downrigger uses a weighted line to carry the fishing line down to a desired depth. When a fish strikes, the fishing line is released from a clip on the downrigger line, allowing the angler to fight the fish directly without the drag of the downrigger weight. This method enables anglers to target fish at specific depths, which is particularly effective for suspended fish that travel in schools. The Scotty Downrigger is built to withstand the demanding marine environment, offering both manual and electric models.
The Scotty Downrigger incorporates several features designed to make trolling more efficient and user-friendly:
Auto Brake: This feature automatically releases when the downrigger line is being wound up and sets automatically when the handle is released. This provides convenience and control during retrieval.
Clutch Brake: The Scotty clutch brake allows for variable descent speeds of the downrigger. Users can choose a uniform slow speed to prevent tangles or a faster speed to quickly reach deep water when necessary. A key advantage of the clutch brake is its ability to slip if the downrigger weight snags on the bottom. This slippage can often allow the angler to turn the boat and free the weight without losing it, preventing damage to the downrigger and loss of tackle.
Horizontal Spool Design: The downrigger features a low-profile horizontal spool design, which facilitates easy winding of the line and allows for compact storage of the unit.
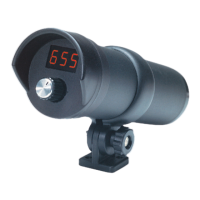
Positive Drive Depth Counter: A spray-protected, positive drive depth counter is integrated into the downrigger, providing accurate depth readings in feet. This allows anglers to note the exact depth where fish are caught and return to that same depth for subsequent casts, increasing the chances of hooking up again, especially when targeting schooling fish.
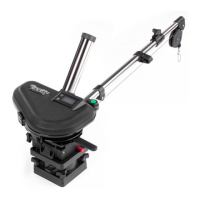
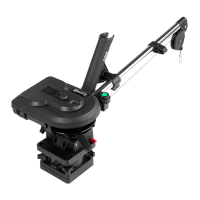
Extendable Handle Arm: Specific models (No. 1060, 1080, 1085, and 1090) are equipped with an extendable handle arm. This feature provides extra cranking leverage, making it easier to retrieve the downrigger line, and a fast retrieve spool that winds in two feet of line per turn.
Rigging Fishing Lines: To use the downrigger, the brake is tightened by moving it counter-clockwise, and a 7 to 10-pound weight is attached to the downrigger snap hook. This is best done outside the boat to avoid damage if the weight is dropped. A Power Grip release clip is then attached to the downrigger weight. The fishing line from the rod is squeezed into the jaws of the release clip. The release tension can be adjusted by placing the fishing line further into the jaws or by moving a tension adjuster slider to the "out" position for harder release. The fishing rod should be placed in a rod holder, and the reel's drag set to allow line payout with enough tension to prevent free-wheeling. This ensures the fishing line remains tight to the downrigger line, minimizing slack after a release and reducing the risk of losing a fish. The downrigger is lowered by moving the brake handle clockwise, allowing for controlled descent. A slow, even descent is recommended, especially when using flashers or dodgers, to prevent fouling on the downrigger cable.
Safety Tips: The manual emphasizes several safety precautions, particularly for ocean or tidal conditions. Downriggers should be mounted near the stern to minimize the risk of tangling the wire in the boat's propeller. Sharp turns and backing up with the downrigger wire out should be avoided. For models with a tilt-up base, the boom must be tilted back past vertical, and the red lock lever tucked fully under the base to secure it upright. Users are advised to keep fingers away from the underside of the downrigger base and remove the lead weight when the downrigger is tilted up or unattended. Mounting areas on the boat must be strong and reinforced, possibly with a backing plate, to withstand the significant forces exerted by long downrigger arms, especially with heavy weights or snags. Attempting to retrieve a weighted or snagged downrigger cable by hand is strongly discouraged due to the risk of serious injury from wave or boat motion.
Bottom Hang-Up Strategy: When the downrigger weight touches the bottom, the boom will bounce, signaling the need to immediately wind up to a safer depth. In strong tidal currents or windy conditions, a snagged weight can put immense strain on the downrigger. The manual advises keeping a sharp pair of wire cutters handy for emergencies, as the built-in tilt-up feature can cause the boom to fly up quickly if the wire breaks or is cut, necessitating standing clear. For relatively smooth bottoms, a snagged weight can often be freed by turning the boat around and pulling from the opposite direction, provided there's minimal tide or wind. After a hang-up, the wire should be inspected for broken strands and replaced if necessary. The Scotty brake handle stop is designed to slip upon a bottom snag, allowing the boat to stop and the angler to strategize for freeing the weight.
The Scotty Downrigger is constructed from corrosion-resistant materials, requiring minimal maintenance to ensure peak performance:
Routine Checks: Users should routinely check all stainless steel fastenings with a screwdriver to ensure they are snug and secure.
Lubrication: No lubricants should be used on the Scotty Downrigger. The material combinations are self-lubricating, and some spray lubricants can damage the plastic components.
Sunlight Exposure: It is not advisable to leave the unit in direct sunlight for extended periods when not in use, as ultraviolet light can eventually damage plastic materials.
Brake Adjustment: If the weight does not descend freely or cannot be held when the brake is engaged, the brake tension may need adjustment. This involves lifting the counter cover, removing the jam nut, and lifting off the counter assembly. Using two 9/16 inch or small crescent wrenches, the bottom nut is held while the top jam nut is loosened. With the brake in the "off" or "6 o'clock" position, the bottom nut is tightened or loosened to achieve the correct brake setting. The brake should automatically engage when the handle is released but slip if constant strain is applied to the wire. After adjustment, the jam nut is tightened, and the counter assembly is re-assembled.
Wire Maintenance: The life of the downrigger wire can be affected by kinks, electrolysis from stray electrical currents, and corrosive effects from certain marine life. Frequent inspection and washing the wire with fresh water after each use can help prolong its usefulness.
Wire Replacement: When replacing the wire, the downrigger should be mounted securely. The old wire is pulled off, and the loop at the end is cut from the spool. The new wire is threaded from the supply spool through the pulley and any fairleads, then through the holes from the inside of the spool. An overhand knot, followed by a second overhand knot (forming a "square knot"), is tied and pulled snug against the spool, with the loose end pointing back towards the pulley. This loose end is secured with tape to prevent fouling. Tension is maintained on the supply spool to wind the new wire as tightly as possible, avoiding twisting, kinking, or loose winding. This operation is best performed with two people. Finally, the end of the wire is threaded through fairleads and the pulley, and a new Scotty bumper and snap hook are attached. The manual notes that winding more than 300 feet of 150 lb. test wire or using heavier test wire will affect the accuracy of the depth counter.
Cleaning: After each use in saltwater, the downrigger should be rinsed off with freshwater.
Wire Handling: It is crucial not to let the downrigger wire go slack, as this can cause kinks and lead to the wire spilling off the spool edges. Monofilament or nylon lines should not be used on the downrigger, as they can stretch and then shrink back with enough force to damage the spool, voiding the warranty. Spray lubricants or oils should not be used on the downrigger or its wire.
| Weight Capacity | 20 lbs |
|---|---|
| Mounting | Swivel |
| Depth Counter | Mechanical |
| Type | Electric |
| Power Source | 12V DC |
| Warranty | 1 year |
| Boom Length | 24 inches |
| Maximum Depth | 200 feet |