EasyManua.ls Logo

Sealey FWB1 - User Manual

Sealey FWB1
2 pages
Print Icon
To Next Page IconTo Next Page
Loading...
INSTRUCTIONS FOR:
FOLDING WORKBENCH
Model No:
FWB1
Thank you for purchasing a Sealey product. Manufactured to a high standard this product will, if used according to these instructions
and properly maintained, give you years of trouble free performance.
1. SAFETY INSTRUCTIONS
IMPORTANT: PLEASE READ THESE INSTRUCTIONS CAREFULLY. NOTE THE SAFE OPERATIONAL REQUIREMENTS, WARNINGS AND
CAUTIONS. USE THIS PRODUCT CORRECTLY AND WITH CARE FOR THE PURPOSE FOR WHICH IT IS INTENDED. FAILURE TO DO SO MAY
CAUSE DAMAGE OR PERSONAL INJURY, AND WILL INVALIDATE THE WARRANTY. PLEASE KEEP INSTRUCTIONS SAFE FOR FUTURE USE.
3 Maintain the workbench in good condition. Replace or repair damaged parts. Use recommended parts only. Non authorised parts may
be dangerous and will invalidate the warranty.
3 Keep the workbench clean for best and safest performance and check moving parts alignment regularly.
3 Locate the workbench in an adequate working area for its function, keep area clean and tidy and ensure there is adequate lighting.
3 Ensure the workpiece is correctly secured before operating the workbench.
3 Ensure that any workpiece which extends beyond the bench centre of gravity is adequately supported.
3 Maintain correct balance and footing. Ensure the floor is not slippery and wear non slip shoes.
7 DO NOT use the workbench for any purpose other than for which it is designed.
7 DO NOT get the workbench wet or use in wet weather conditions, and DO NOT expose the workbench to excessive heat.
7 DO NOT operate the workbench if any parts are missing as this may cause failure or possible personal injury.
7 DO NOT stand on the top of workbench, or use it as standing platform or to support a platform. The workbench is for clamping items only.
3 When not in use store in a safe, dry, child proof area and ensure it will not tipple over.
2. ASSEMBLY
Unpack the product and check contents to ensure no parts are damaged. Should there be any damaged or missing parts contact your supplier
immediately. Follow the step by step illustrations to assembly your bench.
STEP 1
STEP 2
STEP 3
FWB1 - 0021 - 051198 issue 2
Question and Answer IconNeed help?

Do you have a question about the Sealey FWB1 and is the answer not in the manual?

Summary

Safety Instructions

General Safety Precautions

Maintain workbench condition, keep area clean, ensure correct workpiece securing, and proper balance.

Usage and Environmental Restrictions

Do not use for unintended purposes, avoid wet conditions, excessive heat, or operating with missing parts.

Safe Storage

Store workbench in a safe, dry, child-proof area to prevent tipping.

Assembly Instructions

Step 1 Assembly

Illustration showing initial assembly steps for the workbench components.

Step 2 Assembly

Illustration detailing the next phase of workbench assembly.

Step 3 Assembly

Diagram showing the progression of workbench assembly, including frame connections.

Step 4 Assembly

Further assembly steps illustrating the attachment of legs and supports.

Step 5 Assembly

Final assembly illustration, including details on attaching components like the tool rack.

Parts List

Component Identification

List of all parts with their respective part numbers and descriptions for assembly.

Overview

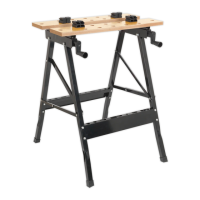
This document describes the Sealey FWB1 Folding Workbench, a versatile and portable tool designed to provide a stable and secure work surface for various tasks. The workbench is engineered for ease of use, durability, and safety, making it suitable for both professional and DIY applications. Its folding design allows for convenient storage and transport, maximizing workspace efficiency.

Function Description

The primary function of the Sealey FWB1 Folding Workbench is to provide a stable platform for clamping and supporting workpieces during various operations. It features a robust construction with two table tops that can be adjusted to accommodate different workpiece sizes and shapes. The workbench is equipped with an easy adjustment handle, allowing users to quickly and securely clamp items. Swivel pegs are included to further secure irregularly shaped objects, enhancing versatility. The folding mechanism enables the workbench to be collapsed for compact storage when not in use, and easily set up for immediate use. Its design incorporates a tool rack, providing convenient storage for essential hand tools, keeping them within reach during work. The workbench is intended for clamping items only and should not be used as a standing platform or to support other platforms.

Usage Features

The Sealey FWB1 Folding Workbench is designed with several features to enhance its usability and safety.

  • Adjustable Table Tops: The two table tops can be adjusted to securely hold workpieces of varying dimensions. This flexibility is crucial for tasks ranging from woodworking to metalworking, ensuring a snug fit and preventing movement during operations.
  • Easy Adjustment Handle: A dedicated handle facilitates quick and effortless adjustment of the clamping mechanism. This feature allows for rapid setup and release of workpieces, improving workflow efficiency.
  • Swivel Pegs: Four swivel pegs are provided to accommodate and secure irregularly shaped objects. These pegs can be positioned to create a custom clamping surface, ensuring stability even for non-standard workpieces.
  • Folding Design: The workbench's ability to fold significantly reduces its footprint, making it ideal for workshops with limited space or for users who need to transport the workbench frequently. The folding process is straightforward, ensuring quick deployment and storage.
  • Integrated Tool Rack: A built-in tool rack offers a practical solution for organizing and storing frequently used hand tools. This keeps the work area tidy and ensures that tools are readily accessible, minimizing interruptions during tasks.
  • Stable Footing: The workbench is designed to maintain correct balance and footing during use. Users are advised to ensure the floor is not slippery and to wear non-slip shoes for added safety.
  • Secure Workpiece Clamping: It is crucial to ensure that the workpiece is correctly secured before operating the workbench. Any workpiece extending beyond the bench's center of gravity must be adequately supported to prevent tipping or instability.
  • Appropriate Working Area: The workbench should be located in an adequate working area that is clean, tidy, and well-lit. This ensures a safe and productive environment for all tasks.
  • Purpose-Specific Use: The workbench is specifically designed for clamping items. It should not be used for any other purpose, such as a standing platform or to support other structures, to prevent damage or personal injury.
  • Environmental Considerations: The workbench should not be exposed to wet weather conditions or excessive heat. It is also important to avoid getting the workbench wet, as this can compromise its integrity and safety.
  • Storage: When not in use, the workbench should be stored in a safe, dry, child-proof area to prevent accidental tipping or damage.

Maintenance Features

Proper maintenance is essential to ensure the longevity and safe operation of the Sealey FWB1 Folding Workbench.

  • Regular Condition Checks: Users should regularly maintain the workbench in good condition. This includes inspecting all parts for wear, damage, or misalignment.
  • Damaged Part Replacement: Any damaged or worn parts must be replaced promptly. It is critical to use only recommended parts to ensure compatibility and maintain the workbench's safety standards. Using non-authorized parts can be dangerous and will invalidate the warranty.
  • Cleaning: The workbench should be kept clean for optimal and safe performance. Regular cleaning helps prevent the buildup of debris that could interfere with the clamping mechanism or other moving parts.
  • Alignment Checks: Periodically check the alignment of all moving parts. Proper alignment ensures smooth operation and prevents unnecessary wear and tear.
  • Missing Parts: Never operate the workbench if any parts are missing. Missing components can compromise the workbench's structural integrity, leading to failure or potential personal injury.
  • Lubrication: While not explicitly detailed, general maintenance practices for tools often include occasional lubrication of moving parts to ensure smooth operation and prevent corrosion, especially in the adjustment mechanisms.
  • Storage Environment: Storing the workbench in a dry environment helps prevent rust and corrosion, extending its lifespan. Keeping it in a child-proof area adds an extra layer of safety.

By adhering to these usage and maintenance guidelines, users can ensure that their Sealey FWB1 Folding Workbench provides years of reliable and safe service.

Sealey FWB1 Specifications

General IconGeneral
ModelFWB1
TypeFolding Workbench
Weight Capacity100kg
Worktop Height850mm
Vice IncludedYes
MaterialSteel
LegsSteel