EasyManua.ls Logo

Sealey GSA70 - User Manual

Sealey GSA70
3 pages
Print Icon
To Next Page IconTo Next Page
Loading...
INSTRUCTIONS FOR
AIR ORBITAL SANDER MINI DISC Ø50MM
MODEL NO: GSA70
Thank you for purchasing a Sealey product. Manufactured to a high standard, this product will, if used according to these instructions,
and properly maintained, give you years of trouble free performance.
IMPORTANT: PLEASE READ THESE INSTRUCTIONS CAREFULLY. NOTE THE SAFE OPERATIONAL REQUIREMENTS, WARNINGS & CAUTIONS. USE
THE PRODUCT CORRECTLY AND WITH CARE FOR THE PURPOSE FOR WHICH IT IS INTENDED. FAILURE TO DO SO MAY CAUSE DAMAGE AND/OR
PERSONAL INJURY AND WILL INVALIDATE THE WARRANTY. KEEP THESE INSTRUCTIONS SAFE FOR FUTURE USE.
1. SAFETY
1.1. GENERAL SAFETY
WARNING! Ensure Health & Safety, local authority, and general workshop practice regulations are adhered to when using this equipment.
WARNING! Disconnect from air supply before changing accessories or servicing.
9 Maintain the sander in good condition (use an authorised service agent).
9 Replace or repair damaged parts. Use genuine parts only. Unauthorised parts may be dangerous and will invalidate the warranty.
9 Use in a suitable clean and tidy work area and ensure there is adequate lighting.
9 Before each use check abrasive pads for condition. If worn or damaged replace immediately.
9 Ensure the abrasive pad rating is the same as, or, greater than the RPM rating of the sander.
9 Ensure there are no flammable or combustible materials near the work area.
WARNING! Always wear approved eye or face and hand protection when operating the sander.
9 Use face, dust, or respiratory protection in accordance with COSHH regulations.
9 Depending on the task, sander noise level may exceed 85dB, in which case wear safety ear defenders.
9 Remove ill fitting clothing. Remove ties, watches, rings, other loose jewellery and contain and/or tie back long hair.
9 Maintain correct balance and footing. Ensure the floor is not slippery and wear non-slip shoes.
9 Keep children and unauthorised persons away from the work area.
9 Check moving parts alignment on a regular basis.
9 Ensure workpiece is secure before operating the sander. Never hold a workpiece by hand.
9 Check the workpiece to ensure there are no protruding screws, bolts, nuts, nails, stones, etc.
9 Avoid unintentional starting.
WARNING! Ensure correct air pressure is maintained and not exceeded. Recommended pressure 70-90psi.
9 Keep air hose away from heat, oil and sharp edges. Check air hose for wear before each use and ensure that all connections are
secure.
9 Prolonged exposure to vibration from this sander poses a health risk. It is the owner’s responsibility to correctly assess the potential
hazard and issue guidelines for safe periods of use and offer suitable protective equipment.
8 DO NOT use the sander for a task it is not designed to perform.
8 DO NOT operate sander if any parts are damaged or missing as this may cause failure and/or personal injury.
WARNING! DO NOT sand any materials containing asbestos.
8 DO NOT carry the sander by the hose, or yank the hose from the air supply.
8 DO NOT force, or apply heavy pressure to the sander, let the sander do the work.
8 DO NOT place air line attachments close to your face and do not point at other persons or animals.
8 DO NOT operate sander when you are tired or under the influence of alcohol, drugs or intoxicating medication.
8 DO NOT use sander where there are flammable liquids, solids or gases such as paint solvents and including waste wiping or cleaning
rags etc.
8 DO NOT carry the sander with your finger on the power lever.
8 DO NOT direct air from the air hose at yourself or others.
9 When not in use disconnect from air supply and store in a safe, dry, childproof location.
1.2. LEAD PAINT WARNING!
Paint once contained lead as a traditional ingredient. The dust caused by the removal of such paint is toxic and must therefore be
avoided. The following action must be taken before using the sander on a surface that you suspect may contain lead paint.
1. User must determine potential hazard relating to age of paint to be removed (modern paints do not have lead content).
2. DANGER! Keep all persons and pets away from the working area. The following are particularly vulnerable to the effects of lead paint
dust: Pregnant women, babies and children.
3. We recommend personal protection by using the following safety items:
a) Paint Spray Respirator (Our ref SSP16EN)
b) PE Coated Hooded Coverall (Our ref SSP267). c) Latex Gloves (Our ref SSP24).
4. Take adequate measures to contain the paint dust, flakes and scrapings.
5. Continue to wear safety equipment as in (3) and thoroughly clean all areas when task is complete.
6. Ensure paint waste is disposed of in sealed bags or containers.
GSA70 | Issue:3 (L) 21/09/17
Original Language Version
© Jack Sealey Limited
Refer to
instruction
manual
Wear eye
protection
Wear ear
protection
Wear
protective
gloves
Wear
a mask
Question and Answer IconNeed help?

Do you have a question about the Sealey GSA70 and is the answer not in the manual?

Summary

SAFETY

GENERAL SAFETY

General safety guidelines and precautions for operating the sander.

LEAD PAINT WARNING!

Specific safety advice and protection for sanding lead-based paint.

INTRODUCTION

SPECIFICATION

PREPARATION FOR USE

Air Supply

Requirements and procedures for connecting and maintaining the air supply.

Couplings

Guidance on using leader hoses and quick-change couplings to reduce vibration.

OPERATION

Assembly

Steps for fitting the backing pad and securing sanding discs.

Operation

Instructions on proper sanding techniques and disc management.

MAINTENANCE

Maintenance Procedures

Routine lubrication, cleaning, and troubleshooting common issues.

Vibration and Safety

Information on Hand Arm Vibration Syndrome and protective measures.

Environmental Protection

Guidelines for recycling and disposing of the tool and its parts.

Overview

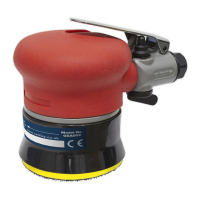
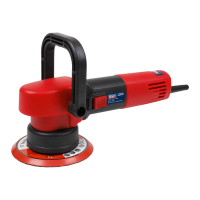
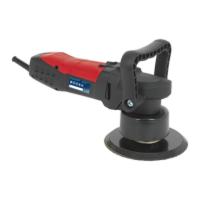
The Sealey GSA70 Air Orbital Sander Mini Disc Ø50mm is a robust and versatile tool designed for various sanding tasks. Its primary function is to provide a combined "rotary" and "random orbit" action, allowing for efficient material removal and a smooth finish. The tool is suitable for professional use in workshops and other environments where controlled sanding is required.

Function Description:

The GSA70 is an air-powered orbital sander that utilizes compressed air to drive its motor. The composite cover, molded around a lightweight aluminum alloy housing, helps reduce the effects of chill on the operator's hands, enhancing comfort and control during prolonged use. The air motor is equipped with quality bearings, ensuring smooth and powerful operation. A key safety feature is the fitted safety release trigger control, which prevents accidental operation, thereby minimizing the risk of injury. The exhaust outlet is designed to adjust 360°, directing airflow away from the operator for a cleaner and more comfortable working environment. The sander is supplied with a Ø50mm pad and an installation spanner, making it ready for immediate use upon connection to an air supply.

The combined "rotary" and "random orbit" action of the sander is crucial for achieving optimal results. The rotary motion provides aggressive material removal, while the random orbit action helps to prevent swirl marks and ensures a smoother, more uniform finish. Users are advised to work progressively from coarse to finer grit grades to achieve the best results, avoiding large jumps in grit size that can leave noticeable marks.

Important Technical Specifications:

  • Model No: GSA70
  • Pad Size: Ø50mm
  • Thread Size: M6 x 1mm
  • Motor Power: 0.3hp
  • Free Speed: 15000rpm
  • Orbit Size: Ø3mm
  • Air Consumption: 4cfm
  • Operating Pressure: 70-90psi (recommended)
  • Inlet Size: 1/4"BSP
  • Weight: 0.7kg
  • Noise Power/Pressure: 101/90dB(A)
  • Vibration/Uncertainty: 4.5/2.25m/s² (Measured vibration emission value (a) and Uncertainty value (k) respectively)

Usage Features:

Before connecting the sander to an air supply, ensure the air valve (throttle) is in the "Off" position. The sander requires an air pressure between 70-90psi and an air flow consistent with the specifications. It is critical to ensure the air supply is clean and does not exceed 90psi, as high pressure or unclean air can significantly shorten the product's life and pose safety risks. Daily draining of the air tank is recommended to prevent water damage to the sander, which can invalidate the warranty. The air inlet filter should be cleaned weekly. For optimal performance, especially with long air hoses (over 8 meters), line pressure may need to be increased. The minimum hose diameter should be 1/4" I.D., and all fittings must have corresponding inside dimensions. Air hoses should be kept away from heat, oil, and sharp edges, and checked for wear regularly.

To fit the backing pad, the rotating head must first be locked using the locking pin. The pin is inserted through an aperture in the outer shroud after rotating the head until the locking hole is visible. The backing pad is then screwed into the threaded hole in the head and tightened. Only discs with speed ratings equal to or higher than the sander's speed rating should be used. Cloth-backed sanding discs are not recommended. After connecting the air supply, press the control valve lever to verify correct operation. The air flow can be regulated using the regulator valve at the back of the handle.

When operating, always wear approved eye or face and hand protection. Depending on the task, face, dust, or respiratory protection may be necessary, and safety ear defenders should be worn if noise levels exceed 85dB. Loose clothing, ties, watches, rings, and other jewelry should be removed, and long hair should be contained or tied back. Maintaining correct balance and footing, and wearing non-slip shoes, is essential. The workpiece must be secure, never held by hand, and checked for protruding screws, bolts, nuts, nails, or stones. Avoid unintentional starting. The sander should not be forced; allow the tool to do the work. Start the sander and bring the disc to the work surface evenly and slowly, moving it back and forth in overlapping areas. Remove the disc from the work surface before stopping the sander. Regularly check the sanding disc for wear and replace it if cracked or damaged. Avoid running the sander in "idle rotation" for extended periods, as this can reduce bearing life.

Maintenance Features:

Before changing accessories, servicing, or performing maintenance, always disconnect the sander from the air supply. Only genuine parts should be used for replacements or repairs, as unauthorized parts can be dangerous and void the warranty.

If the air supply lacks an oiler, the air sander should be lubricated daily with a few drops of good grade air tool oil (such as Sealey ATO/500 or ATO/1000) dripped into the air inlet before use. After use, the sander should be cleaned, and pads replaced when necessary.

Loss of power or erratic action can be attributed to several factors:

  • Excessive drain on the air line: This could be due to moisture or restriction in the air pipe, or incorrect size/type of hose connectors. Checking the air supply and following Section 3 instructions can remedy this.
  • Grit or gum deposits: If the model has an air strainer, it should be removed and cleaned. The sander can be flushed out with gum solvent oil or an equal mixture of SAE No 10 oil and kerosene, then allowed to dry.

If problems persist, contact a local Sealey service agent. For full service, contact your local Sealey service agent. When not in use, the sander should be disconnected from the air supply, cleaned, and stored in a safe, dry, childproof location.

Lead Paint Warning:

If sanding surfaces suspected of containing lead paint (common in older paints), specific precautions must be taken. Lead dust is toxic.

  1. Determine the potential hazard based on the paint's age (modern paints typically do not contain lead).
  2. Keep all persons and pets away from the working area, especially pregnant women, babies, and children, who are particularly vulnerable.
  3. Use personal protective equipment: Paint Spray Respirator (SSP16EN), PE Coated Hooded Coverall (SSP267), and Latex Gloves (SSP24).
  4. Take adequate measures to contain paint dust, flakes, and scrapings.
  5. Continue wearing safety equipment and thoroughly clean all areas after the task.
  6. Dispose of paint waste in sealed bags or containers.

Hand Arm Vibration Injury Warning:

Prolonged exposure to vibration from this sander poses a health risk. The tool's use must be managed adequately. The measured vibration emission value (a) is 4.5 m/s² with an uncertainty value (k) of 2.25 m/s². A specific evaluation of vibration emission should be conducted before commencing a specialist task, as the actual value can vary based on the operator, task, and inserted tool/consumable. Ensuring sufficient length of leader hoses can help reduce vibration. Poor maintenance of the tool can also increase the risk of Hand Arm Vibration Syndrome. Health surveillance is recommended to detect early symptoms of vibration injury. While no specific PPE provides complete protection against vibration injury from uncontrolled use, wearing sufficient clothing (including gloves) to stay warm and dry and maintain good blood circulation in fingers is advised. Prevention is the most effective protection. Further guidance can be found on the HSC website www.hse.gov.uk - Hand-Arm Vibration at Work.

Sealey GSA70 Specifications

General IconGeneral
BrandSealey
ModelGSA70
CategorySander
LanguageEnglish

Related product manuals