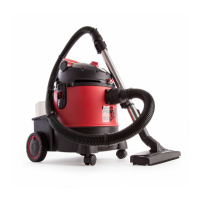
5.3. Fordrysuctiontthecartridgelter(g.2.6a-item18).
5.4. Forcarpetwashingorwetsuctiontthefoamlter(g.2.6b-item25).
5.5. Re-assemblethetoptothetank(g.2.7).
5.6. Fastenthe2clasps(g.2.8).
5.7. Attachthesuctionhosetothesuctioninletonthefrontofthetank(g.2.9).
5.8. Push the end of the suction hose into the air diffuser handle. Push the end of the air diffuser handle into the telescopic
extension tube. Fit the required accessory to the base of the extension tube or directly to the diffuser handle if the extension tube is
notrequired(g.2.10).
6. CARTRIDGE FILTER
WARNING! Always disconnect the plug from the mains supply before removing the tank cover.
IMPORTANT:Thelterismadeofhighqualitypaperdesignedtoltersmallparticlesofdust,thereforethisltermustbeusedtodry
vacuum only.
6.1. Theltermustbecompletelydrywhenusedtocollectdrydustonly.
6.2. Checktheltercarefullyandregularlyfortearsorsmallholes.Evenasmallholecancausedusttobeexhausted.Neverusealter
with holes or tears as this may cause damage to the motor and invalidate warranty. Replace it immediately.
6.3. INSTALLING & CLEANING
6.3.1. Slidecartridgelterdownoverltercage.
6.3.2. Holdthebaserimofthelterandgentlypushandtwistituntilthetoprimtssnugagainstthelidassembly.Ensurethereisnogap
betweenlterandlidassembly.
6.3.3. Toremovelterforcleaning,holdthebaseofthelterandpullgentlyoffthecage.
6.3.4. Cleandrylterbytappingitontheinsideofabin.
7. DRY VACUUM CLEANING
WARNING!Ensureyouread,understandandapplySection1‘SafetyInstructions’.
8 DO NOTvacuumhazardoussubstances.Useofanincorrectcartridgelterwill
invalidate your warranty.
WARNING! Ensure the machine is unplugged from the power supply.
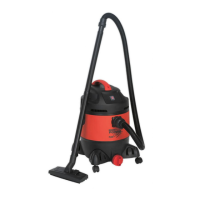
7.1. Fitthecartridgelterdownoverthebasketandpushithomefully(g.3.2).
7.2. Re-positiontheheadontothetank,andclipinplace(g.3.3).
7.3. Insertthelargerendoftheexiblehoseintothefrontinletonthetankandlockinplace.
7.4. Push the required attachment onto the free end of the hose.
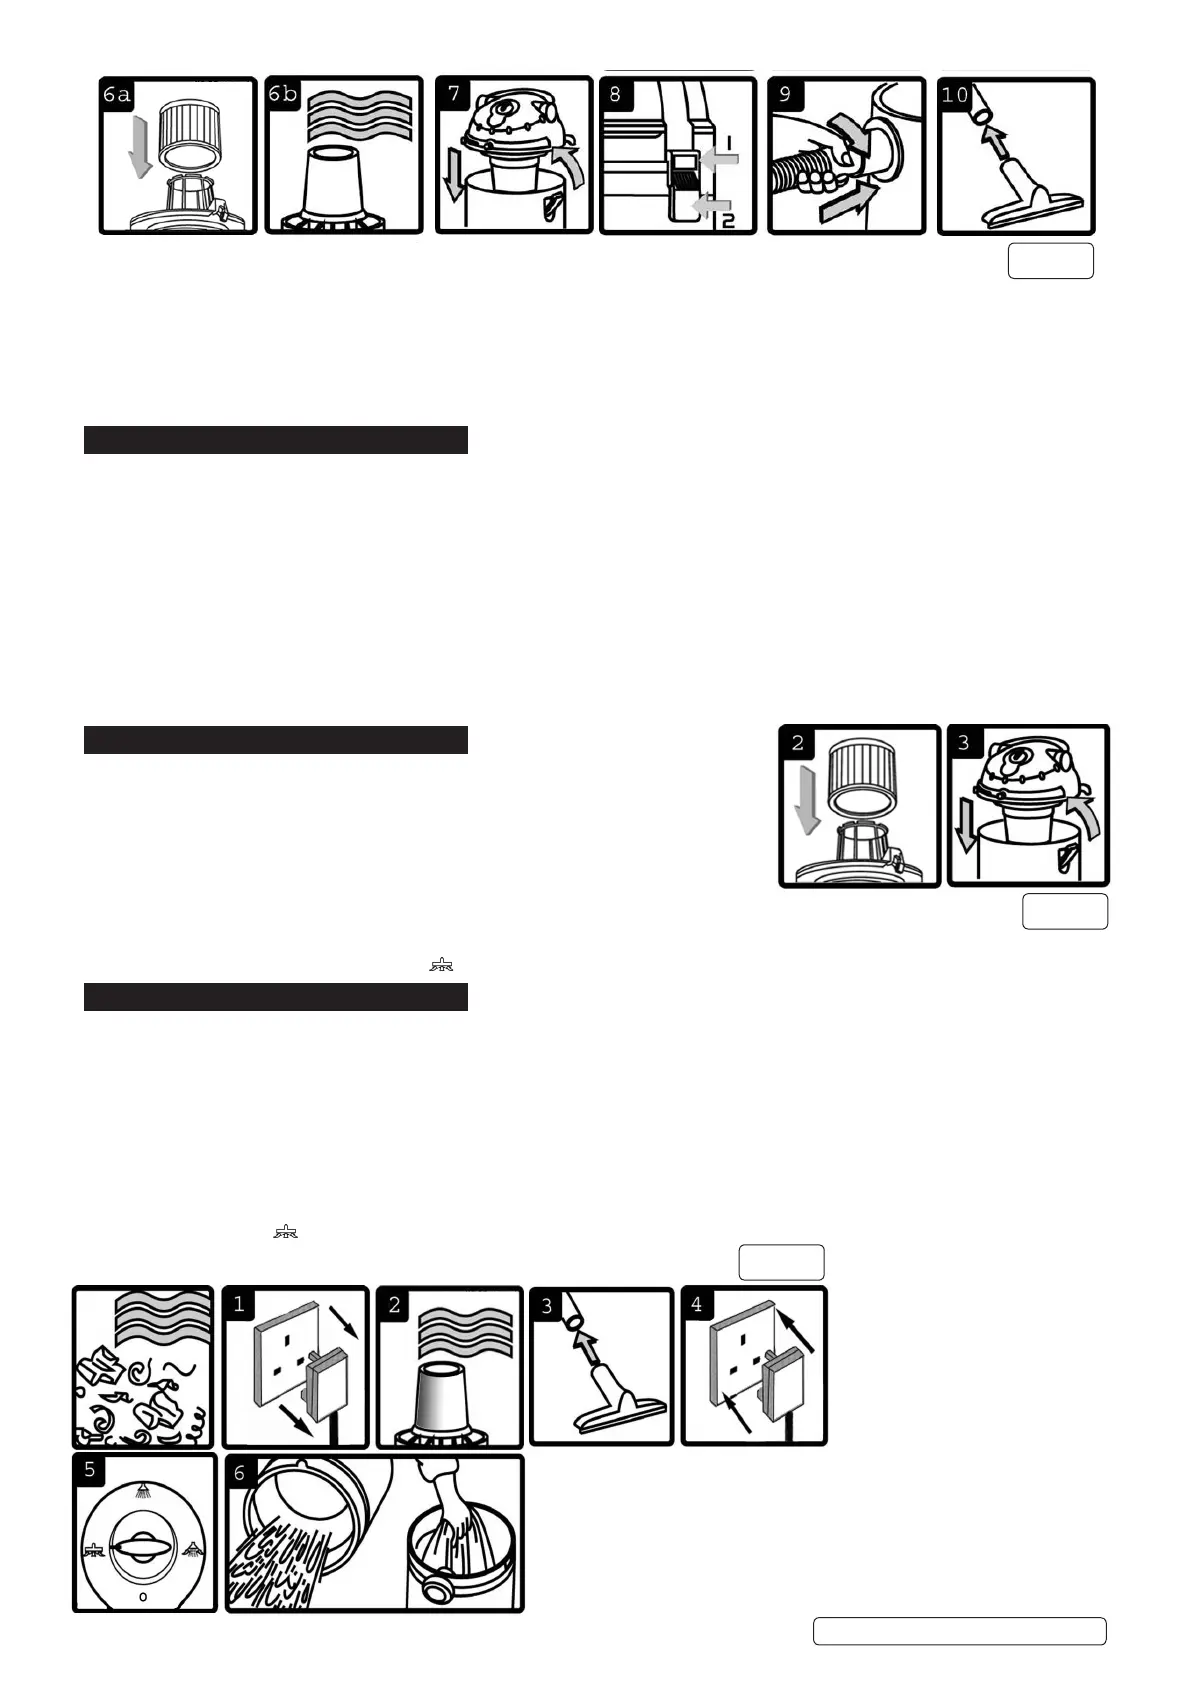
7.5. Plug into the power supply.
7.6. Switch the motor to vacuum only position . When completed, turn the switch to the off position O and unplug from power supply.
8. WET VACUUM CLEANING
WARNING!Ensureyouread,understandandapplySection1‘SafetyInstructions’.
IMPORTANT: Remove plug from power supply before opening unit.
8 DO NOTvacuumsolvents,explosives,ammableand/orhazardousliquidssuchaspetrol,oil,spirits,paint,thinners,acidsetc.Use
ofanincorrectlterwillinvalidateyourwarranty.
WARNING! Ensure the machine is unplugged from the power supply.
8.1. Make sure the tank is clean and free from dust and dirt.
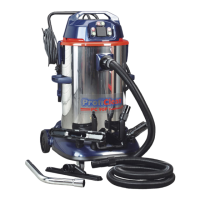
8.2. Forwetvacuumcleaningthefoamltermustbeused(g.4.2).Whenusingthefoamlterrstremoveanycartridgeltertted.
8.3. Ensurethefoamlteriscleananddry.Gentlyplacethefoamlterovertheltercageandadjustcarefully.
8.4. Fittherequiredaccessoriesortubestothesuctionhose(g.4.3).
8.5. Ensure the switch is off position O before plugging into the power supply.
8.6. Switch to position
to use. When completed, turn the switch to the
off position O and unplug from power supply.
8.7. After use, empty the tank and dry.
g.2
g.3
g.4
WARNING! The tank is not designed
for liquid storage. Always empty liquids
after use. Never store the cleaner with
liquid in the tank.
To vacuum large quantities of liquid,
from a sink or tank etc.,
DO NOT immerse the nozzle
completely in the liquid; leave a gap
at the top of the nozzle opening to
allowanairinow.Themachineisttedwithaoatvalvewhichblocksthe
suction action when the tank has reached its maximum capacity. The user will
notice an increase in motor noise. When this happens, turn off the machine,
disconnect from power supply, remove the head from the tank and empty the
liquidintoasuitablereceptacleordrain.Tocontinuetovacuum,retthehead
and proceed. After wet vacuuming, turn the machine off and remove plug from
powersupply.Emptythetankandclean/drytheinsideandoutsidebeforestorage.
PC310|Issue8(H,F,1...)08/08/2019
Original Language Version
© Jack Sealey Limited
 Loading...