4. OPERATION
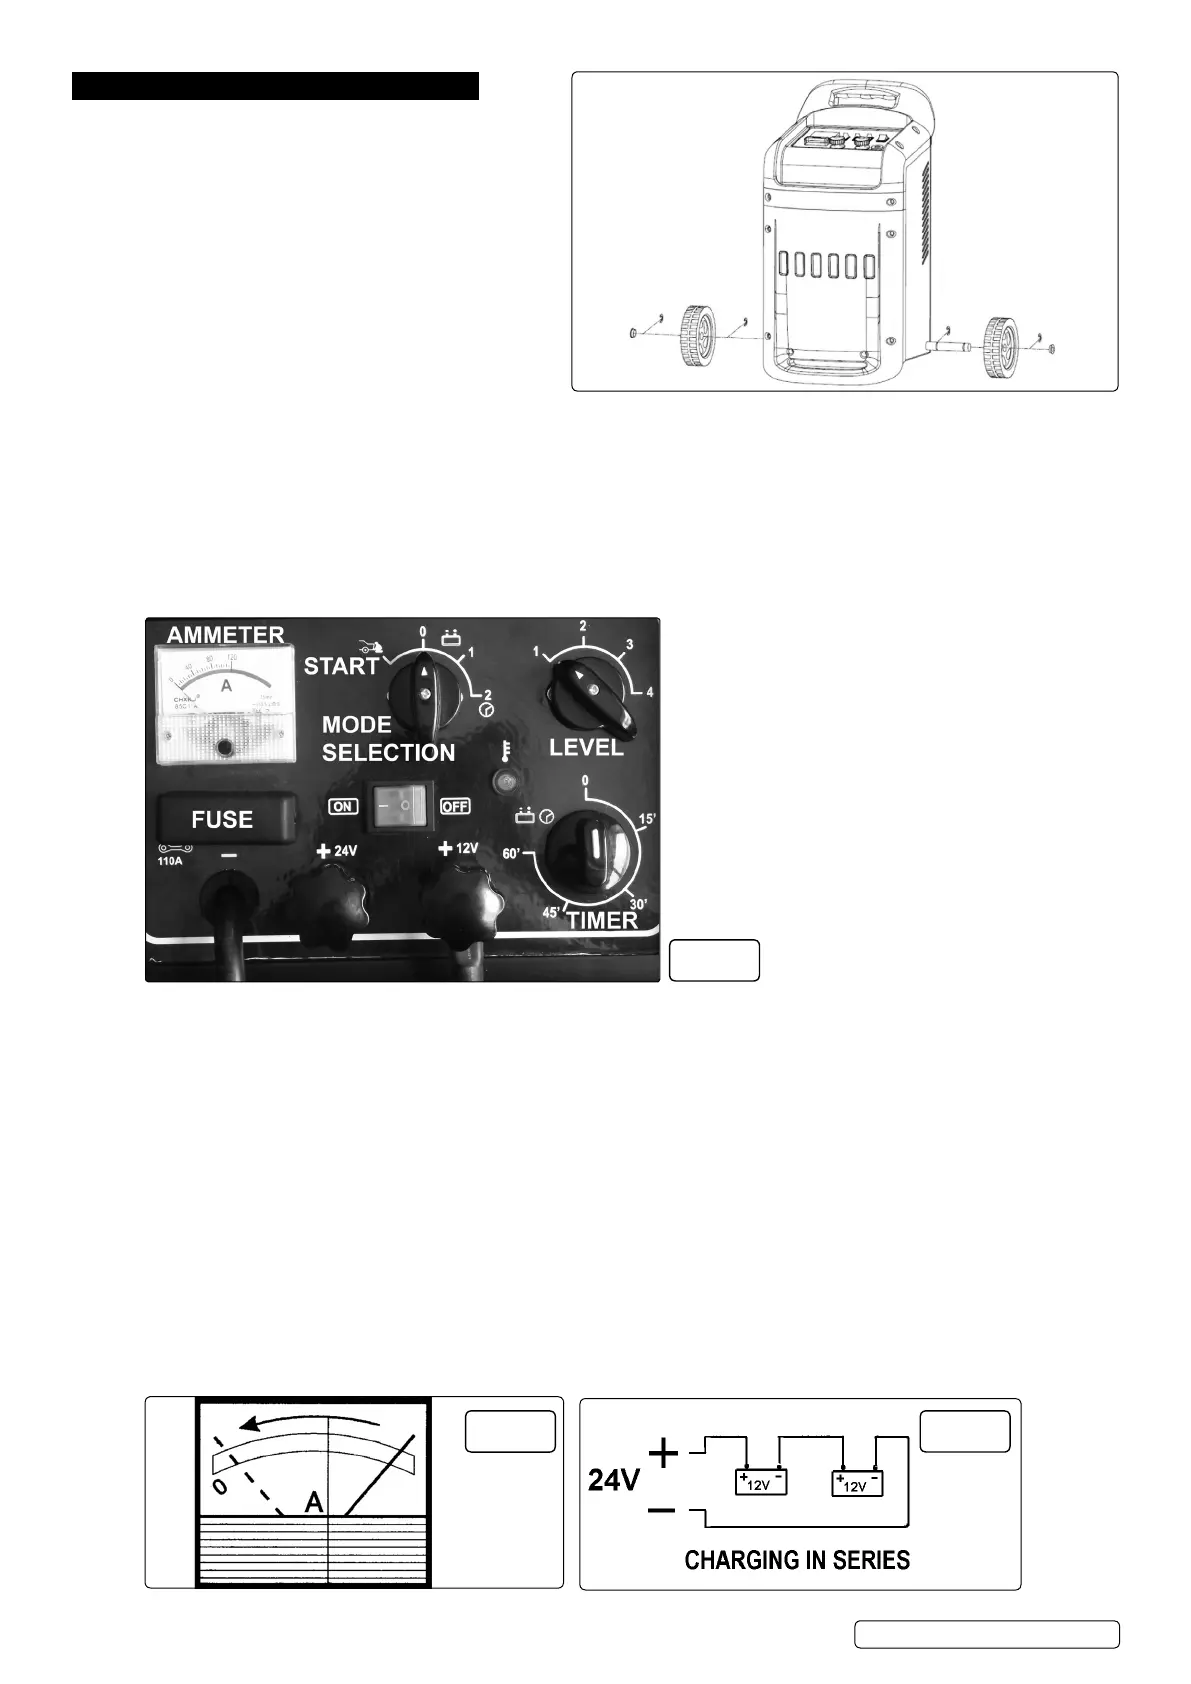
Refer to g.1
4.1. ASSEMBLY
4.1.1. Slide the axle through the casing at the bottom rear
corner. Slide a wheel on to each end of the axle and
retain them with the circlips provided.
4.2. PREPARATION
4.2.1. It is important to correctly prepare for charging ensuring
that you follow Section 1 safety requirements carefully.
4.2.2. Check that the capacity of the battery is compatible with
charger output.
4.2.3. Follow any vehicle manufacturer’s instructions regarding
battery charging. Note special instructions for the
charging of non-removable vehicle batteries.
4.2.4. CheckbatterytoensurethatthePOSITIVEandNEGATIVEterminalsareclearlyidentiablebeforeremovingthebatteryfromthe
vehicle.
4.2.5. Disconnect and remove the battery from the vehicle and place in an appropriate safe area ready for charging.
4.2.6. Remove the battery electrolyte cover or caps to allow the gases produced by charging to escape.
4.2.7. Checkthattheelectrolyteuidlevelinthebatteryisabovetheplates.Ifnot,adddistilledwatertocoverthemby5-10mm.
DO NOTtouchthebatteryuidasitiscorrosive.
4.2.8. Thecorrectchargingstatusofthebatterymaybedeterminedbyusingahydrometerwhichwillmeasurethespecicdensityofthe
electrolyte.Thefollowinggures(kg/ltr)applyat20°C:
1.28 = Fully charged, 1.21 = Half charged, 1.14 = Fully discharged.
WARNING! Be cautious and vigilant as the electrolyte is highly corrosive sulphuric acid.
4.3. CONNECTING CHARGER TO BATTERY
4.3.1. For chargers with dual voltage output, set the charger voltage to match that of the battery (i.e. 12 or 24 volts) by connecting the
positive (red) clamp lead to either the 12 volt + output terminal or the 24 volt + output terminal as appropriate.
4.3.2. Check the charger clamps and battery terminals to ensure that they are clean and free from oxidation.
4.3.3. First connect the charger POSITIVE (Red or +) lead to the POSITIVE (+) terminal of the battery and then the NEGATIVE (Black or -)
lead to the NEGATIVE (-) terminal of the battery.
4.4. CHARGING THE BATTERY
Select charge level 1,2,3,4 using the top left hand level switch.
4.4.1. Checkthecurrentdeliverytothebatterybyreadingtheammeter,seeg.3,onthefrontofthebatterycharger.Initially,therewillbea
high rate of charge which will slowly decrease according to the capacity and condition of the battery.
NOTE: If the charger is connected to a fully charged battery the ammeter will show a low output, no charging is necessary.
4.5. SEALED BATTERIES
4.5.1. Charge a sealed battery very slowly, carefully monitoring the voltage across the battery terminals using a normal tester.
4.5.2. When the battery terminal voltage reaches 14.4V for 12V batteries or 28.8V for 24V batteries, stop charging.
4.6. MULTIPLE CHARGING
WARNING! DO NOT simultaneously charge different types of battery or batteries with different capacities or levels of discharge.
4.6.1. Simultaneous multiple charging should be carried out in series, since this enables monitoring of the current circulating in each battery.
Seeg.4below.
NOTE: If two batteries with rated voltages of 12V are connected in series, move the positive cable to the 24V terminal.
Fig.4
Fig.3
Original Language Version
© Jack Sealey Limited
Fig.2
START800 | Issue:1 23/06/17

 Loading...