EasyManua.ls Logo

Sealey STS104 User Manual

Sealey STS104
3 pages
To Next Page IconTo Next Page
Page #1 background imageLoading...
Page #1 background image
INSTRUCTIONS FOR
SCREWDRIVER TORQUE DIGITAL 0-20NM
1/4”HEX DRIVE
MODEL NO: STS104
Thank you for purchasing a Sealey product. Manufactured to a high standard, this product will, if used according to these
instructions, and properly maintained, give you years of trouble free performance.
IMPORTANT: PLEASE READ THESE INSTRUCTIONS CAREFULLY. NOTE THE SAFE OPERATIONAL REQUIREMENTS, WARNINGS & CAUTIONS. USE
THE PRODUCT CORRECTLY AND WITH CARE FOR THE PURPOSE FOR WHICH IT IS INTENDED. FAILURE TO DO SO MAY CAUSE DAMAGE AND/OR
PERSONAL INJURY AND WILL INVALIDATE THE WARRANTY. KEEP THESE INSTRUCTIONS SAFE FOR FUTURE USE.
1. SAFETY
WARNING! Ensure that Health & Safety, Local Authority Regulations and general workshop practice Regulations are adhered to
when using tools.
8 DO NOT use tools if damaged.
9 Maintain tools to ensure that they are in an adequate condition for safe use and optimum performance.
9 Wear suitable clothing to avoid snagging. DO NOT wear jewellery. Tie back long hair.
9 When not in use, store in a safe, dry childproof place.
9 Keep children and unauthorised persons away from the work area.
WARNING! The warnings, conditions and instructions in this manual cannot cover all possible conditions and situations. The
Operator/ User must apply caution and common sense (good practical sense).
1.1. For battery use and care
WARNING! Keep batteries dry at all times.
8 DO NOT combine used batteries with new ones or mix battery types or mix different brands.
9 Insert the batteries carefully as indicated on the product.
8 DO NOT use a battery if it is cracked or broken.
8 DO NOT heat or incinerate batteries.
8 DO NOT throw battery into a fire.
1.2. Use and care
8 DO NOT exceed the permitted maximum torque value for this meter.
9 Periodic re-calibration is necessary to maintain accuracy.
9 To avoid damaging the torque screwdriver, NEVER apply force to the meter when the power is off. Always turn it on before using.
8 DO NOT turn off the Torque Screwdriver while torque force is applied.
8 DO NOT press, pressure, or damage the LCD display.
8 DO NOT drop or throw this meter. Avoid bumps or shocks to the torque screwdriver.
8 DO NOT leave this meter in any place exposed to excessive heat, humidity, or direct sunlight.
8 DO NOT expose this meter to dust or sand as this could cause serious damage.
WARNING! DO NOT use on live electrical circuits.
2. INTRODUCTION
Suitable for automotive, workshop and factory use. LCD read-out with LED, audible alarm and vibration indicating achieved and target torque
levels. Preset track, peak or desired torque levels using simple push-button menu. Clockwise and anti-clockwise operation. Selectable read-out
in Nm or lb.ft. Accurate to ±1% of stated capacity. Textured, T-handle for added grip and comfort. Supplied with test certicate.
3. SPECIFICATION
Model No. .................................................................. STS104
Drive ..........................................................................1/4”Hex
Range. ...................................................................... 0-20Nm
Length ........................................................................ 170mm
Battery ......................................................2 x AAA (supplied)
Operation
STS104 | Issue 1 15/05/17
Original Language Version
© Jack Sealey Limited
Refer to
instructions
Question and Answer IconNeed help?

Do you have a question about the Sealey STS104 and is the answer not in the manual?

Sealey STS104 Specifications

General IconGeneral
Model NoSTS104
Voltage3.6V
Battery TypeLi-ion
Battery Capacity1.5Ah
Nett Weight0.4kg
Chuck Type1/4" Hex
Charging Time3-5 hours

Summary

Safety Precautions and Warnings

General Workshop Safety

Adhere to Health & Safety, Local Authority, and general workshop practice regulations when using tools.

Manual Limitations Disclaimer

Manual warnings cannot cover all conditions; operator must use caution and common sense.

Battery Handling and Safety

Keep batteries dry, do not mix types/brands, install carefully, and avoid damaged or heated batteries.

Torque Screwdriver Use and Care

Do not exceed max torque, recalibrate periodically, and avoid damage from improper use or environment.

Electrical Safety Warning

Never use the torque screwdriver on live electrical circuits.

Introduction to Torque Screwdriver

Product Specifications

Function Keys and Operation

Button Functions Overview

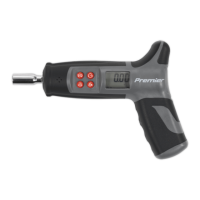
Details the functions of the unit's power, mode selection, backlight, and zero tare buttons.

Preparation and Battery Installation

Instructions for installing batteries and turning the tool on/off.

Mode Selection: Track and Peak

Switch between real-time torque (Track) and maximum recorded torque (Peak) display modes.

LCD Backlight and LED Lamp Control

How to turn the LCD backlight and the front LED lamp on or off.

Unit Selection

Select measurement units between N.m, lbf-ft, or lbf-in.

Programming Pre-set Torque Value

Guide for setting a target torque value, including memorization and warnings for exceeding limits.

Operation and Usage

Reaching Target Torque

User feedback (buzzer, vibration) upon reaching target torque and mode switching.

Directional Force Application

Display indication for clockwise and anti-clockwise force application.

Automatic Power Off

The torque screwdriver automatically switches off after 5 minutes of inactivity.

Maintenance and Care

Storage and Environmental Conditions

Avoid storing in dusty, humid, hot, or direct sunlight conditions; keep dry and clean.

Battery Removal for Long Storage

Remove batteries if the tool is not used for a long period to prevent leakage damage.

Cleaning Instructions

Clean only with a damp cloth; never use liquid, aerosol cleaners, or organic solvents.

Recalibration Requirements

Periodic recalibration (12 months/5000 cycles) or after repair, overload, or misuse is necessary.

Environmental and Battery Disposal

Dispose of product and batteries responsibly according to environmental and WEEE regulations.