Do you have a question about the Sealey VSE952 and is the answer not in the manual?
Tests engine vacuum to diagnose issues like sticky valves or blockages.
Checks vacuum on mechanical fuel pump inlet to assess its condition.
Measures fuel pump pressure output for mechanical pumps.
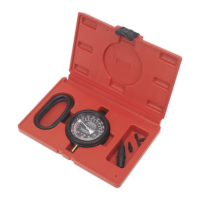
The Sealey VSE952 Vacuum & Fuel Pump Pressure Test Gauge Set is a specialized diagnostic tool designed for automotive applications, particularly for vehicles equipped with carburettor fuel systems. This comprehensive set allows for accurate testing of vacuum systems, fuel pump vacuum, and fuel pump pressure, as well as assisting in carburettor adjustments and diagnosing various engine issues.
The core function of the VSE952 is to measure pressure and vacuum levels within an engine's systems, providing crucial data for diagnosis and adjustment. It features an Ø80mm gauge, which is large enough for clear readings, encased in a protective rubber bumper and equipped with a hanging hook for convenience during use.
For Vacuum Testing, the device connects to the inlet manifold to assess the engine's overall vacuum condition. By observing the gauge needle's behavior—whether it remains steady, drops, pulsates, or rises quickly—users can diagnose a range of engine problems. These include sticky valves, tight valve clearances, burnt valves, weak valve springs, worn or loose valve guides, partially blocked exhaust systems, and late valve timing. It also helps in checking the choke operation by monitoring vacuum rise during engine cranking.
The VSE952 also performs Fuel Pump Vacuum Tests specifically for mechanical fuel pumps. By connecting the gauge to the fuel pump's inlet, it measures the vacuum generated by the pump, indicating its operational health.
For Fuel Pump Pressure Tests, again for mechanical fuel pumps, the gauge connects to the outlet side of the fuel pump. This allows for measurement of the pressure delivered by the pump, which can then be compared against manufacturer specifications to ensure proper fuel delivery. The ability to observe pressure stability after the engine stops helps identify leaks in the fuel pump diaphragm or seals.
Finally, the set is invaluable for Carburettor Testing and Adjustment. After ensuring spark plugs, ignition timing, and valve clearances are correctly set, the gauge connects to the inlet manifold. It helps determine if the carburettor requires adjustment by monitoring the vacuum reading at idle. The tool guides users through adjusting the mixture screw to achieve the highest and steadiest vacuum reading, both at idle and at higher engine speeds (2000-2500rpm). This ensures the carburettor is tuned for optimal performance.
The VSE952 is designed for ease of use and versatility in a workshop environment. It comes with a long flexible hose and a variety of adaptors, including a T-piece and a cone connector, to ensure compatibility with different engine configurations and connection points. These adaptors facilitate connecting the gauge hose as close as possible to the inlet manifold for accurate vacuum readings or to the fuel pump for pressure and vacuum tests.
The gauge's Ø80mm size ensures that readings are easily visible, and the protective rubber bumper helps prevent damage from accidental impacts in a busy workshop. The hanging hook allows the gauge to be suspended, keeping it visible and hands-free during diagnostic procedures.
The manual provides clear, step-by-step instructions for each test, including specific readings to look for and what those readings signify. For instance, a steady reading between 17 and 22 inHg during a vacuum test indicates a healthy engine, while specific drops or pulsations point to particular issues. It also accounts for environmental factors, such as altitude, noting that gauge readings will vary, with a 1 inHg drop for every 1000ft above sea level.
Safety is paramount during operation. The manual emphasizes wearing safety eye protection and protective clothing, avoiding contact with petrol, and having fresh water nearby. It also warns against using the gauge on vehicles other than those with carburettor fuel systems, smoking or using open flames near the vehicle, and operating the tester if it is damaged.
While the VSE952 is a robust diagnostic tool, its maintenance primarily revolves around proper handling and storage to ensure its longevity and accuracy. The manual advises against dismantling the test gauge, stating that it must be checked by qualified service personnel only if issues arise. This suggests that internal components are not user-serviceable.
Users are instructed to keep the tester dry and avoid using it in damp or wet locations or areas with condensation, as moisture can damage the internal mechanisms. After use, the tester should be stored in a safe, dry, childproof location to protect it from damage and unauthorized access.
The set is supplied in a storage case, which is crucial for protecting the gauge, hose, and adaptors from dust, dirt, and physical damage when not in use. This organized storage also helps prevent loss of the various components, ensuring the complete set is ready for the next diagnostic task.
Regular adherence to the safety guidelines, such as keeping the work area clean and uncluttered, also contributes to the overall maintenance and care of the device by preventing accidents that could lead to damage. The robust design, including the rubber bumper, offers a degree of inherent protection against minor impacts, contributing to its durability in a workshop environment.
| Model No | VSE952 |
|---|---|
| Nett Weight | 0.5kg |
| Display | LCD |
| Weight | 0.5kg |
| Battery Type | 9V |