This document is an owner's manual for a Sears Craftsman 900 Series 14 Inch Tine Width Rear Tine Tiller, model number 944.629660. The manual provides detailed instructions for assembly, operation, maintenance, and repair of the tiller.
Function Description
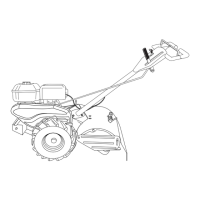
The Sears Craftsman 900 Series Rear Tine Tiller is designed for cultivating soil, preparing seedbeds, and weeding. Its primary function is to break up and aerate soil, making it suitable for planting. The rear tine design is generally preferred for heavier-duty tasks and for breaking new ground, as the tines rotate in the opposite direction of the wheels, providing better traction and deeper tilling.
Important Technical Specifications
- Model Number: 944.629660
- Series: 900 Series
- Tine Width: 14 inches
- Tine Type: Rear Tine
- Engine: LCT Model PLMHK14600124P (208cc)
- Fuel Capacity: 3 quarts (2.8L)
- Oil Type (API-SG-SL): SAE 10w30 Above 32°F/0°C, SAE 5w30 Below 32°F/0°C
- Oil Capacity: 20 oz./0.6L
- Spark Plug: NGK BPR6ES or TORCH-F8RTC
- Spark Plug Gap: .030" (0.76mm)
- Tire Pressure: 20 PSI
Usage Features
The tiller offers several features to enhance usability and control:
- Drive Control Bar: Used to start the engine.
- Shift Lever: Used to shift transmission gears. The shift lever indicator shows which gear the transmission is in.
- Throttle Control: Used to control engine speed.
- Fuel Valve: Used to turn fuel off and on.
- On/Off Switch: Used to stop the engine.
- Depth Stake: Controls depth at which the tiller will dig.
- Leveling Shield: Levels tilled soil.
- Tine Operation - With Wheel Drive: Always release the drive control bar before moving the shift lever into another position. The movement is achieved by moving the shift lever to the appropriate position and engaging the drive control bar.
- Forward - Wheels Only/Tines Stopped: Releases the drive control bar and moves the shift lever indicator to "F" (forward) position. Engage the drive control bar and the tiller will move forward.
- Reverse - Wheels Only/Tines Stopped: Releases the drive control bar and moves the shift lever indicator to "R" (reverse) position. Hold the drive control bar against the handle to start tiller movement.
- Hard to Shift Gears: Briefly engage the drive control bar and release or rock the tiller forward and backward until able to shift gears.
- Depth Stake Adjustment: The depth stake can be raised or lowered to allow more aggressive tilling and cultivating, or to more easily transport the tiller.
- Tilling: The depth stake is used to pull the depth stake pin and place the depth stake up for increased tilling depth. The place shift lever indicator in the appropriate position for tilling.
- Turning: Release the drive control bar, move the throttle control to "SLOW" position, place the shift lever indicator in "F" (forward) position, and lift the handle to raise the tines out of the ground. Swing the handle in the opposite direction you wish to turn, being careful to keep feet and legs away from the tines.
- Transport: The depth stake pin is moved to the top hole for transporting the tiller. The depth stake is placed in the top hole to lift the tines off the ground. The shift lever is placed in "F" (forward) position for transporting. The drive control bar is held against the handle to start tiller movement. Tines will not turn.
- Starting the Engine: Ensure the fuel valve is open, the spark plug wire is connected, the engine is cold (for choke), the throttle lever is in the "ON" position, and the shift lever is in the "ON" position. Pull the recoil starter handle quickly.
- Cultivating: Tilling is done by moving the throttle to "FAST" and "IDLE" positions. The depth stake can be set at 1-2 inches for light cultivation or up to 4-6 inches for deeper tilling.
Maintenance Features
The manual outlines a comprehensive maintenance schedule to ensure the longevity and optimal performance of the tiller.
Maintenance Schedule:
- Before Each Use: Check engine oil level.
- Every 5 Hours: Change engine oil, oil pivot points, inspect spark arrester/muffler, inspect air screen.
- Every 25 Hours: Inspect spark arrester/muffler, inspect air screen, clean or replace air cleaner cartridge, clean engine cylinder fins.
- Every 50 Hours: Replace spark plug.
General Recommendations:
- Engine Oil: Use high-quality detergent oil rated with API service classification SG-SL. Check the oil level before each use. Change the oil after every 25 hours of operation or at least once a year.
- Air Cleaner: Clean the air cleaner cartridge every twenty-five hours, or more often if used in dusty conditions. Loosen air cleaner screws, remove the cover, clean debris, and replace the cartridge.
- Cooling System: Keep the engine free of grass, leaves, spilled oil, or fuel. Clean air screen frequently using a stiff-bristled brush. Remove blower housing and clean as necessary.
- Spark Plug: Replace the spark plug at the beginning of each tilling season or every 25 hours of use, whichever comes first.
- Transmission: The transmission is sealed and will not require lubrication unless serviced.
- Cleaning: Do not clean the tiller when the engine and transmission are hot. Use pressurized water (garden hose, etc.) to clean the unit. Keep finished surfaces and wheels free of all gasoline, oil, etc. Protect painted surfaces with automotive type wax.
- Storage: Prepare the tiller for storage at the end of the season or if the unit will not be used for 30 days or more. Drain the fuel tank, clean the entire tiller, inspect and replace belts, lubricate as shown in the Maintenance section, ensure all nuts, bolts, and screws are securely fastened, inspect moving parts for damage, breakage and wear, and touch up all rusted or chipped paint surfaces. Store in a clean, dry area.
- Fuel System: It is important to prevent gum deposits from forming in essential fuel system parts such as the carburetor, fuel filter, fuel hose, or tank during storage. Use a fuel stabilizer to minimize gum formation. Drain the fuel tank and carburetor if storing for longer than 30 days.
Service and Adjustments:
- Adjust Handle Height: Select the handle height best suited for your tilling conditions. The handle height will be different when tilling digs into soil.
- Remove Wheel: Place blocks under the transmission to keep the tiller from tipping. Remove the hairpin clip and clevis pin from the wheel. Remove the wheel and tire. Repair the tire and reassemble.
- Remove Belt Guard: Remove two (2) screws from the side of the belt guard. Remove the hex nut and washer from the bottom of the belt guard (located behind the wheel). Pull the guard out and away from the unit. Replace the belt guard by reversing the above procedure.
- Ground Drive Belt Adjustment: The extension spring should have about 5/8 inch (16 mm) stretch when the drive control bar is in the "ENGAGED" position. This tension can be attained by loosening the cable clip screw, securing the drive control cable, sliding the cable forward for less tension and rearward for more tension until the 5/8 inch (16 mm) stretch is obtained while the drive control bar is engaged. Tighten the cable clip screw securely.
- Tine Replacement: Tines are sharp; wear gloves or other protection when handling tines. A badly worn tine causes the tiller to work harder and dig more shallow. Most importantly, worn tines cannot chop and mix organic matter as effectively nor will it till deeply as good tines. A tine this worn needs to be replaced. To maintain superb tilling performance, the tines should be checked for sharpness, wear, and bending, particularly the tines which are next to the transmission. The gap between the tines exceeds 3-1/2 inches, they should be replaced or straightened as necessary. New tines should be assembled as shown in the figures. Sharpened tine edges will rotate rearward from above.