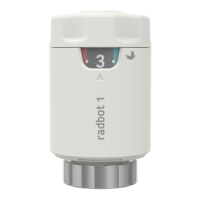
The device is the Radbot 1 Intelligent radiator thermostat, an electronic radiator controller designed for residential or similar indoor use. It regulates the flow of hot water through radiators to control room heating, sensing temperature and occupancy to automatically adjust heating for desired comfort and energy saving.
Important Technical Specifications:
- Type Code: SCV100
- Size (including retaining ring): 90 mm (L) x 55 mm (W) x 55 mm (H)
- Weight (including batteries): Approximately 164 grams
- Power: 2 x 1.5 V (LR6) AA alkaline batteries
- Power Consumption: 3 µW sleep, 1.5 W peak
- Battery Life (normal operating conditions): 2 years
- Temperature Range (working): 0 to 40°C
- Temperature Range (storage): -20 to 60°C
- Max Water Circulation Temperature: 90°C
- Temperature Set Point Range: 15°C to 24°C, with a Frost protection setting of 6°C
- Temperature Set Point Interval: 1°C
- Motor: Linear motion 5.8 mm max
- Pin Force: 70 N max
- Protection Class: IP30
- Pollution Degree: 2
- Other: Ball pressure test verified at 75°C
Usage Features:
The Radbot 1 features a control wheel for setting the comfort level, indicated by a temperature dial on a scale of 1-5. The mid-point (setting 3) corresponds to 19°C. Rotating the dial counterclockwise from 1 to 5 increases the temperature, while rotating clockwise from 5 to 1 decreases it. Each click on the dial changes the set point by 1°C, and each full number changes it by 2°C.
- Boost Button: Provides a 30-minute heating boost, temporarily increasing the temperature to the maximum set point. After the cycle, the device reverts to the previously selected set point. This function is not activated if the room temperature has already reached the maximum supported range. The boost can be cancelled by temporarily turning the temperature dial down and then resetting it.
- Temperature Set Back Feature: Radbot 1 saves energy by setting back the temperature in a room when it detects that the room is not being used. Turning the dial towards the cold end of the scale increases the maximum allowed energy-saving temperature setback.
- Additional Temperature Settings:
- Maximum Allowable Setting: A specific setting allows the room temperature to be set to a maximum of 24°C.
- Frost Protection Mode: Activating this mode (by positioning the dial to the snowflake symbol) sets the temperature to a nominal 6°C to prevent frost damage. If high humidity is detected, the set point may be raised to reduce condensation risk.
- Valve Pin Maintenance Cycle (Decalcination): To ensure correct valve function, Radbot 1 automatically performs a weekly cycle where the valve is fully opened and then returned to its normal position.
Installation and Setup:
- Finding an Ideal Location: Install on radiators with existing thermostatic radiator valves, ensuring free airflow for temperature sensing and occupancy prediction. Do not install behind curtains, radiator panels, or furniture, or in the same room as the main thermostat.
- Removing the Old Thermostat: Loosen the retaining ring at the base of the old valve and lift off the old thermostat.
- Fitting the Correct Adaptor: Select from the provided adaptors (M30x1.5, M30x1.0, M28x1.5, RA, RAVL) to securely fit the radiator valve. Secure the adaptor by screwing it clockwise or tightening the locking screw with a small screwdriver.
- Installing Batteries: Insert 2 x AA batteries. A long red flash indicates the device is active.
- Fitting Radbot 1: Tighten Radbot 1 onto the adaptor using the retaining ring, ensuring the temperature dial faces you for easy reading. Hand tighten the retaining ring to secure the device. It is crucial not to press the boost button or turn the temperature wheel before installation to avoid moving the valve plunger from its factory set position. If this happens, remove batteries for ~2 minutes, reinsert, and wait 60 seconds before restarting.
Maintenance Features:
- Battery Replacement: Under typical operating conditions, batteries should last 2 years. A continually flashing red LED indicates a low battery warning. When replacing batteries, new ones should be inserted within 5 minutes of removing the old ones to retain the device's internal memory of occupancy events and heating schedule. Alternatively, the unit can be removed from the radiator, batteries replaced, and the installation procedure repeated.
Troubleshooting:
- Room gets too hot: Could be due to run-out batteries or insufficient tightening of Radbot 1, preventing the pin from closing the valve. Solution: Replace batteries or check connection, push down Radbot 1, and tighten the retaining nut.
- Radiator will not turn off: Similar to the above, often due to insufficient tightening of Radbot 1, preventing the pin from closing the valve. Solution: Check connection, push down Radbot 1, and tighten the retaining nut.
- Radbot 1 will not respond to controls: Batteries depleted. Solution: Replace with new batteries.
- Rapid flashing LED and no other activity: Device mal-functioning due to hardware/software fault. Solution: Check with customer support.
- Room temperature control seems strange: Batteries were flat/out for an extended period, or the device was moved to a new room and needs to re-learn time of day and room use. Also, obstruction or blocking can cause this. Solution: The device will re-learn over a few days. Replace batteries before they are completely exhausted. Ensure the device is not covered by objects (e.g., curtains) and has adequate air circulation.
- Valve is loose on radiator: Retaining ring not tightened sufficiently, or pin was not fully retracted during installation. Solution: Tighten retaining ring. If still loose, remove and reinstall Radbot, checking the valve adaptor.
LED Pattern:
- Power-on: One long (~1s) flash indicates the device is active.
- Boost: Immediate long flash on releasing the Boost button, medium flash every 2s for two minutes, then flash every 8s for up to 30 minutes if the room is not dark.
- Acknowledge: Single flash once the dial position has been changed.
- Low Battery: Repeated medium flash every 2s until battery is exhausted or replaced. Most Radbot 1 features will not operate.
- Fault: Continual rapid flashing (more than once per second) until battery exhausted or replaced. Radbot 1 will not operate.