Brake Motor Installation & Maintenance
Installation
It is the responsibility of the machine installer to ensure that:
• The brake functions correctly after final installation;
• Earthing has been carried out according to local regulations before the connection to the
mains;
• The supply of motor, rectifier/brake, and auxiliary equipments (if any) has been made using
cables of suitable section so as to avoid overheating and/or too high voltage drop;
• In case of inverter supply the wiring instructions of the inverter manufacturer have been
correctly followed for the motor and a separate supply (directly from the mains) has been
provided for the rectifier/brake.
Note: due to poor supply characteristics we do not recommend use with phase converters.
Maintenance
***Brake reliability & lifetime is dependent upon good periodic maintenance.
• All maintenance work on brake motors should be carried out by qualified personnel, always
with the machine out of operation, disconnected and secured against starting.
Low-torque DC brake motors (with electromagnetic braking in case of supply failure) have a
fixed braking torque; it is not possible to adjust the stopping times of these motors.
I
I
f
f
a
a
b
b
r
r
a
a
k
k
e
e
m
m
o
o
t
t
o
o
r
r
i
i
s
s
r
r
u
u
n
n
n
n
i
i
n
n
g
g
e
e
x
x
c
c
e
e
s
s
s
s
i
i
v
v
e
e
l
l
y
y
h
h
o
o
t
t
i
i
t
t
i
i
s
s
l
l
i
i
k
k
e
e
l
l
y
y
t
t
o
o
b
b
e
e
c
c
a
a
u
u
s
s
e
e
d
d
b
b
y
y
t
t
h
h
e
e
b
b
r
r
a
a
k
k
e
e
n
n
o
o
t
t
r
r
e
e
l
l
e
e
a
a
s
s
i
i
n
n
g
g
.
.
T
T
h
h
i
i
s
s
i
i
s
s
p
p
r
r
o
o
b
b
a
a
b
b
l
l
y
y
a
a
s
s
a
a
r
r
e
e
s
s
u
u
l
l
t
t
o
o
f
f
o
o
n
n
e
e
o
o
f
f
t
t
h
h
e
e
f
f
a
a
c
c
t
t
o
o
r
r
s
s
b
b
e
e
l
l
o
o
w
w
:
:
• Brake air-gap setting incorrect
• Poor rectifier supply connection
• Use with phase converter
• Dust, wood chipping etc locking the mechanism
• Blown or damaged rectifier
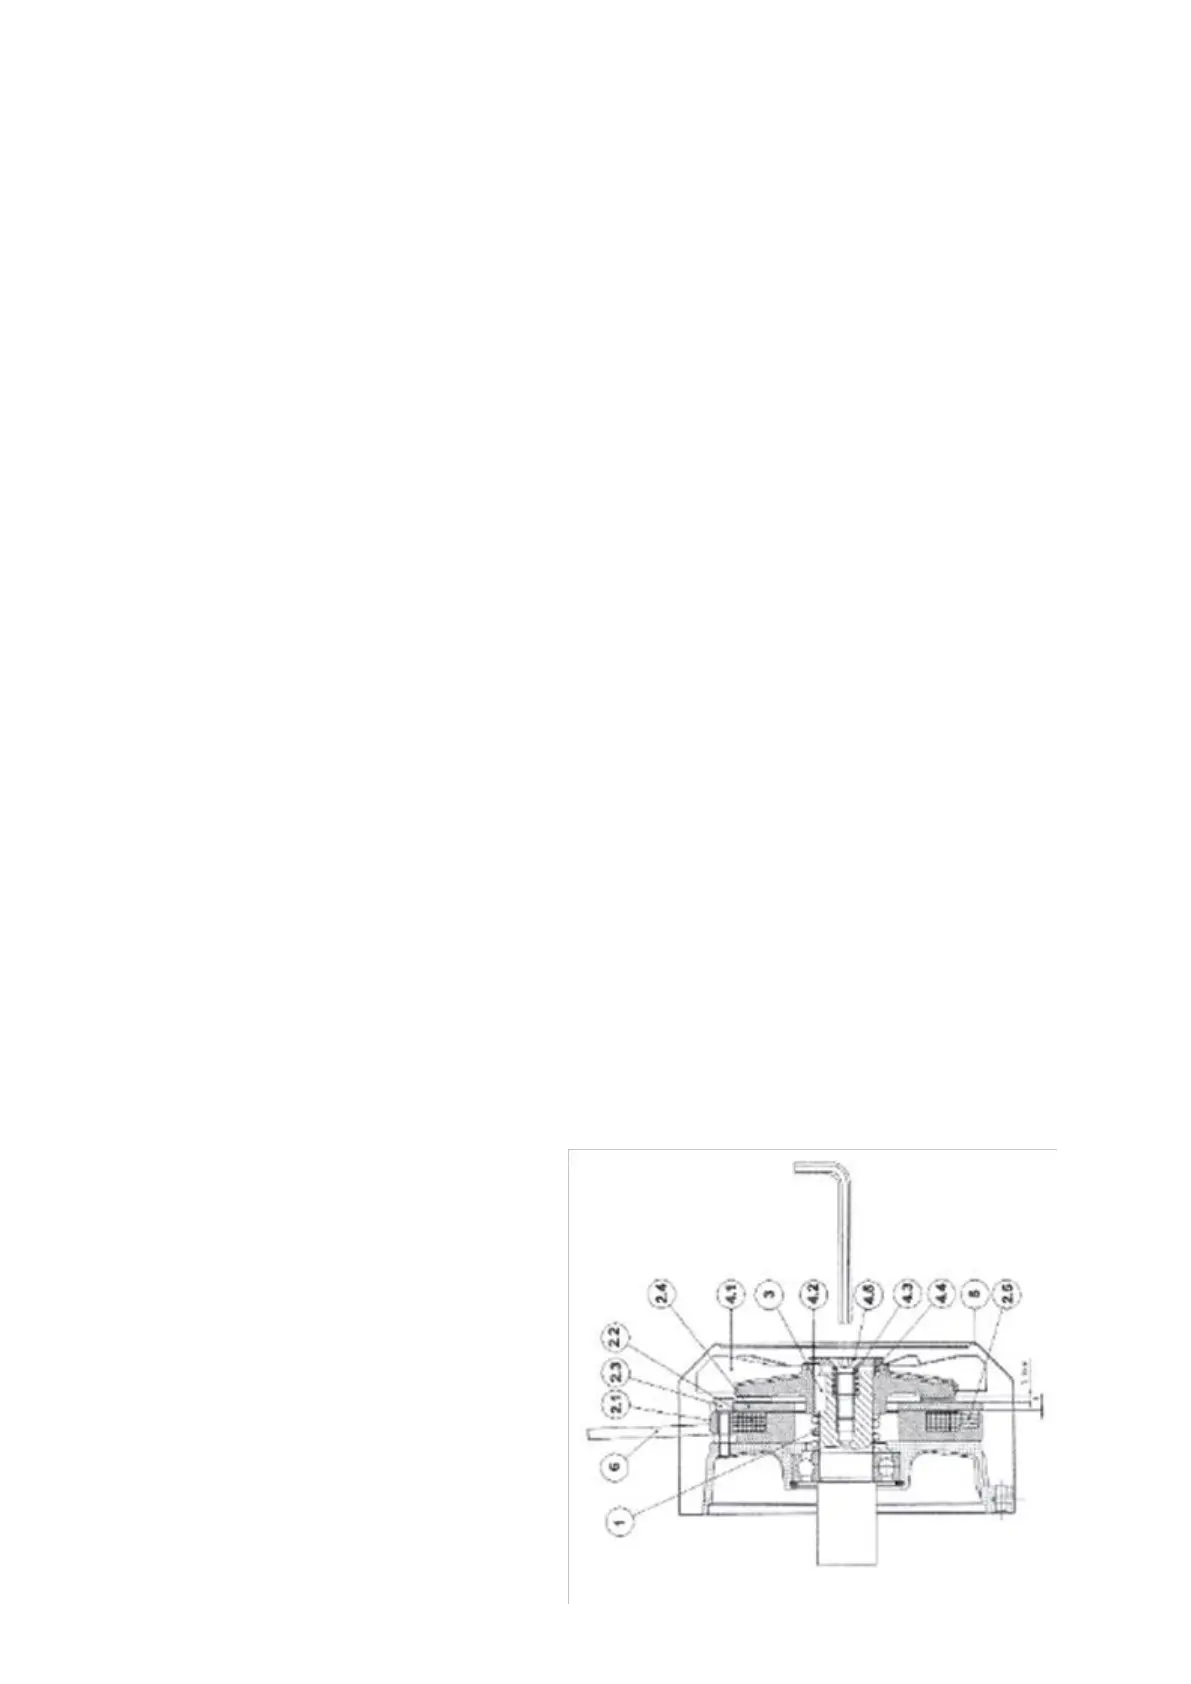
Air-gap Adjustment
1. Tighten down the hexagon head bolt in the centre of the fan cover completely (without
forcing) then unscrew by one third of a turn (with the exception of the TE/TESH motors
which need adjusting by one half of a turn). For a more accurate setting remove the fan
cover & tighten down the hexagon head bolt, again without forcing, then unscrew until the
air-gap (between 2.1 & 2.3) is between 0.3mm & 0.5mm.
2. We recommend the occasional use of an air jet to eliminate dust or other particles that may
have settled on the braking surface.
3. After several air-gap adjustments verify that the thickness of the friction surface is no less
than 1mm, if it is then replace the fan with an original manufacturer’s part.
Parts List:
1 Main contrast spring
2.1 Magnet casing
2.2 Brake coil
2.3 Fastening screw
2.4 Mobile anchor / friction surface
2.5 Braking spring
3 Key
4.1 Fan
4.2 Washer with spigot
4.3 Auxiliary contrast spring
4.4 Elastic pin
4.5 Screw TSPEI UNI 5933
5 Fan cover