20
Mount the Date
jumper.
19
Fix the Date
jumper to the
calendar plate by
tightening the
Date jumper
screw.
Set and hook the
date jumper to the
day star wheel.
21
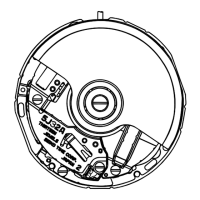
<20>
Mount the Date jumper.
◆
Firmly press down the points
of engagement to securely
set it in position. (455#, 456#)
<19>
Fix the Date jumper to the
calendar plate by tightening
the Date jumper screw.
Lubricate the Day
star wheel.
Lubricate the Day star wheel.
◆
◆
Apply the lubricant as shown Fig.53
below.
Type of oil: AO-3 (Reducing the
resistance by friction)
(68#, 101#)
◆
Set and hook the date jumper
to the day star wheel.
Take care so as not to deform
the date jumper.
Check the clear-
ance between the
wheels under the
Date jumper.
Check the clearance between wheels.
2nd Intermediate
wheel for calendar
corrector
3rd Intermediate
wheel for calendar
corrector
1st Intermediate
wheel for day
corrector
2nd Intermediate
wheel for day
corrector
Day driviing wheel
◆
◆
When checking, the Date jumper should be mounted without clearance (hold the point
Target value)
Tightening torque:
lower than 350gcm
38/51
Fig.53
Fig.52
Fig.51
lightly.)
The points of checking are shown in the above illustrations.
5
4
3
2
1
1
2
3
4
5
68#
455#
456#
101#
PROCESS
No.
 Loading...