8 WWW.SENIXTOOLS.COM
OIL AND FUEL
Attempting to start the engine before it has been
properly lled with lubricant will result in
equipment failure not covered by the warranty.
Do not overll. Overlling the crankcase may cause
excessive smoke, oil loss, and engine damage.
OVERFILLING THE CRANKCASE MAY CAUSE
SERIOUS PERSONAL INJURY. Check the oil level
before each use. The importance of maintaining the
proper oil level cannot be overemphasized. Change the
oil according to the Maintenance Schedule.
Gasoline is extremely ammable. Ignited vapors may
explode. Always stop the engine and allow it to cool
before lling the fuel tank. Do not smoke while lling the
tank. Keep sparks and open ames at a distance from
the area.
Remove the fuel cap slowly to avoid injury from fuel
spray. Never operate the unit without the fuel cap
securely in place.
Add fuel in a clean, well-ventilated outdoor area. Wipe
up any spilled fuel immediately. Avoid creating a source
of ignition for spilled fuel. Do not start the engine until
fuel vapors dissipate.
Gasoline and its vapors are highly ammable and
explosive. To prevent serious personal injury and
property damage, handle it with care. Keep away from
ignition sources and open ames, handle outdoors only.
Pour fuel outdoors where there are no sparks or ames.
Slowly remove the fuel cap after stopping the engine.
Do not smoke while fueling. Wipe spiled fuel from unit.
Move at least 3 m (10 ft) away from the fueling source
before starting engine.
Always wear heavy, long pants, boots, gloves, and a
long-sleeve shirt. Do not wear loose clothing, jewelry,
short pants, sandals, or go barefoot. Secufe hair so it is
above shoulder level.
Use a high-quality SAE 30 weight oil. DO NOT use dirty
oil. Failure to use clean oil of the correct type can cause
premature engine wear and failure.
CAUTION:
CAUTION:
WARNING:
WARNING:
WARNING:
WARNING:
WARNING:
WARNING:
NOTE: This unit was shipped without oil in the
crankcase. Oil must be added before starting the unit.
NOTE: This unit comes with a 2.03 uid oz. (60 ml)
container of oil.
1. Set the unit on a at, level surface.
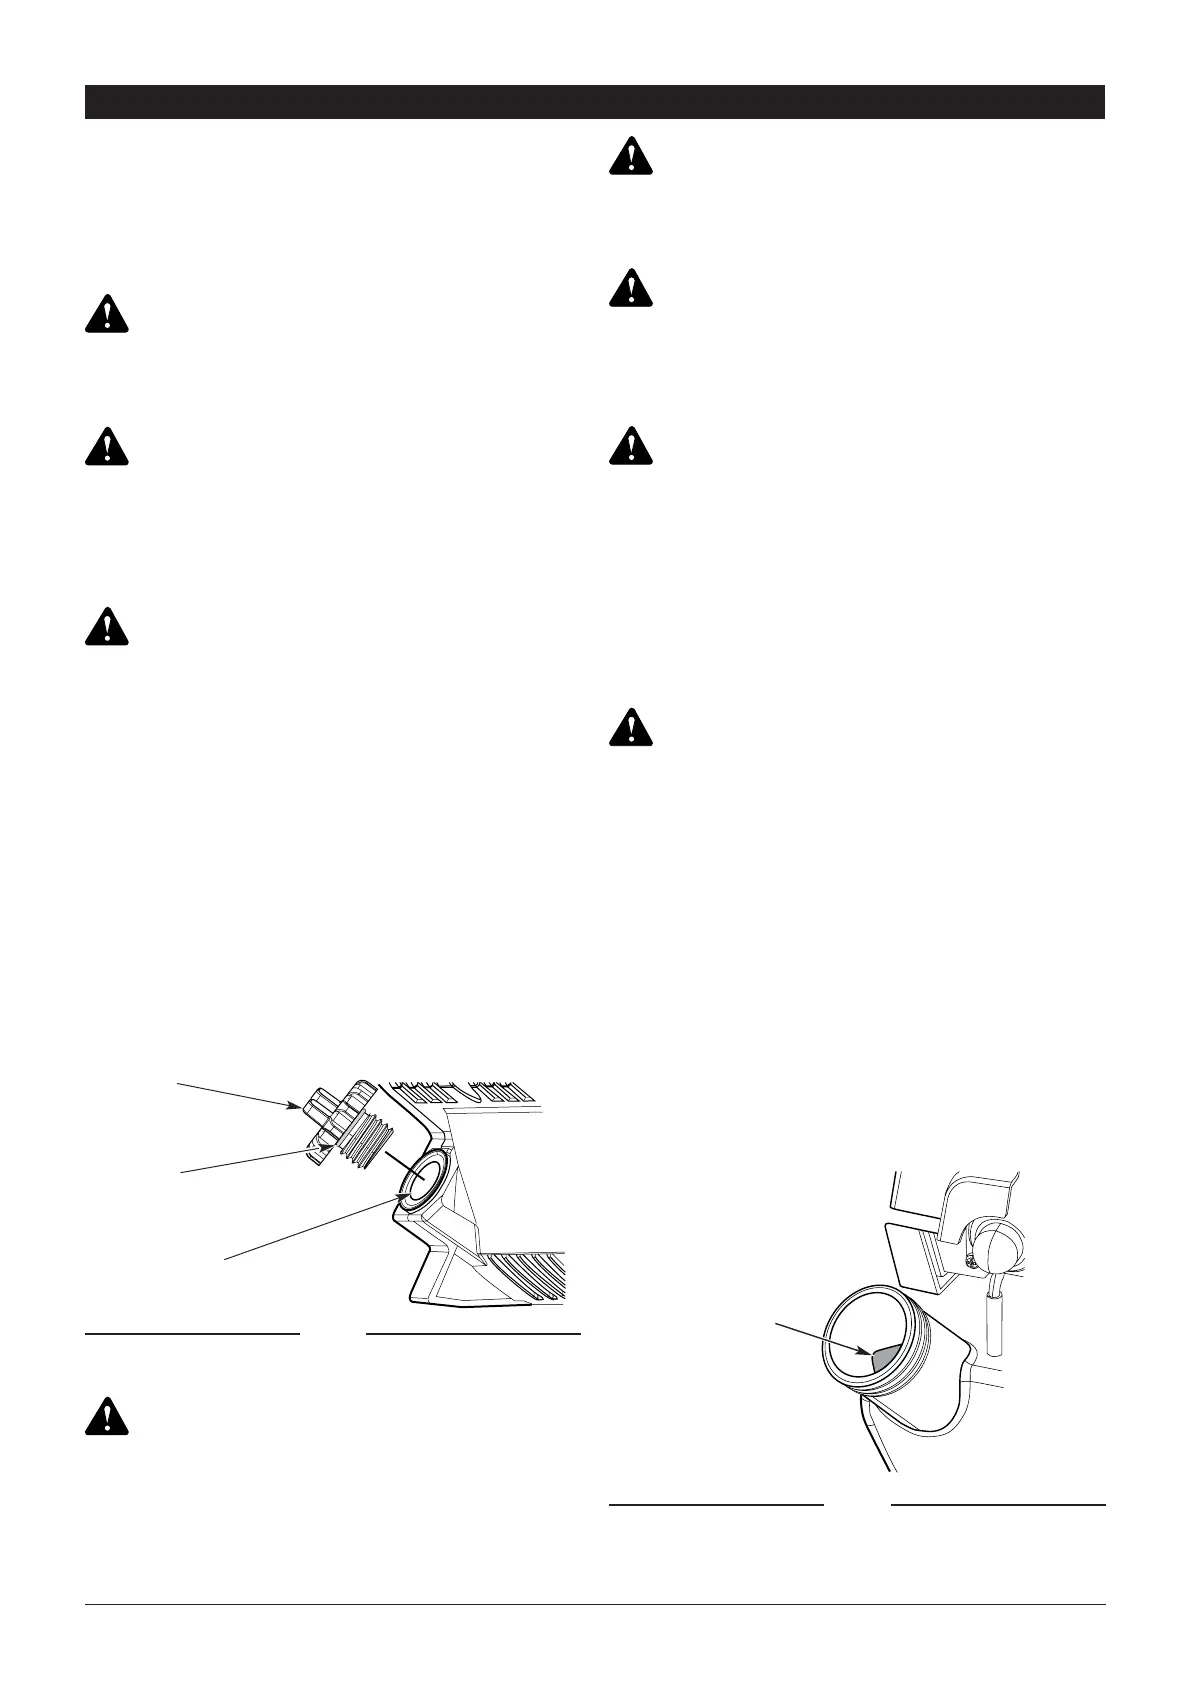
2. Unscrew the oil ll plug (Fig. 6).
3. Pour the entire container of oil into the oil ll hole. DO
NOT overll. Refer to Checking the Oil Level.
NOTE: Never add oil to the fuel tank. This unit has a
four-cycle engine. DO NOT mix oil with gasoline.
4. Wipe up any oil that may have spilled.
5. Reinstall the oil ll plug. Make sure the O-ring is in
place on the oil ll plug (Fig. 6).
1. Position the unit with the fuel cap facing up.
2. Slowly remove the fuel cap.
3. Place the fuel container spout into the fuel tank ll
hole and ll the tank. Stop adding gas when you see
that the level reaches the base of the tank spout
(Fig. 6a).
NOTE: Do not overll the tank.
4. Wipe up any fuel that may have spilled.
5. Reinstall the fuel cap.
6. Move the unit at least 30 ft. (9.1 m) from the fuel
container and the fueling site before starting the
engine.
USING THE RIGHT OIL
ADDING OIL: INITIAL USE
FUELING THE UNIT
Oil Fill Plug
Oil Fill Hole
O-Ring
Fig. 6
Fig. 6a
Base of
Tank Spout