6 Sentry Equipment Corp
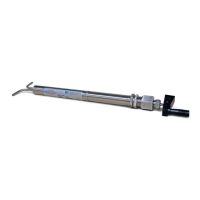
Installing the VREL valve in a Panel
Isolate the sample line and make sure that it cannot be opened during installation of the VREL
valve. Failure to isolate the sample line could expose personnel to high pressure and/or hot
materials.
1. Drill holes in panel per Panel Cutout diagram in Figure 4.
2. Remove valve handle assembly by unscrewing head nut and pulling assembly out of
body.
3. Remove panel lock nut.
4. Insert body assembly from rear of panel using locating pin to position body.
 NOTE
Do not rely on the locating pin to hold the barrel assembly while tightening the head nut.
5. Install panel locknut. Pull up snug.
6. Insert rods into barrel. Be sure keyway on rod assembly lines up with key inside barrel.
Tighten head nut nger tight.
7. From the backside of the panel, use a wrench on the body nut to hold the body while
further tightening the head nut. It may require considerable torque to get a tight seal
on the metal-to-metal sealing surface inside the head nut.
8. The head nut must be fully tightened before the packing nut can be tightened or
loosened. Tighten packing nut with 15-20 ft-lb (20.3-27.1 Nm) of torque.
Connecting Sample Tubing
Isolate the sample line and make sure that it cannot be opened during installation of the VREL
valve. Failure to isolate the sample line could expose personnel to high pressure and/or hot
materials.
Three types of tube end congurations are available:
Type 1: Plain end – 1/4" tubes with no connections for use with customer supplied
compression ttings.
Type 2: Socket weld – socket weld ttings for customer’s 1/4", 3/8" or 1/2" tubing.
Type 3: 37° Fitting - 37° metal to metal tting for customer’s 1/4" or 3/8" tubing.
 Loading...