31
GB
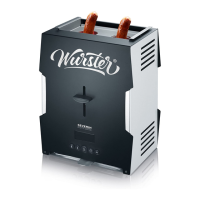
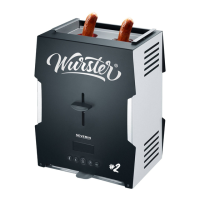
4 Setting up
The appliance should be set up on a suitable worktop meeting following
requirements:
• near an earthed safety socket (minimum fuse protection 10 A),
• level, stable and shock-resistant,
• heat-proof and unaffected by the rubber coating of the feet,
• well away from any heated or inammable surfaces and objects
(minimum 1 m or more)
• well away from walls (minimum 1 m or more)
WARNING!
Fire hazard – The heat radiating from the appliance
is sufciently strong to ignite ammable objects
nearby.
– A minimum clearance of 1 metre or more from
any appliance, overhang, ceiling or other object
must be maintained.
5 Using the appliance for the first time
Before you use the appliance for the rst time, is must be operated once
without any sausages inserted; this will eliminate of any odour typically
emitted when switching on appliances of this type for the rst time:
1. Set up the unit as described in Chapter 4 ‚Setting up‘.
2. Completely remove any packaging materials and stickers from on and
inside the appliance. Pull the grill insert together with the reectors
upwards and out of the appliance (see 9.2 ‚After use: cleaning the grill
insert‘ on page 36). Open and take off the cleaning ap (see 9.3 ‚After
use: cleaning the interior‘ on page 38). Remove all cardboard and
polyfoam inlays from the interior of the appliance.
3. Insert the plug into a suitable safety wall socket.
4. Select the ‘thick sausage’ programme, using the „ “ button.
 The selected button lights up.
5. Push the slide control all the way down until it locks into place.
HINT:
Press down the slide control and hold for 0.5 seconds
until it clicks into place and the countdown or the
animated image „pre-heating phase“ starts.
 Pre-heating starts.
 During this phase, the display shows an animated picture.
 Once pre-heating is complete, the display shows the remaining
grilling time, counting down.
HINT:
During the rst few heating cycles, the appliance
may emit a slight smell and a little smoke. This is
harmless and will disappear after a short while.
Ensure adequate ventilation.
6. Wait until the grilling cycle has nished, when the slide control comes
up again.
7. Let the appliance cool for 2 minutes before starting the next grilling cycle.