114
1-BIT PORTABLE MINIDISC RECORDER MD-DR77
ENGLISH OPERATION MANUAL
MD-DR77(J)
TINSJA019AWZZ
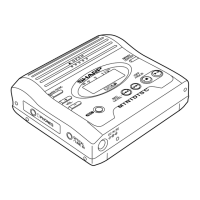
INSERTING A MINIDISC
(page 23)
1. Move the OPEN lever in the direction shown by the arrow to
open the disc holder.
2. Insert the arrow end of the MiniDisc first while pushing the cen-
ter of the MiniDisc and close the disc holder.
RECORDING
(pages 24 - 46)
Purchase a commercially available cable for recording.
About the TOC (Table of Contents) (page 27)
To avoid data loss while recording or editing (TOC indicator lights
or flashes), do not;
Subject the main unit to shock or vibration.
Unplug the AC adaptor.
Remove the battery.
While “TOC” is displayed, you cannot eject the MiniDisc. Eject it
after turning off the power.
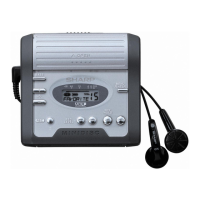
Recording from audio equipment
(manual recording) (pages 28 - 31)
1. Insert a recordable MiniDisc.
2. Connect external equipment to the OPTICAL/LINE IN jack.
3. Press the REC button.
4. Start playback on the external equipment and adjust the re-
cording level by pressing the or button.
Adjust it so the level meter fluctuates between – 4 dB and 0 dB
at the maximum level.
5. Press the PAUSE button on the external equipment to enter
the playback pause mode.
6. Press the
button.
7.
Resume playback on the external equipment and start recording.
To pause recording
Press the button.
The track number increases by one.
To resume recording, press the button again.
To stop recording
Press the button.
When you record or edit, “TOC” appears. This indicates the TOC
information is changed, but not recorded yet.
When recording is stopped, TOC is written on the MD.
To turn off the power
Press the button in the stop mode.
Recording from a microphone
(manual recording) (page 33 - 34)
1. Insert a recordable MiniDisc.
2. Connect a plug-in microphone to the MIC IN jack on this unit.
3.
Press the REC button.
4.
Press the MENU button.
5. Select “MIC LEVEL” by pressing the
or button, and
then press the MENU button.
6. Select “ALC-H”, “ALC-L” or “MANUAL“ by pressing the
or button, and then press the MENU button.
7. Press the
button to start recording.
Sound-actuated synchronous recording
(pages 36 - 37)
This function detects sound from the connected equipment and
automatically starts or pauses recording.
1.
Press the REC button.
2.
Press the MENU button.
3. Select “SYNC REC” by pressing the
or button, and
then press the MENU button again.