USER & SAFETY GUIDE
Read before use
This document contains important technical and safety information
about the device and its safety use and installation.
⚠CAUTION! Before beginning the installation, please read this guide and
any other documents accompanying the device carefully and complete-
ly. Failure to follow the installation procedures could lead to malfunction,
danger to your health and life, violation of the law or refusal of legal and/or
commercial guarantee (if any). Allterco Robotics EOOD is not responsible
for any loss or damage in case of incorrect installation or improper opera-
tion of this device due to failure to follow the user and safety instructions
in this guide.
Introduction to Shelly devices
Shelly® is a line of innovative microprocessor-managed devices, which
allow remote control of electric appliances through a mobile phone,
tablet, PC or home automation system. Shelly® devices can work stand-
alone in a local Wi-Fi network or they can also be operated through cloud
home automation services. Shelly® devices can be accessed, controlled
and monitored remotely from any place the user has internet connectiv-
ity, as long as the devices are connected to a Wi-Fi router and the Inter-
net. Shelly® devices have built-in web servers through which the user
can adjust, control and monitor them. The cloud function can be used if
it is activated through the web server of the device or the settings in the
Shelly Cloud mobile application. The user can register and access Shelly
Cloud using either Android or iOS mobile application, or with any internet
browser at https://my.shelly.cloud.
Shelly® devices have two Wi-Fi modes - Access Point (AP) and Client
mode (CM). To operate in Client Mode, a Wi-Fi router must be located
within the range of the device. Shelly® devices can communicate directly
with other Wi-Fi devices through HTTP protocol. An API is provided by
Allterco Robotics EOOD. For more information, please visit
https://shelly-api-docs.shelly.cloud/#shelly-family-overview or contact
us at developers@shelly.cloud.
Control your home with your voice
Shelly® devices are compatible with Amazon Alexa and Google Home
supported functionalities. Please see our step-by-step guide on
https://shelly.cloud/support/compatibility.
Shelly® TRV (the Device) is an intelligent Wi-Fi connected, self-regulating
valve tted to a hot water heating system radiator. It can control the tem-
perature of a room by changing the ow of the hot water through the radi-
ator. Shelly® TRV can maintain the room temperature according to a set
weekly schedule. If needed, the temperature can be changed at any time
by pressing the buttons on the device, or through your mobile phone, tab-
let or PC. Shelly® TRV is powered by a built-in rechargeable battery. The
battery can be recharged via a USB-C connector. Shelly® TRV is designed
to work without recharging for 2 years, but this depends on the specic
working conditions, such as how often it is necessary to adjust the hot
water ow, Wi-Fi signal strength and wireless network quality.
45 6
1
2
3
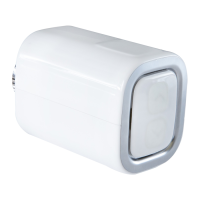
1. Display
2. Up button
3. Down button
4. Temperature sensor
5. USB type C charging port
6. Reset button
7. Metal ring
Installation Instructions
⚠CAUTION! The product is intended for indoor use only.
⚠CAUTION! Protect the product from dirt and moisture.
⚠CAUTION! Do not use the product in a damp environment and avoid
splashing water.
⚠CAUTION! Ensure that the radiator is turned off and has cooled down
before beginning the Device installation.
Compatible valves
If you already have thermostatic radiator valves, which typically have a
dial on top with numbers from 1 to 5, most probably, your radiators are
compatible with Shelly® TRV. Check the list of compatible radiator valves
by brand and model at https://shelly.cloud/knowledge-base/devices/
shelly-trv/.
Radiators with manual valves are not compatible with Shelly® TRV. Man-
ual valves are typically small and discrete. They are standard when you
have a separate thermostat in the room or a central thermostat.
If your radiator valves are not compatible you can use one of the adapters
included in the box.
Remove the existing thermostatic radiator valve
1
1. Turn the dial counter clockwise until the valve is fully open.
2. Unscrew the metal ring counter clockwise to remove the valve.
Install Shelly® TRV
1. Check if you need an adapter and, if necessary, mount the suitable one
before installing Shelly® TRV.
2. Fasten the Shelly® TRV to the radiator valve by turning the metal ring
clockwise. Do not fully tighten the ring.
3. Place the Device display in the correct position and then fully tighten
the metal ring.
⚠CAUTION! Do not try to rotate the Device, if the metal ring is fully tight-
ened. This can damage it.
Switch on the Device
Press briey the Device Reset button. The screen will light up with the
CL message and the motor inside will turn in both directions. This is the
calibration process.
If the calibration process is successful, the screen will display AP and the
Device is ready to be connected to your Wi-Fi network.
If the calibration is not successful, E1 message will be displayed. The
reason is either the ring is not tightened enough or the Device is not prop-
erly mounted to the radiator.
Try tightening the ring or remove the Device and carefully mount it again.
Press and holding for 3 seconds any of the Up and Down buttons. Then
press Down button a couple of times. The Device will try to calibrate again.
⚠IMPORTANT: If the Device has not been added into your Wi-Fi network
in 3 minutes, it will switch off. Press briey the Reset button to start it
again.
If needed, the Device can be switched off manually by pressing briey the
Reset button while the Device is in AP mode.
Charge the device
Fully charge the Device before its rst use for about 7 hours. Battery sta-
tus is displayed while charging. The line, which indicates the battery level,
is ashing while the device is charging. A dot is displayed next to the bot-
tom line, when a charger is connected. If the battery level is not displayed,
press briey the Reset button.
• b
_
. <50%
•
b=. 50-75%
• bX. >90%
⚠IMPORTANT: The device heats up during charging, which prevents it
from measuring the room temperature correctly.
⚠CAUTION! Use only charging adapters that comply with USB-C standard. Do
not use the Device if the charging adapter or the charging cable are damaged.
⚠CAUTION! Do not use the Device if it has been damaged.
⚠CAUTION! Do not attempt to service or repair the Device yourself.
Device Status
To check the Device status press and hold for 5 seconds both Up and
Down buttons. Use the Up or Down buttons to scroll through all the pa-
rameters:
• Mode:
- AP Access point mode
- St Station mode
- CO connected to a Wi-Fi network
• Battery level:
- b
_
<50% (<10% if the dash is ashing)
- b= 50-75%
- bX >90%
• Status:
- E0 No issues
- E1 Calibration problem
- E2 Temperature sensor problem