Do you have a question about the Sherwood PD-702 and is the answer not in the manual?
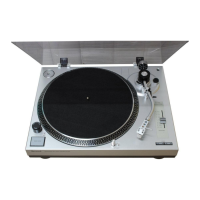
The Sherwood PD-702/702B is a direct drive system, semi-automatic turntable designed for high-performance audio playback. It is intended to provide a refreshing music experience for many years, offering professional-caliber sound.
The turntable's primary function is to play vinyl records. As a semi-automatic turntable, it automates certain aspects of playback, such as automatically lifting the stylus from the record and returning the tonearm to its rest position once a record finishes playing. It also features a direct drive system, meaning the platter is directly driven by the motor, which typically results in better speed stability and reduced wow and flutter compared to belt-drive systems. The turntable includes controls for selecting playback speed (33 1/3 RPM and 45 RPM) and fine-tuning the speed. It also has a cueing device for gently raising and lowering the tonearm, and an anti-skating mechanism to ensure even tracking of the stylus in the record groove.
Voltage Selection: The appliance operates on either 120V or 220V AC. A voltage selector switch is located on the upper left side, under the platter, and must be set to the correct AC line voltage before connecting the power cord. The unit is factory-set to 220V AC, but can be switched to 120V for use in 120V areas.
Assembly: The turntable requires some initial assembly, including removing transportation screws, fitting the platter, laying the rubber sheet, installing the headshell, and installing the counterweight. Transportation screws secure the floating platter and tonearm during shipping and should be retained for future transportation.
Connection: The turntable connects to an amplifier or receiver via RCA cables (white for left, red for right) and a ground wire.
Cartridge Installation: The headshell cartridge connects to the tonearm with specific wiring for left/right positive and negative channels (white for L(+), blue for L(-), red for R(+), green for R(-)).
Stylus Line Adjustment: For optimal tracking, the cartridge screws should be loosened slightly, the tonearm moved above the Stylus Line Direction, and the cartridge adjusted until the stylus tip aligns with the stylus line. The screws are then tightened to secure the cartridge.
Stylus Pressure Adjustment: This involves balancing the tonearm horizontally with the cueing button down, setting the counter ring to zero, and then turning the counterweight clockwise to achieve the designated stylus pressure (grams) for the cartridge. The anti-skating knob should then be set to the same value as the stylus pressure.
Speed Fine Adjustment: The turntable features a strobo light and a speed fine adjustment knob. By observing the strobo marks while playing at 33 1/3 or 45 RPM, the user can adjust the knob clockwise (if marks flow left, indicating faster speed) or counter-clockwise (if marks flow right, indicating slower speed) until the marks appear stationary, indicating the correct speed.
Stylus Replacement: Diamond styli typically last for 500 to 1,000 hours of continuous playing. A worn stylus can cause distorted and harsh treble tones, necessitating replacement. Users should obtain the correct replacement stylus matching their cartridge, which can be readily inserted into the cartridge assembly. The manual provides instructions for removing the stylus assembly (pull up slightly, then pull out toward an arrow) and reversing the procedure for installation.
Dust Cover: The dust cover can be easily detached and features a freestop mechanism, allowing it to remain open at angles from 20° to 60°.
The manual emphasizes that users should not attempt to service the appliance beyond the described instructions and should refer all other servicing to qualified service personnel.