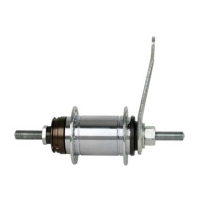
EasyManua.ls Logo

Shimano CB-E110 - User Manual

Shimano CB-E110
5 pages
Print Icon
To Next Page IconTo Next Page
Loading...
CB-E110
JAPAN
Tightening torque:
30 45 N·m
{260 390 in. lbs.}
SI-2860A
CB-E110
General Safety Information
WARNING
CAUTION
To avoid serious injuries:
NOTE:
Spin the wheel and confirm that the braking force of the
coaster brake is correct.
If the brakes are used frequently, the hub shell may
become hot. Do not touch the hub shell for at least 30
minutes after you finish riding the bicycle.
It is important to completely understand the operation of
your bicycle's brake system. Improper use of your bicycle's
brake system may result in a loss of control or an accident,
which could lead to sever injury. Because each bicycle
may handle differently, be sure to learn the proper braking
technique (including bicycle control characteristics) and
operation of your bicycle. This can be done by consulting
your professional bicycle dealer and the bicycle owner's
manual, and by practicing your riding and braking
technique.
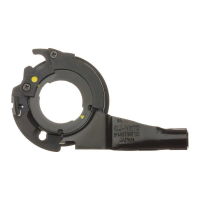
When securing the brake arm to the frame, be sure to use
a brake arm clip that matches the size of the chainstay,
and securely tighten them with the clip screw and clip nut
to the specified tightening torque.
Use a lock nut with a nylon insert (self-locking nut) for the
clip nut. It is recommended that standard Shimano parts be
used for the clip screw, clip nut and brake arm clip. In
addition, use a brake arm clip that matches the size of the
chainstay.
If the clip nut comes off the brake arm, or if the clip screw
or brake arm clip becomes damaged, the brake arm may
rotate on the chainstay and cause the handlebars to jerk
suddenly, or the bicycle wheel may lock and the bicycle
may fall over, causing serious injury.
Obtain and read the service instructions carefully prior to
installing the parts. Loose, worn, or damaged parts may
cause serious injury to the rider.
We strongly recommend only using genuine Shimano
replacement parts.
Check that the wheels are fastened securely before riding
the bicycle. If the wheels are loose in any way, they may
come off the bicycle and serious injury may result.
Read these Technical Service Instructions carefully, and
keep them in a safe place for later reference.
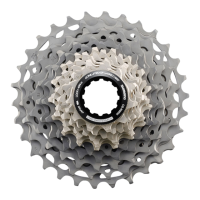
The CB-E110 should be used with Sprockets from 15T
to 23T.
If the wheel becomes stiff and difficult to turn, you
should lubricate it with grease.
Do not apply any lubricant to the inside of the hub,
otherwise the grease will come out.
You should periodically wash the sprockets in a neutral
detergent and then lubricate them again. In addition,
cleaning the chain with neutral detergent and
lubricating it can be a effective way of extending the
useful life of the sprockets and the chain.
If the chain keeps coming off the sprockets during use,
replace the sprockets and the chain.
Parts are not guaranteed against natural wear or
deterioration resulting from normal use.
For maximum performance we highly recommend
Shimano lubricants and maintenance products.
For any questions regarding methods of handling or
adjustment, please contact the place of purchase.
Technical Service Instructions
Coaster Brake
E-type
These service instructions explain how to use and maintain
the Shimano bicycle parts which have been used on your
new bicycle. For any questions regarding your bicycle or
other matters which are not related to Shimano parts please
contact the place of purchase or the bicycle manufacturer.
Mar. 2004 by Shimano Inc. PIT. SZK. Printed in Japan
C
These service instructions are printed on recycled paper.
Please note: Specifications are subject to change for improvement without
notice. (English)
When installing the brake arm clip, securely
tighten the clip screw while holding the clip nut
with a 10 mm spanner.
Note:
After installing the brake arm clip, check that the
clip screw protrudes about 2
3 mm from the
surface of the clip nut.
Clip nut
Brake arm Brake arm clip
Clip screw
(M6 16 mm)
2 3 mm
Tightening torque:
2 3 N·m {17 26 in. lbs.}
Installation of the hub to the frame
Mount the chain on the sprocket, and then set the hub
axle into the fork ends.
Hub axle
Fork end
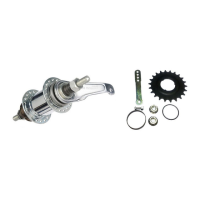
Installation of the sprocket to the
hub
Place the dust cap onto the driver on the right side of the
hub body. Next, install the Sprocket and secure it in place
with the snap ring.
Note the
direction
Snap ring
Snap ring
Sprocket
Sprocket
Dust cap
Hub shell
Driver
Groove of
hub body
Attach the brake arm to the chainstay with the brake
arm clip, and then lightly tighten the clip screw and clip
nut to provisionally secure the brake arm in place.
Brake arm
Clip nut
Clip screw
Brake arm clip
Chainstay
Flange nut or toothed washer and hub nut
Hub nutToothed washerFlange nut
Screw the flange nuts or the toothed washers and hub
nuts onto both ends of the Hub axle. After this, take up
the slack in the chain and then tighten the flange nuts
or hub nuts to secure the wheel to the frame.
Hub axle
Flange nut
Fork end
Sprocket
Overall dimensions of fork end,
stand and mudguard stay
(Varies depending on the bicycle)
Thread should
be visible
Check that the right end of the Hub axle protrudes
from the edge of the flange nut or hub nut by at
least 2 mm.
Note:
Check that the snap ring is sitting securely in the
groove of the hub body.
Note:
Fix the brake arm securely to the chainstay with the
brake arm clip.
Before using the Coaster Brake, check that the brake
works properly and that the wheel turns smoothly.
– To avoid serious injuries:
1.
4.
5.
2.
3.
®
One Holland, Irvine, California 92618, U.S.A. Phone: +1-949-951-5003
Industrieweg 24, 8071 CT Nunspeet, The Netherlands Phone: +31-341-272222
3-77 Oimatsu-cho, Sakai, Osaka 590-8577, Japan
Question and Answer IconNeed help?

Do you have a question about the Shimano CB-E110 and is the answer not in the manual?

Summary

Installation of the Sprocket to the Hub

General Safety Information

Installation of the Hub to the Frame

Summary

Installation of the Sprocket to the Hub

General Safety Information

Installation of the Hub to the Frame

Overview

This document provides technical service instructions for the Shimano CB-E110 Coaster Brake, an E-type hub designed for bicycles. It covers installation procedures for the sprocket and the hub to the frame, along with general safety information, usage notes, and maintenance recommendations.

Function Description:

The Shimano CB-E110 is a coaster brake hub, meaning it integrates the braking mechanism directly into the rear wheel hub. Braking is typically engaged by pedaling backward. The "E-type" designation likely refers to a specific design or compatibility characteristic within Shimano's coaster brake lineup. The hub is designed to work with various sprockets and is intended for use on bicycles, providing a reliable braking solution integrated with the drivetrain.

Important Technical Specifications:

  • Model: CB-E110 (Coaster Brake E-type)
  • Sprocket Compatibility: The CB-E110 should be used with sprockets ranging from 15T (teeth) to 23T.
  • Tightening Torque for Hub Nuts/Flange Nuts: 30 – 45 N·m (260 – 390 in. lbs.). This ensures the wheel is securely fastened to the frame.
  • Tightening Torque for Brake Arm Clip Screw: 2 – 3 N·m (17 – 26 in. lbs.). This torque is critical for securing the brake arm to the chainstay.
  • Hub Axle Protrusion: The right end of the hub axle must protrude from the edge of the flange nut or hub nut by at least 2 mm, with the thread visible, to ensure proper installation and security.
  • Clip Screw Protrusion: After installing the brake arm clip, the clip screw should protrude about 2 – 3 mm from the surface of the clip nut.

Usage Features:

  • Integrated Braking: The coaster brake mechanism is built into the hub, offering a clean aesthetic and potentially simpler operation for some riders.
  • Sprocket Installation: The sprocket is installed onto the driver on the right side of the hub body, secured with a snap ring. The manual emphasizes noting the direction of the sprocket during installation.
  • Hub to Frame Installation:
    1. The chain is mounted on the sprocket, and the hub axle is set into the fork ends.
    2. The brake arm is attached to the chainstay using a brake arm clip, with the clip screw and clip nut provisionally tightened.
    3. Flange nuts or toothed washers and hub nuts are screwed onto both ends of the hub axle.
    4. The chain slack is taken up, and then the flange nuts or hub nuts are tightened to the specified torque to secure the wheel to the frame.
  • Brake Arm Security: The brake arm must be securely fixed to the chainstay with a brake arm clip. It is crucial to use a brake arm clip that matches the chainstay size and to tighten the clip screw and clip nut to the specified torque. The use of a lock nut with a nylon insert is recommended for the clip nut.
  • Pre-ride Check: Before riding, it is essential to confirm that the coaster brake's braking force is correct and that the wheel turns smoothly.
  • Heat Warning: Frequent use of the brakes can cause the hub shell to become hot. Riders are advised not to touch the hub shell for at least 30 minutes after riding to avoid burns.

Maintenance Features:

  • Lubrication for Stiffness: If the wheel becomes stiff and difficult to turn, it should be lubricated with grease.
  • No Internal Lubrication: It is explicitly stated not to apply any lubricant to the inside of the hub, as this could cause grease to come out. This suggests the internal mechanism is factory-lubricated or designed not to require external lubrication in that area.
  • Sprocket and Chain Maintenance:
    • Sprockets should be periodically washed in a neutral detergent and then lubricated.
    • Cleaning and lubricating the chain with neutral detergent is recommended to extend the useful life of both the sprockets and the chain.
  • Sprocket and Chain Replacement: If the chain consistently comes off the sprockets during use, both the sprockets and the chain should be replaced.
  • Genuine Parts Recommendation: Shimano strongly recommends using only genuine Shimano replacement parts for optimal performance and safety.
  • Warranty: Parts are not guaranteed against natural wear or deterioration resulting from normal use.
  • Lubricant Recommendation: For maximum performance, Shimano lubricants and maintenance products are highly recommended.
  • Regular Checks: Users should regularly check that the wheels are fastened securely before riding. Loose wheels can lead to serious injury.
  • Snap Ring Check: After installation, ensure the snap ring is sitting securely in the groove of the hub body.

Safety Information (General):

  • Brake System Understanding: Users must fully understand their bicycle's brake system. Improper use can lead to loss of control, accidents, and severe injury. Learning proper braking technique (including bicycle control characteristics) is crucial, ideally by consulting a professional bicycle dealer, the bicycle owner's manual, and practicing.
  • Secure Brake Arm: The brake arm must be securely fastened to the frame using a correctly sized brake arm clip and tightened to the specified torque. Failure to do so can cause the brake arm to rotate, leading to sudden handlebar jerks, wheel lock-up, and potential falls.
  • Service Instructions: Always read service instructions carefully before installing parts. Loose, worn, or damaged parts can cause serious injury.
  • Wheel Fastening: Always check that wheels are securely fastened before riding. Loose wheels can detach, causing serious injury.
  • Documentation Retention: Keep the Technical Service Instructions in a safe place for future reference.

Shimano CB-E110 Specifications

General IconGeneral
BrandShimano
ModelCB-E110
CategoryBicycle Accessories
LanguageEnglish

Related product manuals