EasyManua.ls Logo

Shoprider 889XLSBN - User Manual

Shoprider 889XLSBN
25 pages
Print Icon
To Next Page IconTo Next Page
Loading...
1
Instruction Manual
889XLSBN
Question and Answer IconNeed help?

Do you have a question about the Shoprider 889XLSBN and is the answer not in the manual?

Summary

Introduction

EMI Warning

Safety Guidelines

Features

Tiller Adjustment

Explains how to adjust the tiller for a comfortable driving position.

Seat Adjustment

Details the reclining, sliding, and swiveling adjustments for the seat.

5-Stage Adjustable Suspensions

Mentions the 5-stage adjustable suspension system on the scooter.

Tiller Control

Front Headlights

Instructions on how to operate the front headlights.

Left and Right Turn Signals

How to use the turn signal switch for making turns.

Hazard Lights

How to activate and deactivate hazard lights.

On-Off Switch

Details on using the key to turn the scooter on and off.

Battery Indicator Gauge

Explains how to read the battery indicator gauge on the console.

Speed Adjustment Dial

How to use the speed adjustment dial and high/low speed switch.

Thumb Lever Control

Explains the function of the thumb levers for forward and reverse motion.

Free Wheel Mode

Operating Your Scooter

Mounting

Instructions on how to safely mount the scooter before operation.

Dismounting

Procedures for safely dismounting the scooter after use.

Parking in Public

Advice on how to park the scooter safely in public areas.

Basic Driving

Step-by-step guide for basic driving operations and familiarization.

Control Through Tight Spots

Tips for maneuvering the scooter through confined spaces and obstacles.

Control Through Doors

Techniques for operating the scooter through doorways.

Control on Ramps

Guidance on safely navigating ramps, including uphill and downhill.

Control Over Grass, Gravel and Inclines

How to operate the scooter on various terrains like grass, gravel, and inclines.

Battery Charging & Maintenance

Battery Charging

Details on the importance and process of nightly battery recharging.

Batteries

Information about the scooter's virtually maintenance-free sealed batteries.

Battery Charger

Guidance on using the specific battery charger supplied with the scooter.

Charging The Batteries

When to recharge batteries based on the indicator and general advice.

Charging Your Scooters Batteries

Step-by-step instructions for plugging in the charger and charging the batteries.

Safe and Lasting Batteries

Tips for ensuring the longevity and proper care of the scooter batteries.

Inspection & Maintenance

Seat Upholstery

How to clean and maintain the seat and backrest upholstery.

Bodywork

Instructions for cleaning and polishing the scooter's bodywork.

Electronics

Information regarding servicing of drive electronics and charger units.

Motor Brakes

How to check the function of the motor brakes.

Driving Brake

How to check the scooter's driving and slowing performance.

Tires

Information on tire pressure, wear, cuts, and foreign objects.

Batteries

Advice on keeping batteries charged, clean, and terminals tight.

Tire Pressure

Specifies the correct tire pressure for front and rear tires.

Trouble Shooting

Warranty

Specifications

Overview

This document is an instruction manual for the Shoprider 889XLSBN mobility scooter, providing comprehensive guidance on its operation, safety, and maintenance.

Function Description

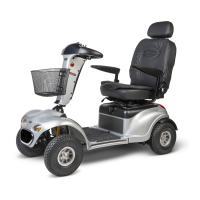
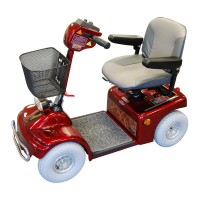
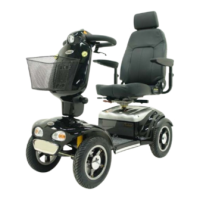
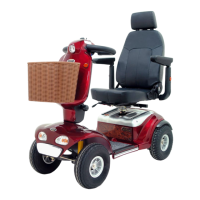
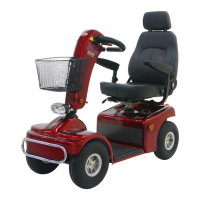
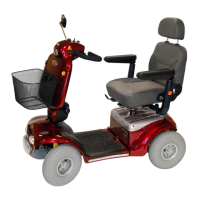
The Shoprider 889XLSBN is a powered mobility scooter designed to assist individuals with mobility challenges. It enables users to travel independently and comfortably, both indoors and outdoors. The scooter is equipped with an electric motor and battery system, offering forward and reverse motion, adjustable speed, and a braking system.

Usage Features

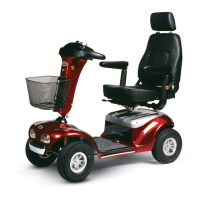
Tiller Adjustment: The scooter features a versatile tiller that can be adjusted to a comfortable driving position. To adjust, pull the black lever on the left side of the tiller, then gently raise or lower it. Releasing the lever locks the tiller into place for safety.

Seat Adjustment: For optimal comfort, the scooter includes a fully adjustable deluxe captain seat.

  • Recline: To recline the seat, pull the lever located on the lower left side of the seat.
  • Slide: To move the seat closer to or farther from the tiller, pull up the black lever under the front right of the seat and slide it to the desired position.
  • Swivel: To rotate the seat left or right, pull up the red lever on the lower right side of the seat.

5-Stage Adjustable Suspensions: The scooter's suspension system can be adjusted to one of five stages, allowing users to customize the spring force for a softer or harder ride. This adjustment is made using a 4mm hex key wrench to twist a position-adjustable hole clockwise (for harder) or counterclockwise (for softer). It's important not to twist counterclockwise from position No.5 next to No.1, as this may require disassembling the suspension to reset.

Tiller Control Panel: The handlebar console houses several controls:

  • Front Headlights (1): A round blue button on the left side of the tiller, below the backwards lever, turns the front headlight on and off.
  • Left and Right Turn Signals (2): A switch on top of the tiller, above the speed dial, activates the turn signals. Flip it right or left for the desired direction, and back to center when done.
  • Hazard Lights (3): A red button on the left side of the tiller, below the backwards lever, activates hazard lights in case of breakdown or assistance needed. Press again to turn off.
  • On-Off Switch (4): Located in the center of the tiller, this switch is operated by inserting and turning a key clockwise to power on the scooter. Turning it counterclockwise switches the scooter off. The digital bar on the battery state indicator moves right when powered on.
  • Battery Indicator Gauge (5): Positioned at the top of the console, this gauge shows battery charge. Red bars moving left indicate decreasing power. Recharging is recommended when two red bars remain.
  • Speed Adjustment Dial (6): This dial allows pre-selection of speed from 1 to 10 increments. Turn counter-clockwise for minimum speed and clockwise for maximum. A "High / Low" switch on top of the console provides extra speed, requiring caution in "High" mode. For climbing slopes, a "high" setting is recommended.
  • Thumb Lever Control (7): Located within the tiller grips, this controls forward and reverse motion. The right thumb lever moves the scooter forward, and the left moves it in reverse. The speed is proportional to the pressure applied. Releasing the lever returns it to neutral, gently stopping the scooter.

Free Wheel Mode: This mode allows the scooter to be moved manually without riding it. To disengage the electromagnetic brake, turn the key switch off, remove the key, and pull up the red free-wheel lever located underneath the rear shroud, above the back left wheel. Always push the lever down to re-engage the brake when done. Never sit on the scooter with free-wheel disengaged, especially on slopes, as there will be no braking function. If the scooter is in free-wheel mode, the speed control will not move it under motor power; depress the free-wheel switch again to re-apply brakes and drive.

Operating Your Scooter:

  • Mounting: Ensure the scooter is off and on a level surface before sitting. Keep both feet on the deck. Insert the key but leave it off.
  • Starting: Turn the speed adjustment dial to 'slow', then turn the key clockwise to 'on'. The battery state indicator will move, and red status lights will illuminate. Press the right thumb control for forward motion. Releasing the lever applies brakes automatically. Avoid pressing the forward/reverse lever when switching on to prevent fault mode.
  • Dismounting: Always switch off the scooter and dismount on a level surface.
  • Parking: Remove the key to engage the brake and make the scooter difficult to move. Note the serial number for security.
  • Basic Driving: Start with the speed control dial on 'slow'. Push the thumb lever gently to accelerate and release to stop. Steer by turning handlebars, remembering to give wide clearance for rear wheels, especially on corners.
  • Reversing: Set the speed control dial to 'slow'. Push the left thumb reverse lever. Steer in the opposite direction of desired movement. Practice in open spaces.
  • Control Through Tight Spots: Stop, turn handlebars in the desired direction, then gently apply power to turn sharply.
  • Control Through Doors: Approach slowly. Use one hand to hold the doorknob/bar and the other to apply power. For self-closing doors, go through and let it close. For doors opening towards you, hold the knob/bar and use reverse power to open, then quickly pass through.
  • Control on Ramps: Use 'slow' speed for controlled descent. The automatic parking brake holds the scooter on uphill stops.
  • Control Over Grass, Gravel and Inclines: The scooter performs well on grass and gravel, but avoid deep, loose gravel or sand. Maximum gradient limit is 8 degrees for stability. Always lean forward when ascending curbs. Do not drive through deep water or heavy rain.

Maintenance Features

General Maintenance: Regular servicing by a Shoprider dealer is recommended. Only qualified technicians should perform service work.

Seat Upholstery: Clean with a damp cloth and mild soap. Avoid abrasive or chemical cleaners, which can damage the coating. UV light can reduce upholstery life, which is a normal aging process and not covered by warranty.

Bodywork: Lightly wash with mild soap and water. Auto polish can maintain paint condition. Do not use abrasive cleaners or strong detergents. Avoid pressure washing, as water can damage electronics. Do not park in damp conditions for extended periods.

Electronics: Servicing of drive electronics and charger should only be done by an authorized Shoprider dealer. These units are sealed, and opening them voids the warranty.

Battery Charging & Maintenance:

  • Charging: Recharge batteries nightly after use for longer life. The scooter's batteries are sealed and maintenance-free. Use only the charger supplied with the scooter; other chargers may cause permanent damage and void the warranty. Recharge when the battery state indicator shows two red bars, rather than waiting until it's completely depleted.
  • Charging Procedure:
    1. Switch off the scooter and remove the key.
    2. Plug the off-board charger into a standard wall socket.
    3. Plug the round tip of the charger into the scooter's charging receptacle, located on the left inside of the delta tiller (flip up the safety cap and align pins carefully).
  • Charging Time: Minimum recharge time is overnight, but it may take longer for older batteries. The scooter can be considered ready after 8 hours. Charge batteries monthly during periods of non-use.
  • Battery Life: Distance traveled will increase over the first few weeks as batteries reach optimum efficiency (approx. 12 full discharge/recharge cycles).
  • Battery Care: Keep batteries clean, in a dry, frost-proof place, and terminals tight. Replace batteries with the standard model fitted to the scooter.
  • Warnings: Do not smoke or use open flames near charging batteries. Use extension cords only if absolutely necessary and ensure they are appropriate to avoid fire/shock risk. Do not use a damaged charger. Do not dismantle the charger (voids warranty). Do not switch off, unplug, or interrupt the recharge cycle until complete (charger indicator light should be green). Failure to observe these instructions can result in overcharging.

Motor Brakes: When the scooter is off or switched on with the speed control throttle in neutral, it should not be possible to push it. If it can be pushed, the motor brakes may be faulty; contact your dealer immediately. Check brake function before each journey.

Driving Brake: When releasing the speed control throttle, the scooter should slow down quickly. If it doesn't, contact your dealer.

Tires: The scooter has air-filled tires. Regularly check air pressure (15-30 PSI for front and rear) and look for wear, cuts, or foreign objects. Adjust pressure for rider weight and comfort. Note that the tire itself may state a maximum pressure of 50 PSI, but this is a maximum, and tires should never be inflated to this level. Do not remove wheel bolts on split wheel rims.

Shoprider 889XLSBN Specifications

General IconGeneral
Weight Capacity500 lbs
Top Speed5 mph
Range25 miles
Ground Clearance3 inches
Seat Width20 inches
Overall Length56 inches
Overall Width27 inches
Tires12 inch pneumatic

Related product manuals