Operations
Press hard against the quill feed lever
to
be
sure the
tips
of
the drive center
and lathe center are engaged, then
lock the
quill
in
place.
WARNING
If
you're using a
cup
center, gen-
erously wax or soap the end
of
the
stock
that
mounts
to
the
cup
cen-
ter. This lubrication helps keep the
cup
center from wearing into the
stock
and causing the
stock
to
loosen on the lathe.
NOTE
• Use as
iittle
quill extension as
possible.
• If you've mounted a live center
in
the tail stock, its ball bearing
construction
will permit more
headstock
pressure
than
the
non-rotating cup center.
Mounting a Spindle
Template
Accurate mounting
of
your spindle
template
is essential
to
prevent inac-
curate diameters, improper position-
ing profiles or unwanted tapering.
To
properly
mount
a spindle template,
follow
this
procedure:
1.
Adjust
the
right· hand
template
support assembly. Loosen the bracket
mounting
screw
(11).
Use a ruler and the
tool
rest assembly
to
position the
template support assembly so
that
the
front edge
of
the template clamp
(5)
is
1-1/4" back from the cup
of
the tail-
stock
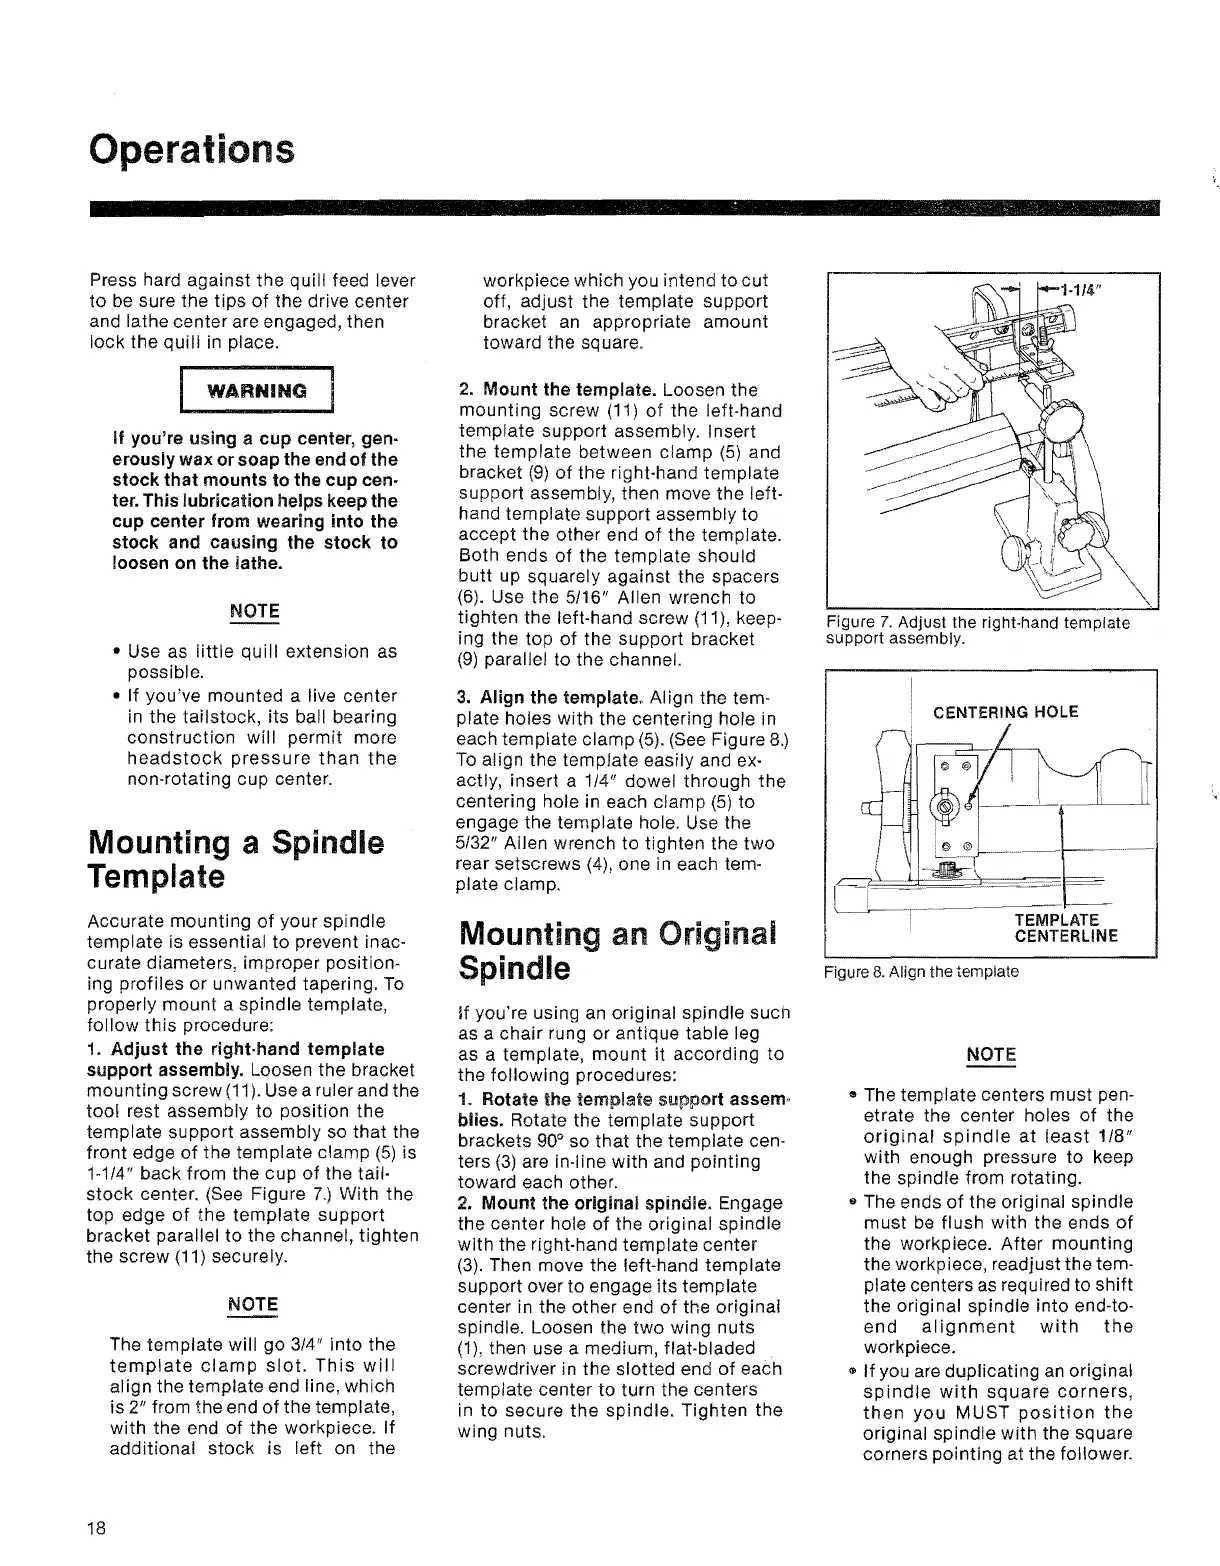
center. (See Figure 7.) With the
top edge
of
the
template
support
bracket parallel
to
the channel, tighten
the screw (11) securely.
NOTE
The template will go
3W
into
the
template
clamp
slot.
This
will
align the template end line, which
is 2" from the end
of
the template,
with the end
of
the workpiece. If
additional
stock
is left on the
workpiece which you intend
to
cut
off, adjust the template support
bracket
an
appropriate amount
toward the square.
2.
Mount
the template. Loosen the
mounting screw
(11)
of
the left·hand
template support assembly. Insert
the
template
between
clamp
(5) and
bracket
(9)
of
the right·hand template
support assembly, then move the left-
hand template support assembly to
accept the other end
of
the template.
Both ends
of
the
template should
butt up squarely against the spacers
(6). Use the 5/16" Allen wrench
to
tighten the left-hand screw (11), keep-
ing the top
of
the support bracket
(9) parallel to the channel.
3. Align
the
template. Align the tem-
plate holes
with
the centering hole in
each template clamp
(5). (See Figure 8.)
To
align the template easily and ex-
actly, insert a 1/4" dowel through
the
centering hole in each clamp (5)
to
engage the template hole. Use the
5/32" Ailen wrench
to
tighten the
two
rear setscrews (4), one
in
each tem-
plate clamp.
Mounting an Original
Spindle
If
you're using
an
original spindle such
as a
chair
rung or antique table leg
as a template,
mount
it according
to
the following procedures:
1. Rotate the template support assem·
blies. Rotate the template support
brackets 90° so
that
the template cen-
ters
(3)
are in-line with and pointing
toward each other.
2.
Mount
the
original
spindle. Engage
the center hole
of
the original spindle
with
the right-hand template center
(3).
Then move the left-hand template
support over
to
engage
its
template
center in the other end
of
the original
spindle. Loosen the
two
wing nuts
(1),
then use a medium, flat-bladed
screwdriver in the slotted end
of
each
template center
to
turn the centers
in
to
secure
the
spindle. Tighten the
wing nuts.
Figure
7.
Adjust the right-hand template
support assembly.
CENTERING HOLE
TEMPLATE
CENTERLINE
Figure
8.
Align the template
NOTE
" The template centers must pen-
etrate the center holes
of
the
original
spindle
at
least
1/8"
with enough pressure
to
keep
the spindle from rotating.
..
The ends
of
the original spindle
must
be
flush
with
the ends
of
the workpiece. After mounting
the workpiece, readjust the tem-
plate centers
as
required to
shift
the origi nal spindle into end-to-
end
alignment
with
the
workpiece.
..
If
you are duplicating
an
original
spindle
with
square
corners,
then
you
MUST
position
the
original spindle
with
the square
corners pointing at the follower.
18


 To Next Page
 Loading...