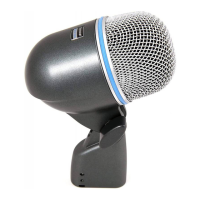
MODEL BETA 56
A
COMPACT SUPERCARDIOID
DYNAMIC MICROPHONE
GENERAL
The compact Shure BETA 56
A is a high output supercar-
dioid dynamic microphone designed for professional sound
reinforcement and project studio recording. Its extremely
uniform supercardioid pickup pattern provides high gain
before feedback and excellent rejection of unwanted noise. A
built–in dynamic locking stand adapter with an integral XLR
connector simplifies installation. The stand adapter keeps the
microphone securely in place, even if it is struck by a
drumstick. Typical BETA 56A applications include close
miking of tom–toms and other percussion instruments, as well
as guitar amplifiers, brass instruments, and woodwinds.
FEATURES
• Tailored frequency response provides drums, amplified
instruments, and horns with studio quality sound
• Built–in stand adapter with dynamic locking system and
XLR connector simplifies setup and provides greater
flexibility
• Uniform supercardioid pattern for high gain before feed-
back and superior rejection of off–axis sound
• Compact design reduces stage clutter
• Hardened steel mesh grille resists wear and abuse
• Neodymium magnet for high signal–to–noise ratio output
• Minimally affected by varying load impedance
• Advanced pneumatic shock mount system that minimizes
transmission of mechanical noise and vibration
• Legendary Shure quality and reliability
GENERAL RULES FOR MICROPHONE USE
1. Aim the microphone toward the desired sound source and
away from unwanted sources. This may not be obvious or
intuitive, since supercardioid microphones such as the
BETA 56A have narrow pickup patterns and can pick up
sounds from the rear. Refer to Figure 1 on the following
page.
2. Place the microphone as close as practical to the desired
sound source (refer to the table in the opposite column).
3. Work close to the microphone for extra bass response.
4. Use only one microphone to pick up a single sound source.
5. Use the fewest number of microphones as practical.
6. Keep multiple microphones separated by a distance equal
to at least 3X the distance to the nearest sound source.
7. Place mics as far as possible from reflective surfaces.
8. Use a windscreen when using the microphone outdoors.
BETA 56A APPLICATIONS AND PLACEMENT
The most common BETA 56A applications and placement
techniques are listed in the following table. Keep in mind that
microphone technique is largely a matter of personal taste;
there is no one “correct” microphone position.
APPLICATION SUGGESTED MICROPHONE
PLACEMENT
TONE
QUALITY
Tom–Toms One BETA 56A on each tom, or be-
tween each pair of toms, 2.5 to 7.5
cm (1 to 3 in.) above drum heads.
Aim each mic at top drum heads.
On double head toms, you can also
remove bottom head and place a
mic inside pointing up toward top
drum head.
Medium attack;
full, balanced
sound.
Medium attack;
full, balanced
sound.
Snare Drum 2.5 to 7.5 cm (1 to 3 in.) above rim
of top head of drum. Aim mic at
drum head.
If desired, place a second mic just
below rim of bottom head.
Most “snap”
from drumstick.
More “snare”
sound.
Guitar & Bass
Amplifiers
2.5 cm (1 in.) from speaker, on–
axis with center of speaker cone.
2.5 cm (1 in.) from speaker, at edge
of speaker cone.
15 to 30 cm (6 to 12 in.) away from
speaker and on–axis with speaker
cone.
60 to 90 cm (2 to 3 ft .) back from
speaker, on–axis with speaker
cone.
Sharp attack;
emphasized
bass.
Sharp attack;
higher frequency
sound.
Medium attack;
full, balanced
sound.
Softer attack;
reduced bass.
Brass &
Woodwinds
Brass: 30 to 90 cm (1 to 3 ft.) away,
on–axis with bell of instrument.
Woodwinds: 2.5 to 15 cm (1 to 6 in.)
away, on–axis with bell of instru-
ment.
Bell of instrument 90° off–axis from
front of mic.
Bright, clear
sound.
Bright, clear
sound.
Softer, mellow
sound.
MOUNTING THE BETA 56A ON A MICROPHONE STAND
The built–in stand adapter features a dynamic locking
system that permits adjustments to the microphone’s posi-
tion, but resists slipping when struck by drumsticks. To mount
the BETA 56A on a stand and adjust its position, proceed as
follows:
1. Screw the integral stand adapter onto the end of a micro-
phone stand (see Figure 4). Adjust the stand height and
position as necessary. Make sure the adjustment knob on
the adapter is loose.
2. Pivot the BETA 56A until it is in the desired position relative
to the drum head or instrument speaker.
3. Lock the BETA 56A in place by rotating the thumbscrew on
the stand adapter clockwise until it is tight. Do NOT use
tools to overtighten the adjustment knob.
4. If necessary, make minor adjustments to the microphone
position without loosening the adjustment knob.
5. Connect an audio cable to the integral XLR connector.
Model BETA 56
A User Guide
27D2798 (Rev. 5)
2005, Shure Incorporated
Printed in U.S.A.